You can do pretty much what you like with your result: create signatures with name added, extras or stats, websets. Give all the credits that are required and for the tut to: Martine (lien ŕ http://chezmartine.com) pour PSP 4 ALL (lien ŕ http://psp4all.com).

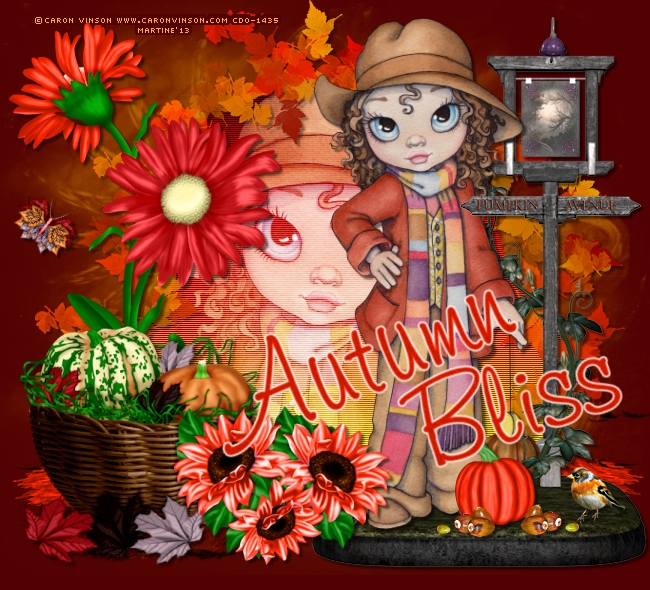
Mask: Gemsmask-129 by Gems at Gems Taggin' Scraps. Scrapkip: AM_MyFall by Created by Amymarie - Download here. Plugins: UnPlugged Tools - Interlace. Word Art: Autumn by Doris at Scraps Dimensions. Download here. Font: Pixelette for the credits. You can download my E-Book which will let you work without being connected. STEP 1: Mask Open a new transparent image 650x575 in PSP. Fill with #510102. Add a layer and fill with #EB9101. Open Gemsmask-129 and apply. Masks > New > From image - OK. Then Masks > Delete. In PSP 8 and above, it's under Layers > New Mask Layer > From Image. OK then Delete. STEP 2: Elements and Tube Once each element is resized, sharpen if necessary: Adjust > Sharpen > Unsharp Mask
Add a layer and fill with an Autumn gradient with these 3 colours #8A0000, #FF4923 and #FFEBOA. Then apply the UnPlugged tools > Interlace effect.
Move the gradient layer under the Element 22 layer. Add your tube. Click on invert > Delete to remove the excess. Adjust the Tube layer - Layers > Properties and set the Blend Mode on Screen. Selections > Select None. Check your layers: Elément 22 should be on the top, the tube layer under and the gradient layer under the tube. Duplicate Element 22. Element 1 - On the right. I selected the lampost and pasted it on the right. I deleted the original on the left. This is where I placed my tube. Pumpkin - 20%. Colourize as before with the Hue at 6 and the Saturation at 255. Element 26 - 20%. Image > Mirror. Element 21 - 35%. Duplicate. Flower 1 - On the left. Using the Lasso tool, selection around the flower on the left and colourize the Hue at 6 and the Saturation at 255. Fall butterfly - 20%. Image > Free Rotation on the right 38°. STEP 4 : Word Art Autumn Bliss - 55%. Colourize with the Hue at 6 and the Saturation at 255. STEP 5: Credits Credits: with a font like Pixelette or any other pixel font.
STEP 6: Finished tag |