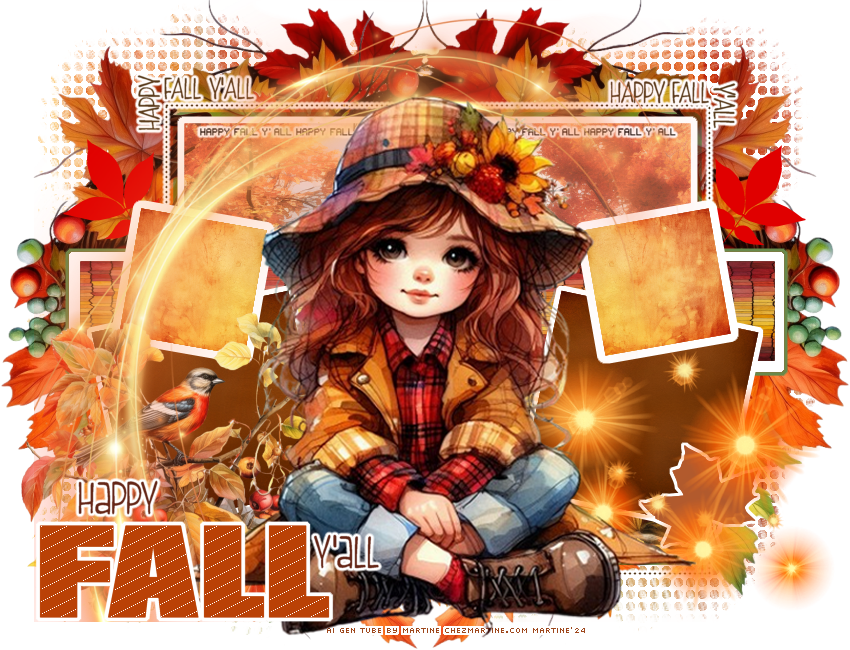
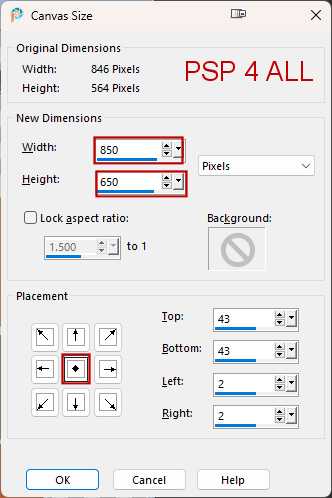
 Temp1-MisfitsFALL-syllycreationz2015 by Sylvie on the Creative Misfits site. Download here. Scrapkit: Shades of Autumn, AI scrapkit by Linda of My Tagging Addiction. Plugins: AP(Lines) > Silverlining Eye Candy 4000 > Gradient Glow FU2 > UnPlugged Tools > SpicedDots Mask: mask by Chelle Weescottslass - WSL_MASK116. Download here. Fonts: Pixelette for the credits ****************************** Reminder: *** Method to color a layer or add a paper - To fill a layer with colour, Selections > Select All. Selections > Float > Selections > Defloat. Or click with the magic wand. Add a layer > Fill with the new colour or paper, texture. Apply plugin if needed. Selections > Select None. Delete the original layer. *** Depending on the colors & tube you are going to use, feel free to change the mode and opacity of the layers. STEP 1 - Template 1. Open the template. Shift+D to duplicate. 2. Delete the Credits at the top: @ sylly creationz. 3. Image > Cancas Size
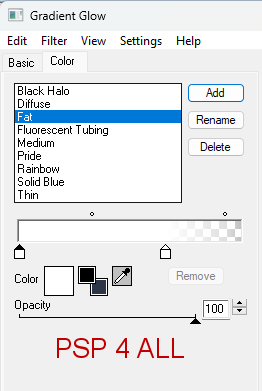
4. background - Fill with blanc. 5. element_49 - 70%. Copy Paste as a new layer eand move towards the left. 6. Duplicate. 7. Image > horizontal Mirror. 8. lrg diamond border - Apply Eye Candy 4000 > Gradient Glow
9. large green border - rectangle. Leave it in green. 10. large white border - rectangle. Leave it as it is. 11. large brown rectangle - Selections. New layer and fill with paper_2. 12. Selections > Select None. 13. long rectangle - green border. Leave it in green. 14. leaf background- right et leaf background- left. Colorize with hue on 255 and saturation on 255. 15. long rectangle - white border - Leave it as it is. 16. long rectangle - brown - Selections. New layer and fill with paper_14. 17. Selections > Select None. 18. left white square et right white square - Leave it as it is. 19. left green square - Selections. New layer and fill with paper_16. 20. Select None. 21. Duplicate. 22. Image > horizontal Mirror. 23. small square border right (left) et small square border (right) - Ne rien changer. 24. yellow square left - Selections. New layer and fill with paper_13. 25. Select None. 26. Duplicate. 27. Image > horizontal Mirror. STEP 2 - Elements 28. element_11 - 50%. Bottom, on the left. 29. element_69 - 75%. Bottom, on the right. 30. element_73 - 80%. On the left. STEP 3 - Tube and Text 31.text FALL orange - Colorized FALL text with #BA4106. 32. Apply AP(Lines) > Silverlining
33. Colorize Leaf with #BA4106. 34. Use #563A1B for these: Happy and Y'ALL. 35. Apply the same Gradient Glow on these 2 layers. 36. text FALL border - Layers > Arrange > Bring to Top. 37. Repeat for these layers: text Fall, text - Happy and text - Y'all. Bring to Top 38. Click on text - Y'All. 39. Layers > Merge Down. 40. Repeat twice so this text in on one layer Happy FALL Y'All. 41. Move Happy FALL Y'All to the left. 42. text - mini - color in black and apply the same Gradient Glow. 43. text - top right and text - top left. Apply the same Gradient Glow. 44. Add the tube in the middle. STEP 4 - Mask 45. Click on White background at the bottom and add a layer. 46. Selections and fill with paper_8. 47. Apply FU2 > UnPlugged Tools > SpicedDots - default configuration
Open WSL_Mask116. 49. Layers > New Mask Layer > From image and choose WSL_Mask116. 50. Click on OK. 51. Layers > Merge Group. STEP 5 - Credits 52. with a small pixel font like Pixelette or any other small font. 53. Save. Martine 15 October 2023 If you have any questions, don't hesitate to contact me |