You can do pretty much what you like with your result: create signatures with name added, extras or stats, websets. Give all the credits that are required and for the tut to: Martine (lien ŕ http://chezmartine.com) pour PSP 4 ALL (lien ŕ http://psp4all.com).

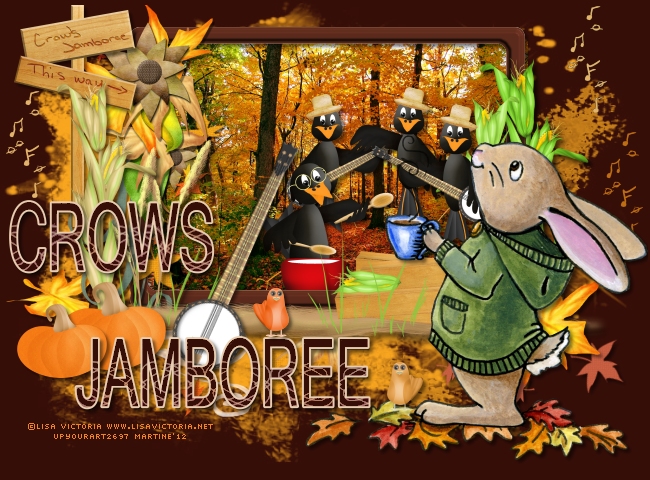
Mask: Gemsmask-120 by Gems at Gems Taggin' Scraps. One photo you are allowed to use. Mine comes from here : Stock.xchng. You have to join but it is free. Scrapkip: Crows Jamboree by WeeFaerie Ring - Download here. Font: Pixelette for the credits. You can download my E-Book which will let you work without being connected. STEP 1: Mask Open a transparent image 650x480 in PSP. Fill with #360E08. Add a layer and fill with #E7981D. Open Gemsmask-120 and apply. Masks > New > From image - OK. Then Masks > Delete. In PSP 8 and above, it's under Layers > New Mask Layer > From Image. OK then Delete. STEP 2: Elements and tube Once your element is resized, sharpen it if needed: Adjust > Sharpness > Unsharp mask
Then add a drop shadow: I used
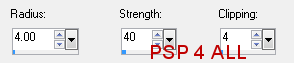
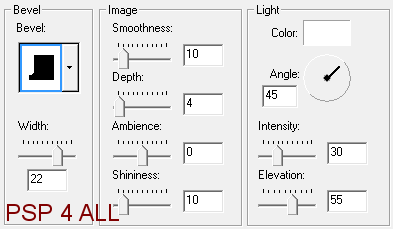
frame 1 - 20%. Place towards the top. Selections > Select All. Selections > Float. Selections > Defloat. Selections > Select None. Fill with #5F2C1D and apply an Inner Bevel. Effects > 3D Effects > Inner bevel:
Open the photo of your choice. Edit > Copy. Click inside the frame with your Magic Wand and then Selections > Increase by 8 pixels. Add a layer. Edit > Paste Into Selection. Selections > Select None. Do not forget the Drop Shadow on the frame. scattered - 15%. Image > Flip. Colorize with #5F2C1D, Hue at 9 and Saturation at 136. Position on the right, just under frame 1. cluster 4 - 15%. On the left, above the frame. sign - 17%. On the left. corn stalk 2 - 10%. On the left. music notes - 15%. Colorize with #BD6D12: Hue at 22 and Saturation at 211. On the right. music notes - 15%. Colorize with #E1B46A: Hue at 6 and Saturation at 189. On the right. Duplicate and place the copy on the left. leaf - 15%. Bottom right. cluster 2 - 15%. Bottom right of the frame. Add the 3 other crows. All 3 above the photo but below the frame 1 layer: crow - 12%. strummin' - 12%. Image > Mirror. drummin' - 15%. banjo - 15%. Bottom left. Rotate right 115°. pumpkin - 12%. On the left. pumpkin - 10%. On the left. banjo - 15%. Bottom left. wordart - 15%. Bottom left. I split the 2 words so I could place them where I wanted. And I also replace the origianl colour #5F2A1C with #360E08. bird - 8%. Add your tube. bird - 8%. Colorize with #EE6418, Hue at 15 and Saturation at 220. STEP 4: Credits Credits: with the font Pixelette or any other pixel font.
STEP 5: Finished tag |