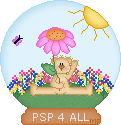
The Boulby bear outline is a present from Meneka from Down Undah. It's one of her "Boulby" bears. She has given me permission to use it for one of my tutorial and this is what I came up with. Please note that with the result of this tutorial, you can: make a premade graphic, a sig tag, part of a web set, etc.. but you cannot use the final image to give it away or sell as a tube..or to create outlines/ lineart for others to use. Quick Guide:  Download your supplies here: Open Paint Shop Pro. Open the Alpha image which is in the zip: MF_Globe_with_bear.psp – Duplicate it:Shift D – Close the original. Zoom in several times. 1. Layer: MF_Globe with bear I have left a background layer = MF_Globe with Bear. Click on it and fill with the fill tool. Choose any colour, it is to make it easier for you to work. 2. Layer: globe. Click on the second layer: globe. Choose Selections>Load From Alpha Channel. And choose globe. Fill the outline with #ADDBF1. Take the magic wand and click inside. Flood fill with #E1F3FB. Keep selected. And we are now going to apply a cut out effect: Go to Selections > Float > Effects > 3D Effects > Cut out with the following settings. H: 2 - V: 2 - Opacity: 100 - Blur: 12. And for the shadow, use the colour of the outline each time. Here it is: #ADDBF1. Deselect and save 3. Layer: herbe/ grass. Click on the third layer: herbe/ grass. Choose Selections>Load From Alpha Channel. And choose herbe/ grass. Fill the outline with #477547. Take the magic wand and click inside. Flood fill with #649E64. Keep selected. And we are now going to apply a cut out effect: Go to Selections > Float > Effects > 3D Effects > Cut out with the following settings. H: 1 - V: 1 - Opacity: 100 - Blur: 8. And for the shadow, use the colour of the outline:#477547. Then go to Effects > Add noise at 6%. Deselect and save 4. Layer: ours/ bear. Click on the fourth layer: ours/ bear. Choose Selections>Load From Alpha Channel. And choose ours/ bear. Fill the outline with #C39759. Take the magic wand and click inside. Flood fill with #F8DFB4. Keep selected. And we are now going to apply a cut out effect: Go to Selections > Float > Effects > 3D Effects > Cut out with the following settings. H: 1 - V: 1 - Opacity: 100 - Blur: 6. And for the shadow, use the colour of the outline: #C39759. Deselect and save Colour in the nose and the eyes. I added some cheeks. Add a layer and take your paintbrush, size: 3 and colour: # F99B9B. FAdd a dot on each cheek and then Effects > Gaussian Blur of 1. 5. Layer: soleil/ sun. Click on the layer: soleil/ sun. Choose Selections>Load From Alpha Channel. And choose soleil/ sun. Fill the outline with #E79F05. Take the magic wand and click inside. Flood fill with #FBE78B. Keep selected. And we are now going to apply a cut out effect: Go to Selections > Float > Effects > 3D Effects > Cut out with the following settings. H: -1 - V: 1 - Opacity: 80 - Blur: 8. And for the shadow, use the colour of the outline: #E79F05. Deselect and save 6. Layer: tige-feuille/ stem-leaf Click on the layer: tige-feuille/ stem-leaf . Choose Selections>Load From Alpha Channel. And choose tige-feuille/ stem-leaf. Fill the outline with #4B834B. Take the magic wand and click inside. Flood fill with #82C082. Keep selected. And we are now going to apply a cut out effect: Go to Selections > Float > Effects > 3D Effects > Cut out with the following settings. H: 1 - V: 1 - Opacity: 100 - Blur: 5. And for the shadow, use the colour of the outline: #4B834B. Deselect and save 7. layer: pétales/ petals. Click on the layer: pétales/ petals. Choose Selections>Load From Alpha Channel. And choose pétales/ petals. Fill the outline with #ED63CB. Take the magic wand and click inside. Flood fill with #FFB6F4. Keep selected. And we are now going to apply a cut out effect: Go to Selections > Float > Effects > 3D Effects > Cut out with the following settings. H: 1 - V: 1 - Opacity: 100 - Blur: 6. And for the shadow, use the colour of the outline: #ED63CB. Deselect and save 8. Calque: coeur/ heart. Click on the layer: coeur/ heart. Choose Selections>Load From Alpha Channel. And choose coeur/ heart. Fill the outline with #E78127. Take the magic wand and click inside. Flood fill with #F3AE71. Keep selected. And we are now going to apply a cut out effect: Go to Selections > Float > Effects > 3D Effects > Cut out with the following settings. H: 1 - V: 1 - Opacity: 100 - Blur: 6. And for the shadow, use the colour of the outline: #E78127. Deselect and save Then add a few brown dots with your paintbrush, size 1 and colour: #8B582B. 9. Calque: papillon1/ butterfly1. Click on the layer: papaillon1/ butterfly1. Choose Selections>Load From Alpha Channel. And choose papillon1/ butterfly1. Fill the outline with #CF5BF1. Take the magic wand and click inside. Flood fill with #E8AFF9. Keep selected. And we are now going to apply a cut out effect: Go to Selections > Float > Effects > 3D Effects > Cut out with the following settings. H: 1 - V: 1 - Opacity: 100 - Blur: 5. And for the shadow, use the colour of the outline: #CF5BF1. Deselect and save 10. Calque:papillon2/butterfly2. Click on the layer: papaillon2/ butterfly2. Choose Selections>Load From Alpha Channel. And choose papillon2/ butterfly2 and fill with #000000. 11. Calque: base. Click on the layer: base. Choose Selections>Load From Alpha Channel. And choose base. Fill the outline with #C16B2B. Take the magic wand and click inside. Flood fill with #CE9266. Keep selected. And we are now going to apply a cut out effect: Go to Selections > Float > Effects > 3D Effects > Cut out with the following settings. H: -1 - V: 1 - Opacity: 100 - Blur: 6. And for the shadow, use the colour of the outline: #C16B2B. Deselect and save New layer. Time to add your text. I used Verdana for my font, size 8 et coulour: #F6E2D4. Save with all the layers- without merging Merge visible all the layers and save under a different name: myglobe_bear1.psp . And here's my result:
You can now add your own personal details. Open a copy of the image with all the layers and then add a layer and add what you like. I added a lot of little flowers:
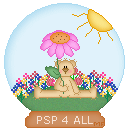
And as Meneka said I could choose another bear, I chose the same but in a different position: with his arm down. I coloured it exactly like the firs one. I opened another copy of my image with all the layers and I then placed my new bear on top of the other one. Zoom in, it will be easier. Then close the layer with the first bear. Then merge visible and save under a different name: myglobe_bear2.psp. Open Animation Shop and click on the Animation Wizard. Add your 2 images: myglobe_bear1.psp and myglobe_bear2.psp. Display time: 250. And my result:
29 July 2005
|