Please note that with the result of this tutorial, you can:
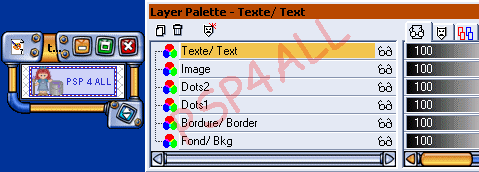
Today we are going to work with the Alpha Channel. To find the Alpha Channel, go to Selections. If you have never work with the Alpha Channel, you will see how easy it is. First click to save the image that you need: HERE. Your image is now open in PSP. You don't see anything but the image is not empty. Look at your layer palette. And then click on Selections > Load from Alpha Channel and as you can see, we have loads to work with here. Click on the image and then go to Windows > Duplicate. Save the other image and close, it's always better not to work on the original. I am not going to give you any colours for this tutorial because it's probably more interesting to let your imagination run. You are going to load these alpha layers one at a time. Here's the order: On the next layer, add your image. And on the next one, your text.
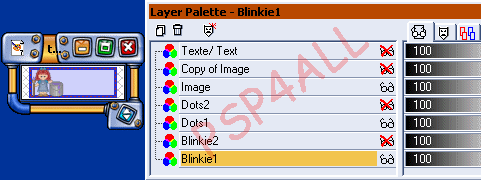
Close all the layers except the Background & Border ones. You will merge visible these two layers. Go to Layers> Merge > Merge Visible. Click on this merged layer and rename: Blinkie1. Stay on your Layer Palette. Right click on Blinkie1 and choose Duplicate. Click on this copy of Blinkie1 and rename Blinkie2. Click on the Image layer and duplicate in order to have two identical images. On your Layer Palette, you should now see this:
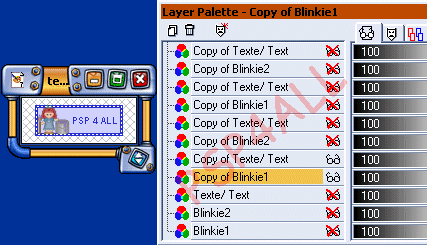
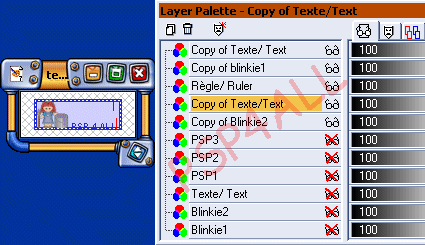
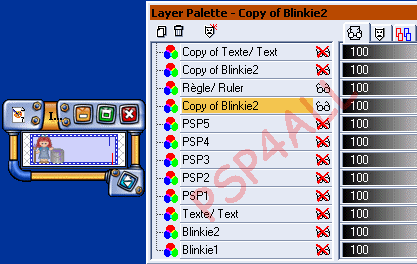
You will now merge visible these three layers: Blinkie1; Dots1; Image. The other layers are closed. Now rename this new layer: Blinkie1. Close this layer and open these: Blinkie2; Dots2 et Copy of Image. Merge visible these three layers and rename Blinkie2. On your Layer Palette, you have three layers: Blinkie1; Blinkie2 et Texte. You are now going to make copies of these three layers and arrange them as follows, starting from the bottom: Copy of Blinkie1 et Copy of Texte/ Text. Copy of Blinkie2 et Copy of Texte/ Text Copy of Blinkie1 et Copy of Texte/ Text Copy of Blinkie2 et Copy of Texte/ Text etc..... You must have a minimum of 6 copies of each Blinkie layer. In all 12 Blinkies layers and 11 Text layers. You will see why later. You must arrange them exactly as mine below, starting from the bottom! Copy of Blinkie1 + Copy of Texte/ Text Copy of Blinkie2 + Copy of Texte/ Text Copy of Blinkie1 + Copy of Texte/ Text Copy of Blinkie2 + Copy of Texte/ Text Copy of Blinkie1 + Copy of Texte/ Text Copy of Blinkie2. No Text. Copy of Blinkie1 + Copy of Texte/ Text Copy of Blinkie2 +Copy of Texte/ Text Copy of Blinkie1 + Copy of Texte/ Texte Copy of Blinkie2 + Copy of Texte/ Text Copy of Blinkie1+ Copy of Texte/ Text Right at the bottom, I have kept a copy of the original layers: Blinkie1; Blinkie2 et une de Texte. Just in case I need more copies. But these three layers must be kept closed.
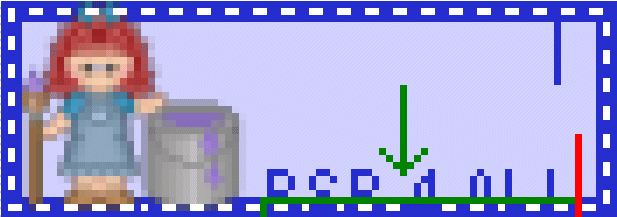
We are now going to move our text. Check that all the other layers are closed. The only 2 which are open are your first copy of Blinkie1 and your first copy of Text. Exactly as above. Zoom in if necessary. Clink on the Text layer and move it down. Now merge visible these two layers and rename. I chose: PSP1. Close this layer. Open the next two layers: Copy of Blinkie2 et Copy of Text.Click on the text layer and again move down; this time we are going down by 6 pixels - 3 more than before! Everytime we will move the text layer by 3 pixels, 3 times more than the Text layer before. And merge visible Blinkie2 and the Text layer. Rename PSP2 and close this layer. Open the next two layers. This time we are working with a copy of Blinkie1. And same as before, you will move the Text layer by 3 pixels so 9 pixels this time. Merge and PSP3 is done! Close! Whe you are working on the next one, you will see that after moving the text layer, it partially recovers the edge. So erase what you don't need as below: the green arrow points towards it. The vertical blue and red lines are just my ruler, drawn on a separate layer which I use to guide me. I move this layer each time and I close it before merging.
You carry on alternating and merging a copy of Blinkie1 with Text with a copy of Blinkie2 with text and moving the Text layer down by 3 pixels each time until Blinkie PSP6. And there, there is no need for a text layer because if you check you will see that after counting down another 3 more pixels the text is outside the blinkie. That's why there is no need for a text layer for this blinkie!
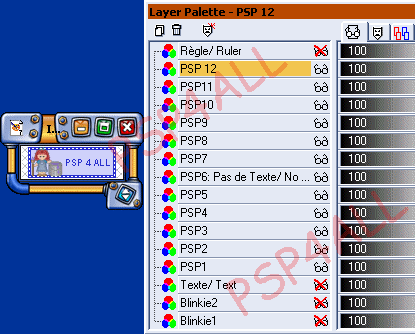
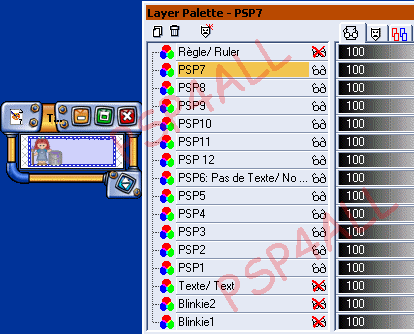
My blinkie PSP7: From now on we are going the other way, moving the Text layer up! We are still moving by 3 pixels. Attention: You must use a copy of blinkie2 for this blinkie: PSP7. And here's what you should have when you have finished moving up and merging the next layers : PSP1= Blinkie1 + Text PSP2= Blinkie2 + Text PSP3= Blinkie1+Text PSP4= Blinkie2+Text PSP5= Blinkie1+ Text PSP6= Blinkie2. PSP8= Blinkie1+Text PSP9= Blinkie2+ Text PSP10= Blinkie1 + Text PSP11= Blinkie2+Text PSP12= Blinkie1+Text
There is only one thing left to do. You need to move and place some of the Blinkies in the right place so that the final animation runs correctly. To move them, you can either go to your Layer Palette and just slide them into position that is put them where they should be or you can go to Layers > Arrange > Move Down. They must be put exactly as below. And your last layer: PSP 12 must be put right above PSP6: Pas de Texte/ No Text. See below:
You are nearly finished! Open all the layers except the last 3 at the bottom, the original blinkies and Save as a PSP file. Open Animation Shop and click on the Animation Wizard. Click OK each time and put 18 for the Display Time, you can always change it later on if you want to. Save as a gif. And that's it! I know it's a bit long but once you understand what to do it is much faster. Here's another one, this time with 2 lines of text. So the number of layers will change as it would change too if you chose a bigger font.
And here's another one but this time the writing is going from right to
left. Again it is the same priciple, moving the text a tiny bit each time but
in a different direction.
| |

