|
|
(Version française ICI) |
|
|
|
|
|
|
|
You can do pretty much what you like with your result: create signatures with name added, extras or stats, websets.
|
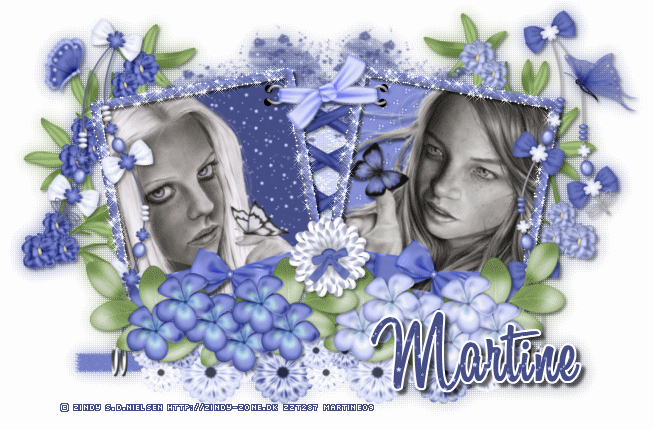
Martine |

Scrapkit: Soft-Blue by Fantasy Moments at http://fantasymoments-scraps.blogspot.com/
Les masks: Gem's Mask 1 et Mask 38. To be downloaded here: Gems Taggin Tuts. Click on Navigation > Dowloads > Gemsmasks1.
Plugin: Alien Skin Xenofex2 that can be bought here: Xenofex2 and Penta.com Color Dot filter that can be downloaded here.
Fonts: A&S Black Swan for your name; Pixelette for your credits.
You can download my E-Book which will let you work without being connected.
STEP 1
Background: Open an image
650x400 - Fill with white, the background
colour for the Results page.
STEP 2
All the elements are resized and then added as a new layer. I then added this
drop shadow:
|
H=2 |
O=40 |
|
V=2 |
F=4 |
Frame 1 on the right : Frame -
FM-SB-Element-99.png, resized to 40%. Then with the lasso tool - Point to Point,
trace a selection on the frame
|
|
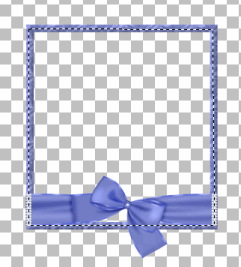
then add paper FM-SB-Paper-1.png as a new layer. Then Selections > Invert
and click on Delete on yoyur keyboard.
Move this paper layer under the
frame.
Click back on the Frame layer sur le calque Cadre and redo the selection with
the lasso tool as you did above. Add your first tube as a new layer(resize if
necessary) then Selections > Invert and Delete.
Move this tube layer under the frame.
Add
the drop shadow on the Frame layer and the Tube layer.
Merge visible those
three layers and Image > Free rotate right 10°.
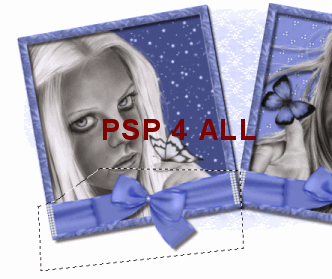
Frame 2 on the left: Repeat what you just did with the frame on the right
but replace the paper with FM-SB-Paper-7.png, add your second tube and at the
end, no rotate to the right but a 10° rotation to the left.
Position the two
frames so they touch in the middle.
Now click on Image > Canvas size 800x500 centered.
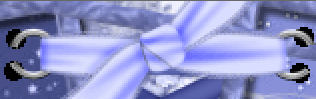
Frames without the bow: Click on the element FM-SB-Element-99.png, realready
resized to 40%. And copy paste it on your image. Image > Free Rotate 10° left
and position on the framed tube layer on the left.
Then with the lasso tool,
trace a selection around the bow and click delete to remove it:
|
|
Duplicate this frame and Image > Mirror.
Check that these two frames
are exactly on top of the other two.
Close all the layers except these two
frames without the bow and merge visible. Rename Frames without a Bow.
STEP 3
Other elements: Open all the layers and click on the
white background.
New layer and fill with FM-SB-Paper-16.png and apply
Gemsmask-1. Masks >New > From Image - OK. Then Masks > Invert > Masks > Delete. In PSP 8 and more recent versions of PSP, go to Layers > New Mask Layer > From Image. OK.
Click on Masks > Invert. Then Masks > Delete
New layer and fill with
FM-SB-Paper-7.png
and apply Gemsmask-38.
Masks >New > From Image - OK. Then Masks > Delete. In PSP 8 and more recent versions of PSP, go to Layers > New Mask Layer > From Image. OK.
Click on Masks > Delete
FM-SB-Element-64.png - resized
to 75% and position under the frames at the bottom.
FM-SB-Element-22.png -
resized to 40% and potion
between the two frames.
FM-SB-Element-21.png -
resized to 35% and posion pn the
frames. Then with the Lasso tool, remove a bit of the rings on each side. See
below.
Then new layer and move it under and with your paint brush, size 6, make
two big circles on each side.
|
|
FM-SB-Element-28.png -
resized to 20% and position on the
left of the frames.
FM-SB-Element-92.png -
resized to 25% and position on the
right of the frames.
FM-SB-Element-74.png et 77 -
resized to 65% and remove a
bit of the stem at the bottom. Position under the frames, one on each side.
FM-SB-Element-53.png et 54 -
resized to 75% and postion on each
side of the two frames.
FM-SB-Element-68.png et 69 (sans le fleur en haut) -
resized to 55% and postioned on the
two frames at the bottom.
FM-SB-Element-91.png -
resized to 25% above Elements 68 and 69
and in between the two frames.
STEP 4
Resize to 80% before adding
Text/ Name and Credits. Do not leave your
tag blank.
New image. Add your name with the A&S Black Swan font or one of your choice -
Size 72 - background FM-SB-Paper 7 with
antalias checked. Selections > Modify > Expand by 2 > New layer and fill with
white. Move this layer under and apply a drop shadow
|
H=4 |
O=60 |
|
V=4 |
B=4 |
New layer and add the necessary credits with the Pixelette font, size 6 with antialias unchecked.
STEP 5: Animation Shop
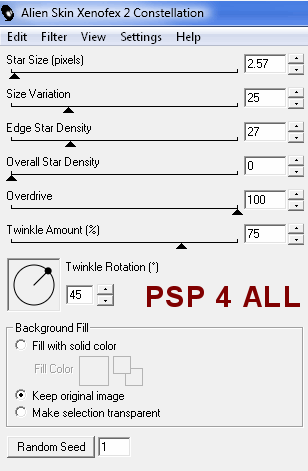
A/ Activate the layer Frames without a Bow. Then apply Alien Skin Xenoflex 2 Constellation:
|
|
Then merge visible all the layers except the Background layer at the
bottom. Keep this one closed when merging. Click on the merged layer and
duplicate.
Activate the original layer and Effects > Gaussian
Blur of 8.
Then Effects > Penta.com > Color Dot
and use these settings:
|
|

Open the Background layer and merge visible all three layers. Copy
paste in Animation Shop.
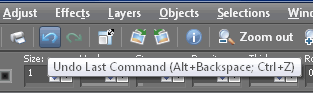
B/ Go back to PSP. And click on Undo Last Command several times.
|
|
You have to be back to the layer Frames without a Bow before you
applied the Constellation filter and with the selection. Repeat what you have
just done in step B: apply the two effects and merge. Keep all the settings
except when applying the Constellation filter, click once on Random Seed. Copy
paste the merged image after the first one in AS.
C/ Repeat step B but change the random Seed when applying the
Constellation filter. Copy paste after the second merged image in AS.
In AS,
click on File and save your animation.
Martine
24 May 2009
If you have any questions, don't hesitate to contact me![]()
![]()