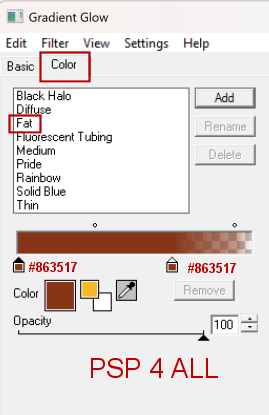
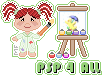
 Template 135 Lby Punky on her blog Punky Productions. Download here. AI Scrapkit Sunnny Flowers on Elfairy Tubes blog. Download here. Mask: More Big Masks - Set 2 by Vix. Download here. 3rd from the top. Plugins: Eye Candy 4000 > Gradient Glow. VM Extravangaza > Transmission Mura's Meister > Copies Carolaine and Sensibility > CS-HLines Fonts: Alice in Wonderland for the text and Pixelette for the credits ****************************** Reminder: *** Method to color a layer or add a paper - To fill a layer with colour, Selections > Select All. Selections > Float > Selections > Defloat. Or click with the magic wand. Add a layer > Fill with the new colour or paper, texture. Apply plugin if needed. Selections > Select None. Or click on Selections and paste the paper or texture as a new layer. Selections > Invert. Delete. Select None. Delete the original layer. *** Depending on the colors & tube you are going to use, feel free to change the mode and opacity of the layers. *** Template: I work from the bottom to the top. My colours: yellow #F9B726 and brown #863517. STEP 1 - Template and Elements 1. Open the template. Shift+D to duplicate. 2. Delete the Credits layer Pbs Credits. 3. Background: Fill with white. 4. Add a layer. Select All and fill with paper_EF (17). 5. Open Vix_BigMask018. 6. Layers > New mask layer > From an image and choose Vix_BigMask018. 7. Click on OK. 8. Layers > Merge group. 9. Duplicate. 10. element_EF (47) - 40%. Left, top. 11. Duplicate. Image > Mirror. 12. Calque Linear Tranmission - Color in brown #863517. 13. Dots bottom. Color in yellow #F9B726 and apply Gradient Glow, Fat, brown.
14. Repeat for dots top. 15. element_EF (3) - 40%. In the middle of the other 2 elements element_EF (47), at the top. 16. Duplicate and Image > Mirror. In the middle too. 17. left rectangle - New layer. Select All. 18. Fill with yellow #F9B726. 19. Appy VM Extravanganza > Transmission
20. Select None. 21. Delete original layer. 22. element_EF (3) - 40%. Bottom, left. 23. Duplicate. Image > Mirror. 24. Move up the copy towards the top to place it above small square frame right. 25. right rectangle - Repeat what you did for left rectangle. See 17. 26. left circle - New layer. Selections and fill with yellow #F9B726. 27. Keep selected. 28. Add a layer. 29. element_EF (6) - Image > Greyscale. 30. Image > Mirror. 31. Copy paste into selection. 32. Blend mode on Overlay. 33. Select None. 34. Delete the original layer. 35. left circle frame -fill with brown #863517. 36. right circle and right circle frame - Repeat what you did for left circle and left circle frame from 26 ŕ 35. 37. large square - new calque and fill with yellow #F9B726. 38. Le fond texte Cuteness - Open an image 600x600. 39. Click on the cuteness small wordart layer. 40. Thare are 2 wordarts. one at the top on the right and one on the left at the bottom. 41. Select one of the WA. 42. Paste this WA on your image as a new calque. 43. Color in brown #863517. 44. Apply Mura's Meister > Copies
45. Image > Rotate left 20°. 46. Click on the large square layer that you filled with yellow. Select All. 47. Add the background text Cuteness as a new layer. 48. Invert and delete. 49. large square frame - Layer and fill with brown #863517. 50. element_EF (44). 40%. Image > Mirror. Rotate left 20°. 51. Place on the left. See my tag above. 52. white square - New layer and fill with yellow. 53. Add the background text Cuteness as a new layer.No rotation. 54. Invert and delete. 55. square frame - Layer and fill with brown #863517. 56. bottom rectangle - Layer and fill with yellow. 57. frame - Layer and fill with brown #863517.. 58. Copy of small square left - New layer. Selections and fill with yellow. 59. Select None. 60. Delete the original layer. 61. Apply CS-HLines.
62. small square frame left - Layer and fill with brown #863517. 63. small square right - Repeat what you did for Copy of small square left: voir 59. 64. small square frame right - Layer and fill with brown #863517. 65. cuteness small wordart - color yellow. 66. Apply same gradient glow. 67. frame - Layer and fill with brown #863517. 68. Add the tube. There are tubes with sunflowers in the kit and also under tubes - Flowers. 69. CuteNess Wordart - Layers > Arrange > Bring to Top. 70. New layer. Select the WA and fill with yellow. 71. Apply same gradient glow.
|