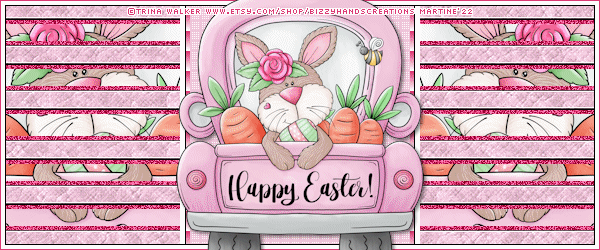
STEP 1 - La template et Tubes Open the template. Shift+D to duplicate. Close the original. Close the Credits layer.
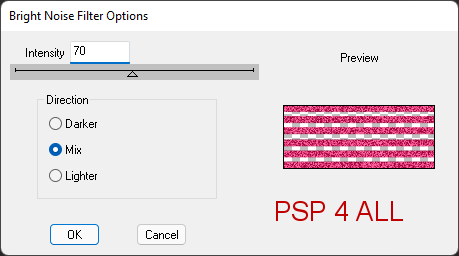
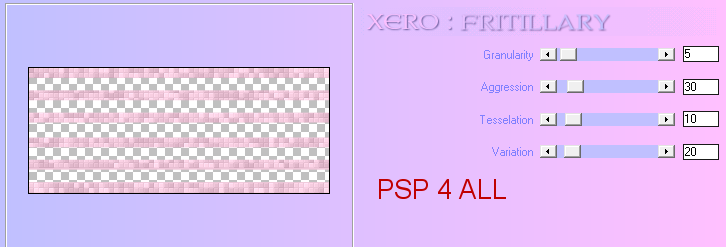
Light Lines (B2) - Apply dsb flux > Bright Noise - 50 and cliquer again on Mix. Close this layer. Light Lines (B3) - Apply dsb flux > Bright Noise - 50 and cliquer again on Mix. Close this layer. Dark Lines (T) - Layers > Merge Down. (Calque Dark Lines (T) and Dark Lines (B)). Dark Lines (B) - Fill with #EFC6D9. Apply Xero > Fritillary
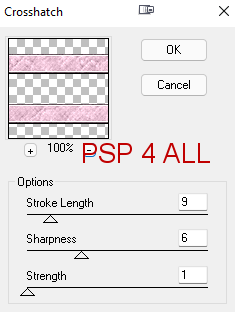
Apply Brush Strokes > Crosshatch
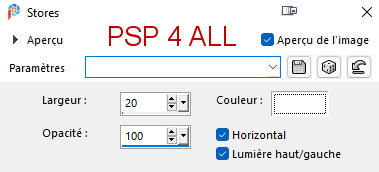
Black Box - Selections. Fill with the dark colour #DC3873. Apply Effects > Texture Effects > Blinds - colour #FFFFFF
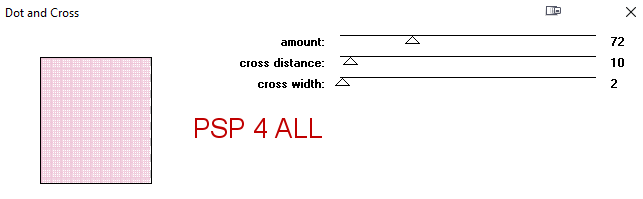
Selections > Select None. Grey Box - Selections. Fill with the light colour. Apply penta.com > Dot and Cross
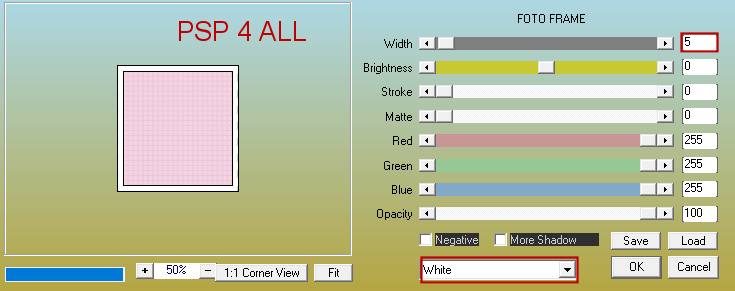
Selections > Select None. Merge visible Black Box and Grey Box. Selections. Apply AAA Frames > Foto Frame
Selections > Select None. Border: Selections and fill with #dc3873. Click with the Magic wand in the middle and fill with #FFFFFF. Selections > Modify > Contract 4 pixels. Edition > Cut. Fill with #000000. Selections > Modify > Contract 1 pixel. Edition > Cut. Selections > Select None. Add the tube. Drop Shadow: 2, 2, 50, 5. STEP 3 - Credits Credits: with a small pixel font like Pixelette or any other small font. STEP 4 - Animation Activate Light Lines (B1). Ensure that the other 2 layers, the copies are closed. Edit > Copy Speciai > Copy Merged. Open Animation Shop. Edit > Paste As New Animation. Back to PSP. Close Light Lines(B1) and open Light Lines (B2). Edit > Copy Speciai > Copy Merged. In AS: Edit > Paste after Current Frame. Back to PSP. Close Light Lines(B2) and open Light Lines (B3). Edit > Copy Speciai > Copy Merged. In AS: Edit > Paste after Current Frame. Animation done. If it's too fast for you then Edit > Select All. The 3 images are lined with blue. Animation / Frame Properties. Change the number. The lower the number, the faster the animation will be. Martine 7 April 2022 If you have any questions, don't hesitate to contact me |