You can do pretty much what you like with your result: create signatures with name added, extras or stats, websets. Give all the credits that are required.
 Scrapkit: Happy Easter Gift - Tagger Size by FrenchieLoverDesign, free kit available at Pics For Design. Download here. Mask: MB and SW Mask 14 by Moonbeams & Spiderwebs. Download here. Word Art: Happy Easter Wordart by Nana Vic's Digitals. Download here. Plugins: Alien Skin Xenofex2; Eye Candy 4000. Font: Pixelette for the crédits. I used this Drop Shadow H 0, V 6, O 35, B 6 except for the Butterflies and WordArt for which I have used H 0, V 4, O 35, B 4. You can download my E-Book which will let you work without being connected. STEP 1 Open an image 680 x550. Fill with white. Add a layer and fill with p2. Open mask MB and SW Mask 14. Layers > New Mask Layer > From Image and choose MB and SW Mask 14. Click on OK. Layers > Merge Group. STEP 2 e49 - 55%. Image > Free Rotation > 90° right. Place as on my tag, leaving space on the left for the tube. Click inside the frame with the magic wand then Selections > Modify > Expand by 6 pixels. Apply Xenofex2 > Little Fluffy Clouds. Click on Setting > Reset to factory default.
Appliquer Effets Art Media > Coup de pinceau.
Selections > Select None. Slide this layer under the frame. Duplicate this layer. Properties of the layer > Blend Mode > set on Luminance(Legacy). Back to the original layer. Colorize. Adjust > Hue and Saturation > Colorize: Teinte on 247 and Saturation on 110. Adjust > Blur > Gaussian Blur of 5. STEP 3 Click on the layer just under the frame and add these elements. e51 - 30%. On the right. e51 - 35%. Image > Horizontal Mirror. Place on the left. Add the barrier: e27 - 50%. STEP 4 Click on the frame layer and add the grass: e41 - 70%. On the grass I added the ckicks. e21 - 10%. On the right. e17 - 10%. On the left. STEP 5 e47 - 40%. On the right. e48 - 35%. Colorize: Hue on 247 and Saturation on 110. e44 - 50%. e42 - 40%. On the right. Duplicate and colorize: Hue at 247 and Saturation at 110. Place on the left. e29 - 23%. Colorize: Hue at 247 and Saturation at 110. On the left. STEP 6 Add the tube on the left. Duplicate and then Adjust > Blur > Gaussian Blur of 5. Layers > Layer Properties et choose Overlay. Opacity at 60%. STEP 7 e13 - 20%. Colorize: Hue at 247 and Saturation at 110. On the left. e4 - 30%. Colorize: Hue at 247 and Saturation at 110. On the left. STEP 8 Word Art - 17%. Bottom right. With the Lasso tool, circle around Happy. Then Edit > Copy > Edit > Paste As New Layer. Delete the original Happy. Happy - resize to 70%. Place on the right. Layers > Merge down. Add an Inner Bevel on the wordart.
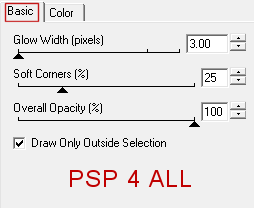
Then apply Eye Candy > Gradient Glow
Selections > Select All. Selections > Float. Selections > Defloat. Selections > Modify by 2 pixels, add a layer and fill with #7F2536. Selections > Select None. STEP 9 Credits: with a font like Pixelette or any other small pixel font. Save your work. Martine 10 April 2019 If you have any questions, don't hesitate to contact me |