|
|
(Version française ICI) |
|
|
|
|
|
|
|
You can do pretty much what you like with your result: create signatures with name added, extras or stats, websets.
|
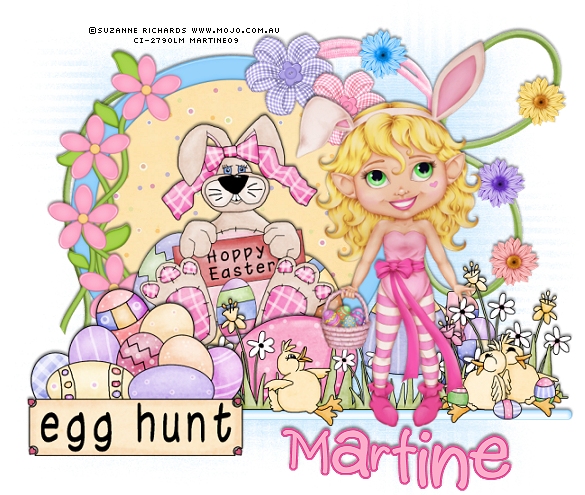
Martine |

Scrapkit: CS_Egg Hunt par Laura de Cinnamon Scraps ŕ http://cinnamonscraps.blogspot.com. It's a freebie that you will find here : Direct link.
Mask: one of Weescotlass: Mask 81
Fonts: Pixelette for your credits and 2 Peas Shake for the name.
You can download my E-Book which will let you work without being connected.
STEP 1
Frame and Chocostick : Open a new image 650X550 - Fill with white. That's the colour for the Results page.
Paste CS_egghunt_frame2.png as new layer and resize to 65%.
Withthe lasso tool :Point to Point, draw a circle about 10 pixels from the edge as below :
|
|
Add a new layer and fill the selection with one of the papers : CS_egghunt_paper10.jpg, resized to 50%. Select none. Move this layer under the frame.
Postion the rabbit clipart CS_egghunt_clipart4.png, resized to 65% inside the frame.
Add the CS_egghunt_chocostick1.png as a new layer. Then click on Image and rotate 90° and position a bit under the frame. Colorize. Colors > Colorize : Hue =145 and Saturation = 236 or choose your own colour.
STEP 2
Elements and Tube : adding the elements on the chocostick, starting on the left -
CS_egghunt_clipart3.png resized to 60%; CS_egghunt_clipart7.png resized to 45%; CS_egghunt_clipart9.png resized to 38% and then position CS_egghunt_clipart8.png resized to 38% partly behind it; then add CS_egghunt_clipart6.png resized to 45% on the right.
Add your tube.
STEP 3
Mask and other elements : activate the white background
at the bottom, add a layer and fill with one of the papers or CS_egghunt_paper5.jpg.
Then apply the WSL
81 mask.
Masks > New >
From image - OK. Then Masks > Delete. In PSP 8 and above, it's under Layers > New
Mask Layer > From Image. OK then Delete. I reduced the opacity
of this layer and set it at 66.
Add the CS_egghunt_string1.png and then click on Image > Mirror.
Add the CS_egghunt_string2.png.
Then add the flowers, resized to 20%.
And the twu crisscrossflowers on the frame : CS_egghunt_crisscrossflower1.png
resized at
35% and CS_egghunt_crisscrossflower3.png at 32%.
STEP 4
Drop Shadow :
Add the same drop shadow to all the elements and your tube :
H: -2 and V: 0
O: 50 and B: 4
ETAPE 5
Name and Credits : I resized my result to 90% for the header
at the top of the page.
For my name, I used 2 Peas Shake; Bold with
antialias on - color : #FCADCA. Keep selected. Then selections > Modify > Expand
by 2 pixels. Add a layer and fill with #DD478F. Place this layer under the text
layer. Add the above drop shadow.
For the credits : Pixelette
in size 6 with no antialias.
Save and export using the JPEG optimiser with a white background
for the group's results page.
Martine
1 April 2009
If you have any questions, don't hesitate to contact me ![]()
![]()