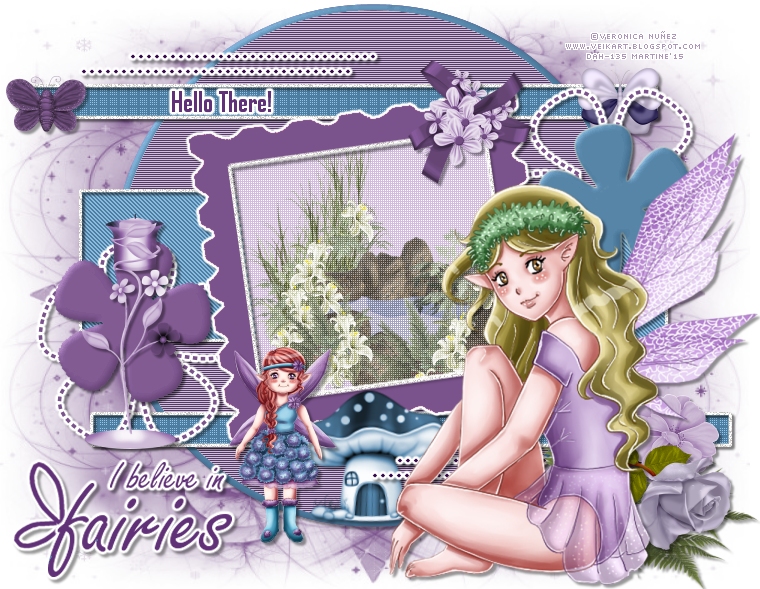
You can do pretty much what you like with your result: create signatures with name added, extras or stats, websets. Give all the credits that are required and for the tut to: Martine (link to http://chezmartine.com) for PSP 4 ALL (link to http://psp4all.com).
 Template: TTzSilentSpringTemp3 de Twyzted T's Playroom. Download here. Scrapkit: Give Me Wings - Wicked Princess. Download here. Mask: Trese Masks0485 de Trese. Download here. Plugins: Penta.com, Unplugged Tools - Interlace, Eye Candy 4000 > Gradient Glow. Fonts: Freestyle Script, Agency FB and Pixelette for the credits. You can download my E-Book which will let you work without being connected. STEP 1 : Template and Mask Drop Shadow: I used
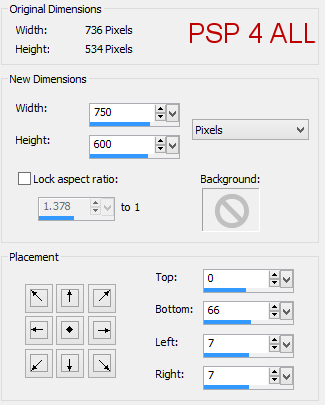
Open the template and make copy. Work on the copy. The template size is 736x534. Increse its size to have 750x600.
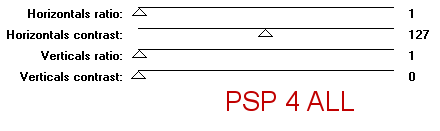
Close Raster 9: the credots layer and open Raster 1. add a layer and fill with a colour from your tubes: #7A528C. Open Trese Masks0485. Masks > New > From image - OK. Then Masks > Delete. In PSP 8 and above, it's under Layers > New Mask Layer > From Image. OK then Layers > Delete. Raster 2 - Selections > Select All > Selections > Float > Selections > Defloat. Add a layer and fill with another colour from your tubes: #7A528C. Apply Unplugged Tools > Interlace
Delete the original layer. Selections > Select None. .
Delete the original layer. Selections > Select None. Raster 11 Shadow 1 et Raster 11 - Leave as they are. Raster 4 - Selections > Select All > Selections > Float > Selections > Defloat. Add a layer and fill with #4C7A9E. Apply penta.com > Jeans
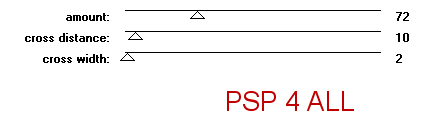
Delete the original layer. Selections > Select None. Raster 12 Shadow 1 et Raster 12 - Leave as they are. Raster 6 - Selections > Select All > Selections > Float > Selections > Defloat. Add a layer and fill wih #D3BBDF. Select WP_GMW_POND and copy paste in the selection. Apply penta.com > Color Dot
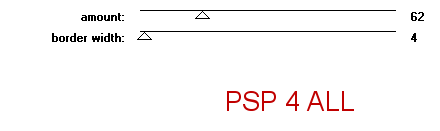
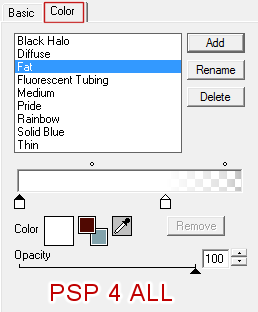
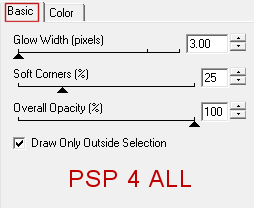
Delete the original layer. Selections > Select None. Raster 8 Shadow 1 - Leave as is. Raster 8 - Selections > Select All > Selections > Float > Selections > Defloat. Add a layer and fill with #7A528C. Apply Eye Candy > Gradient Glow
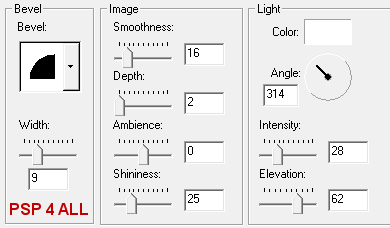
Delete the original layer. Selections > Select None. Raster 7 Shadow 1 - Ne rien changer. Raster 7 - Selections > Select All > Selections > Float > Selections > Defloat. Add a layer and fill with 2 different colours: #7A528C et #4C7A9E. Apply a 3D Effect > Inner Bevel
Delete the original layer. Selections > Select None. Raster 5 - Selections > Select All > Selections > Float > Selections > Defloat. Add a layer and fill with #7A528C. Apply Eye Candy > Gradient Glow, same settings as before. Delete the original layer. Selections > Select None. Raster 13 Shadow 1 et Raster 13 et Raster 10 Shadow 1 - Ne rien changer. Raster 10 - Selections > Select All > Selections > Float > Selections > Defloat. Add a layer and fill with #7A528C. Apply Eye Candy > Gradient Glow, same settings as before. Delete the original layer. Selections > Select None. STEP 2: Tubes and scrapkit elements WP_GMW_FAIRYHOME - 20% - colorize with #4C7A9E, Hue at 146 and Saturation at 90. WP_GMW_SIGN - 55%. Keep just the plant, delete the sign at the top. Add the flowers: WP_GMW_ROSE - 20% and WP_GMW_CAMILLIAFLOWER - 25% and coloriser with #7A528C, Hue at 199 and Saturation at 67. WP_GMW_CANDLE - 40% and colorize with #7A528C, Hue at 199 and Saturation at 67. WP_GMW_FLOWERBOW - 40% and colorize again with #7A528C, Hue at 199 and Saturation at 67. WP_GMW_GLITTERBUTTERFLY - 12%. Colorize with #7A528C, Hue at 199 and Saturation at 67. WP_GMW_BUTTERFLY3 - 12% and colorize like the other butterfly. Add the 2 tubes. STEP 3: Texts and Credits Text 1: I believe in fairies with the Freestyle font, colour #7A528C. Write the word Fairies ina bigger size. Then with the Pen Tool > Draw Freehand, draw a couple of wings on the f of fairies. Apply the same Eye Candy > Gradient Glow. Text 2: Add either mon text or that of your choice or your name with the Agency FB font, colour #7A528C. Same Gradient Glow. Credits with the Pixelette font or any other pixels font. Martine 30 avril 2015 If you have any questions, don't hesitate to contact me |