|
|
(Version française ICI) |
|
|
|
|
|
|
|
You can do pretty much what you like with your result: create signatures with name added, extras or stats, websets.
|
Martine |

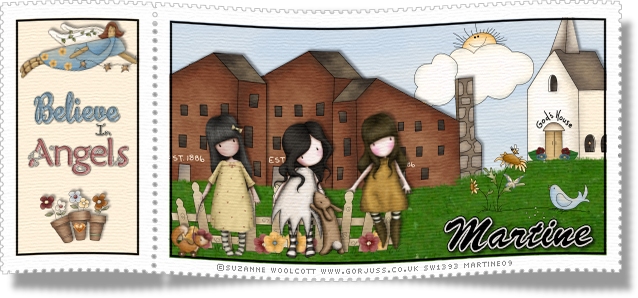
My Stamp Frame:
Scrapkit: Angels Watching Us by Scrappin Mar at http://scrappingmar.blogspot.com/
Plugin: Texturizer - Alien skin Xenofex 2.
Fonts: Signature pour le nom et Pixelette pour les crédits
You can download my E-Book which will let you work without being connected.
STEP 1
Setting up: Open my Stamp Frame > Duplicate and close the original. Save the new one under a different name. Increase the canvas size to : 700x400 - Delete the Credits layer.
STEP 2
Black border: Click inside the 2 empty spaces of the Stamp Frame while keeping your left finger on the Shift key. Add a new layer and fill with black.
Selections > Modify > Contract by 2 pixels and click on the Delete key on your keyboard.
Sky: Keep selected. Click on Selections > Modify > Expand by 6 pixels and add a first layer: fill with #FEF0DA. Add a second layer and apply Alien Skin Xenofex 2 Little Fluffy Clouds - Settings : Wispy Morning. Set the opacity of this second layer to 40.
Deselect All.
STEP 3
First elements: Resize all of them then click on Sharpen > Sharpen and apply a drop shadow:
|
H=-2 |
O=40 |
|
V=2 |
B=2 |
AngelsWatchingus_SMar_38.png - resized to 20%.
AngelsWatchingus_SMar_39.png - 3 copies resized to 29%, 30% and 31% and then positioned on the left, a bit on top of each other. I also removed the star. See my result.
AngelsWatchingus_SMar_38.png - resized to 15%.
STEP 4
The grass : New layer. Click on the Picture Tube tool and select the Lawn tube - set the scale at 75%. Add the lawn so that it goes over the foot of the different buildings; don't worry about going out of the frame on the left, right and at the bottom.
Activate the Stamp frame layer the click once inside. Go back to the grass layer and click on Selections > Invert and hit the delete key on your keyboard.
Move the black border so it is above this grass layer.
STEP 5
Other elements: Apply the Sharpen effect and Drop shadow on each element as before.
AngelsWatchingus_SMar_29.png - 2 copies resized to 15%.
AngelsWatchingus_SMar_41.png - resized to 20% and Image > Mirror.
Your tubes - I used 3 and resized them to fit.
AngelsWatchingus_SMar_42.png - resized to 18%. Position on the left and then click on Image > Mirror.
AngelsWatchingus_SMar_43.png - resized to 17%.
AngelsWatchingus_SMar_30.png - resized to 12%. I removed the butterflies. Select them with your Lasso tool - freehand- and hit Delete on your keyboard.
Text/ Name and Credits: Do not leave your tag empty.
Add your name with the Signature font or one of your choice - Size 32 - #000000 and selctions > Modify > Expand by 2 pixels. Fill with white and move this layer under the Text layer.
Add a Drop shadow.
|
H=2 |
O=60 |
|
V=2 |
B=4 |
New layer and add the correct credits, using the Pixelette font in size 6 without the antialias.
STEP 6
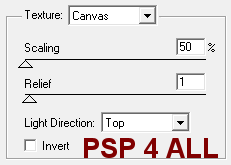
Texturizer: Merge visible all the layers except the background layer. Your merged image must be transparent. And apply the Texturizer:
|
|
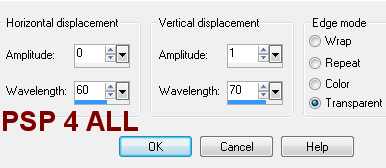
Curved Effect: Click on Effects > Distortion Effects > Wave.
I work with PSP X2 and these settings work with other versions of PSP except PSP 7. So if you use PSP 7 and the same settings as me, your result will be different.
|
|
Shadow: Duplicate this layer. Selections > Select All > Selections > Float > Selections > Defloat and fill with black. Deselect All.
Effects or Adjust > Blur > Gaussian Blur of 3.
Image > Flip. Move this layer under the original and slightly to the right. Move it so it also shows a bit at the bottom. Click on Layers > Properties and set to 40.
Grey border around the stamp: Activate the original layer and Selections > Modify > Expand by 1 pixel. Add a layer and fill with #C0C0C0. Move this new layer under the text layer and above the Shadow layer.
STEP 7
Add a layer and fill with white. Your result must be on a white background for our PSP 4 ALL results page. Merge visible and save optimized as a .jpg.
Martine
17 september 2009
If you have any questions, don't hesitate to contact me