Please note that with the result of this tutorial, you can:
make a premade graphic, a sig tag, part of a web set, etc..
but you
cannot use the final image to give it away or sell as a tube..or to create
outlines/ lineart for others to use.
Guide Rapide:


Download your supplies here:

Open
Paint Shop Pro.
New image: 225 x 225 and zoom to make it bigger.
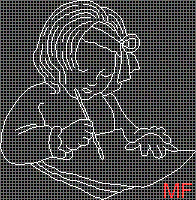
Take your paint brush and draw the outline. This outline is in the zip so
you can have it open in PSP while working.
Time to choose your
colours. There is a sample of mine in the zip but as always, it's better to use
colours which are a bit different in shade or your own colours so the final
image is not totally identical to mine. Remember, the outline colour should be
darker, by at least three shades.
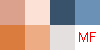
You will also find a sample of the red hair in the
zipped file. I have chosen 6 different shades of red and I have used them from
the outside in, starting with the darker one. Just zoom on the image in the zip
to see how I have done the hair.We are now going to add some shading.
We will apply the cut out effect on each different area of the image. So you
take your magic wand, select the area > Selections > Float > Effects > 3D
Effects > Cut out and and use my settings below. Each time, the shadow colour is that of the
outline of the selected area.
* The skin: Fill with #FCE1D6 and outline is #D69E8C
|
The face:
Vertical: 1
Horizontal: 1
Opacity: 80
Blur:8
Shadow: #D69E8C |
Her right hand:
Vertical: 0
Horizontal:0
Opacity: 80
Blur:5
Shadow:
#D69E8C |
Her left hand:
Vertical: 0
Horizontal:0
Opacity: 80
Blur:5
Shadow:
#D69E8C |
* Paintbrush:
|
Le manche
Vertical: -1
Horizontal: -1
Opacity: 100
Blur: 3
Shadow: #DA7C3E |
La brosse
Vertical: -1
Horizontal: -1
Opacity: 100
Blur: 3
Shadow: #000000 |
* Drawing paper:
|
Vertical: -1
Horizontal: -1
Opacity: 100
Blur: 10
Shadow:
#E4E0E0 |
* Jumper and head
band:
Fill with #6C91B6 and outline is #38526C
This time I did something a bit
different. I selected the jumper. Then I used the airbrush and for colour: #38526C.
I used the following settings:
|
In PSP 7 |
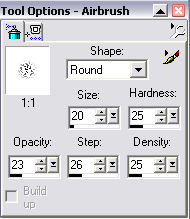 |
|
In PSP 8 |
|
 |
And I just sprayed a bit all over the jumper and the headband.
That's it! You are finished!
You can add a picture on the paper. I just used one of mine and then rotated
it using the deformation tool so it was facing the girl. I also added some
cheeks. New layer > Paintbrush with your choice of red, size 7, round. Place
one dot on each cheek. Then apply a gaussian blur of 5.00. If necessary
lower the opacity of this layer on your layer palette.
Martine
26 May 2005
If you have any questions, don't hesitate to contact me.


|