|
|
(Version française ICI) |
|
|
|
|
|
|
|
You can do pretty much what you like with your result: create signatures with name added, extras or stats, websets.
|
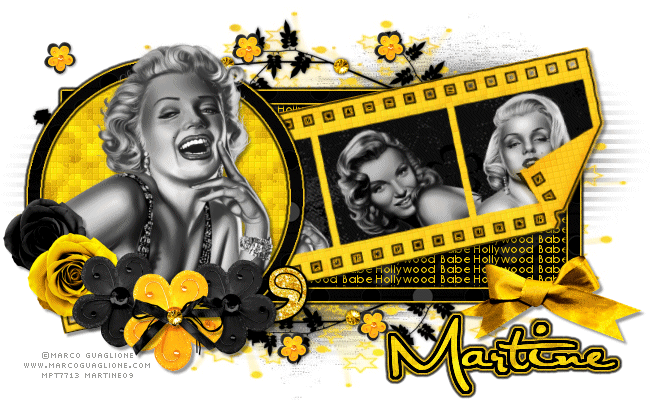
Martine |

Scrapkit: KatNKDA_PassionatelyYellow by KatNKDA of Digital Arts & Scraps at http://nkdigitalart.blogspot.com/
Mask: WSL Mask 10 of Chelle at http://weescotslasscreations.blogspot.com/ and mask UF Mask42 of SunF at http://urbanfairytalesblog.blogspot.com/
Plugins: Xero Fritillary, Mura's Meister Copies et Alien Skin Eye Candy 5 Impact.
Fonts: Al Sandra for the name and Century Gothic or other small font for the text; Pixelette for the credits.
You can download my E-Book which will let you work without being connected.
STEP 1
Background: Open a new image 650x400 - Fill with white for our results page.
STEP 2 - Masks
Mask 1: Paste paper01 as a new layer. Masks > New > From image - OK. Then Masks > Delete. In PSP 8 and above, it's under Layers > New Mask Layer > From Image. OK then Delete.
Mask 2: Paste paper09 as a new layer. Masks > New > From image - OK. Then Masks > Delete. In PSP 8 and above, it's under Layers > New Mask Layer > From Image. OK then Deletee
STEP 3 - Rectangle and Circle
Frame for the Rectangle : Trace a rectangle 530x210 with your Preset shape tool. Use the coordinates at the bottom of the working area:
|
|
Copy paste Paper04 as a new layer. Selections > Invert > Click on the
delete key on your keyboard.
Selections > Select All >Modify > Contract by 12 pixels. Deselect All.
Selections > Float >
Selections > Defloat.
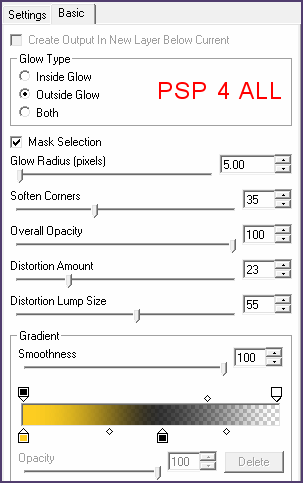
Apply Eye Candy Impact 5: Impact > Gradient Glow :
|
|
Deselect All.
Text inside rectangle:
Colour #EBC507 - Font Century Gothic - Size 8 - Vector.
Click on Objets > Align > Center in canvas.
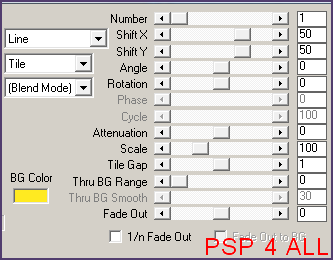
Layers > Convert to Raster layer. Apply Mura's Meister Copies:
Choose Tiling in the Menu on the left and set as I did:
|
|
Merge visible and place this layer with the text under the rectangle frame
layer..
Frame for the Circle: This
time draw a circle 275x275. Use the coordinates at the bottom of the working
area:
|
|
Copy paste Paper04 as a new layer. Selections > Invert > Click on Delete.
Selections > Select All >Modify > Contract by 12 pixels.Deselect.
Selections > Float > Selections >Defloat.
Apply Eye Candy Impact 5: Impact > Gradient Glow as above.
Deselect All.
The
three circles: Click inside the circle. Selections > Modify >
Expand by 10 and paste Paper13 as a new layer. Move under the frame. Duplicate
twice to have 3 copies: Circle 1; Circle 2 and Circle 3.
Apply the plugin
Xero- effect Fritillary on Circle 1 :
|
|
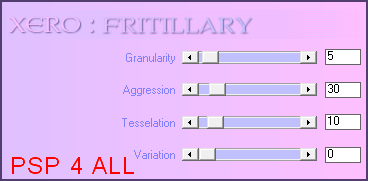
Circle 2: re-apply the same effect on Circle 2 but put 10 for
Variation.
Circle 3: re-apply the Fritillary effect on this circle but put 20
for Variation.
Tube in circle: Add your tube. I
had to resize mine. I placed it inside the circle with a bit of the
head on top of Circle 3.
STEP 4 - Elements
Embellishment: Element09 - resized to
40% , only keep the middle.
Delete the two other bits, after selecting them
with the lasso tool.
Black rose: Element12 resized to 25%.
Yellow rose: resized to 28%.
Black flower: Element08 to 30%. Duplicate.
Yellow flower: Element07 to 32%.
Black bow: Element24 to 25%.
Big yellow bow: Element25 to 25%. Position on the right.
Branch: Element28 to 65%. Position above layer Mask2 towards the top.
Duplicate and Flip and place at the bottom.
Small flowers: Open a new image. Add Element08 resized to 10% and on top,
add Element07 resized to 8%. Merge visible those two layers. And copy paste this
little flower here and there on your tag. See my result above.
STEP
5 - Film
Element03 resized to 80%.
Keep your left finger on the Shift key and with the Magic wand, click inside
each hole in turn to select all 4. Selections > Modify > Expand by 6.
Paste Paper08 as a new layer. Selections > Invert > Delete. Move the paper
layer under the film.
Keep selected.
Resise your other tubes and paste in
the three holes on the right. The 4th will not be visible. Click on Delete.
Select
> Deselect All.
Merge visible.
Duplicate twice: Film 1, Film 2 and Film 3.
Activate the Film 1 layer. Select the whole of the yellow area with your Magic
wand - set tolerance to 30.
Apply the Gradient Glow effect as above.
Then apply the Fritillary effect with Variation set to 0.
Film 2: re-apply the Fritillary effect on Film 2 but set the Variation setting
to 10.
Film 3: re-apply the
Fritillary effect on Film 3 but set the Variation setting to 20.
Click
on Image > Rotation > Free 12° Left and check all layers.
Save as a psp file
with the 3 layers open: Film.
STEP
6 - Your name
New image. Click on the Text tool:
Colour #EBC507 - Font Al Sandra - Size
44 - Bold - Antialias checked.
Duplicate twice so as to have 3 copies: Name 1, Name 2
and Name 3.
Activate the layer Name 1 and apply the Fritillary effect as you
did on the Circle and Film layers before. Set the Variation to 0.
Name 2: re-apply the Fritillary effect on Name 3 but set the Variation
setting to 20.
Name 3: re-apply the Fritillary effect on Name 3 but set the
Variation setting to 20.
Save as a psp file with the 3 layers open:
Name
STEP
7 - Credits
Don't forget them! Choose a small font like Pixelette in
size 6.
STEP
9 - Animation Shop
Close all the layers above the Rectangle frame.
Merge visible all the open layers.
Paste this merged image in Animation Shop.
Duplicate twice in order to have three frames.
Open the three frames of your
Film animation in AS. Click on the first frame and Edit > Select All > Edit >
Copy.
Click back on your main image with the three frames. Click on the 1st
frame. Edit > Select All > Edit > Paste into Selected frame and with your mouse,
position the Film animation like I did in my result above.
Go back to PSP and close the merged layer with the rectangle and open all the
others above.
Activate Circle 1 layer and close Circle 2 and Circle 3 layers. Merge visible
the open layers and paste this merged image as a new animation in AS.
Go back
to PSP and click on the Undo arrow. Close Circle 1 and open Circle 2. Merge
visible and paste as new frame after the first frame in the new animation in AS.
Go back to PSP and click on the Undo arrow. Close
Circle 2 and open Circle 3. Merge visible and paste as new frame after the 2nd
frame in the new animation in AS.
Click on the 1st frame of this new animation and
Edit > Select All > Edit > Copy.
Click back on your main animation with the
three frames. Click on the 1st frame. Edit > Select All > Edit > Paste into
Selected frame and with your mouse, position the Circle frames as I did, on the
left.
Now open the Name
animation. Click on the 1st frame and Edit > Select All > Edit > Copy.
Click
back on your main animation with the three frames. Click on the 1st frame. Edit
> Select All > Edit > Paste into Selected frame and with your mouse, position
the Name animation at the bottom on the right.
Save as a .gif
Martine
30 July 2009
If you have any questions, don't hesitate to contact me ![]()
![]()