You can do pretty much what you like with your result: create signatures with name added, extras or stats, websets. Give all the credits that are required and for the tut to: Martine (link to http://chezmartine.com) for PSP 4 ALL (link to http://psp4all.com).

Tube of your choice, free or not, but the credit for the tube must be added to your tag. The tube I am using is © Alicia Mujica - Luna's Designs - www.ladolccevitta.blogspot.com. If you use the same tube, you must first buy it and use it with your licence. Scrapkit: Jungle Junk par Kittz ŕ Kittz Kreationz. Download here. Mask: Mask 192 by Gems. Download here. Script: Chicken Wire Shapes on Miggs' blog - Miggins Does Scrapsville. Download here. Plugin: UnPlugged Tools > Interlace. Eye Candy 4000 > Gradient Glow. Fonts: Britannic Bold et Aachen Vertical for the text; Pixelette for the credits. You can download my E-Book which will let you work without being connected. STEP 1: Mask Open a transparent image 660x550 in PSP. Add a layer and fill with white #FFFFFF. Selections > Select All and add a layer. Copy paste J-Paper 7 in the selection. Selections > Select None. Open Gemsmask 192 and apply. Masks > New > From image - OK. Then Masks > Delete. In PSP 8 and above, it's under Layers > New Mask Layer > From Image. OK then Delete. Apply UnPlugged Tools > Interlace.
Selections > Select All and add a layer. Copy paste J-Paper 6 in the selection. Selections > Select None. Apply Gemsmask 192. Masks > New > From image - OK. Then Masks > Delete. In PSP 8 and above, it's under Layers > New Mask Layer > From Image. OK then Delete. Layers > Properties > Blend Mode > Screen. STEP 2: Script Unzip. Put the script in the Scripts-Restricted folder.It is generally under Local Disk (C:) > Users > YourName > My Documents > My PSP Files. Put the Selections in the Selections folder. In PSP, click on the arrow "Select Script" next to the menu and choose miggs-chickenwire2. Then click on click on the arrow "Run Selected Script". If you need more help, then have a look at the tut I wrote last year: Spring 12 here - http://psp4all.com/membres/Martine/spring12_E.html You now have 3 Chicken Wire shapes. Choose one, I used the second and copy paste as a new layer on your tag. STEP 3: Elements and tube Once each element is resized, sharpen if necessary: Adjust > Sharpen > Unsharp Mask
Then add a Drop shadow: I used
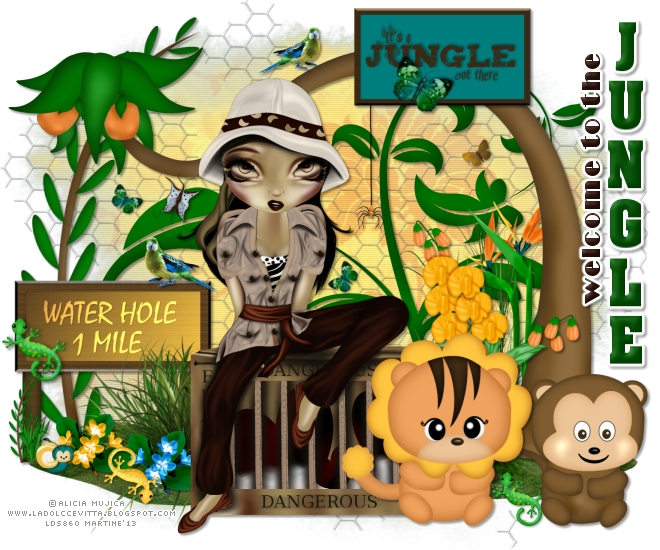
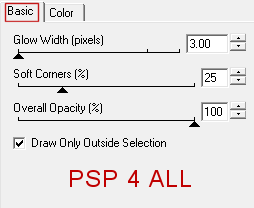
for the elements and tube and set the V & H at 1 for the small elements such as the butterflies, the snail etc... J-Leaves - in the middle. J-Water Hole Sign - 60%. On the left. J-Grasses - 60%. In the middle and at the bottom. J-Plant - 75% On the left. J-Bird Of Paradise Flower - 38%. J-Tree - On the right. J-Spider - 10%. Draw a vertical line in black to hang her from the tree. J-Tropical Flowers - On the right. J-Flowersy - 35%. Bottom, On the left. J-FlowersB - 35%. J-Snail - 10% - On the left. J-Gheko2 - 15% - On the left. J-Gheko - 15% - On the right. J-Bird - 30% - On the left. On the Water Hole sign. J-Bird - 35% - Mirror. On the right. On the J-Tree. J-Sign - 65%. J-Lion - 60%. J-Monkey - 55%. J-Butterfly - 10%. Rotate right 35°. J-Butterfly - 10%. Rotate left 35°. Add your tube. STEP 4: Text - Welcome to the Jungle with the Britannic Bold font in brown for Welcome to the and with Aachen Vertical in green for Jungle. Apply an Inner Bevel
then Eye Candy 4000 > Gradient Glow:
STEP 5: Credits with the Pixelette font or any other small pixel font. File > Save. Martine 15 May 2013 If you have any questions, don't hesitate to contact me |