|
|
(Version française ICI) |
|
|
|
|
|
|
|
You can do pretty much what you like with your result: create signatures with name added, extras or stats, websets.
|
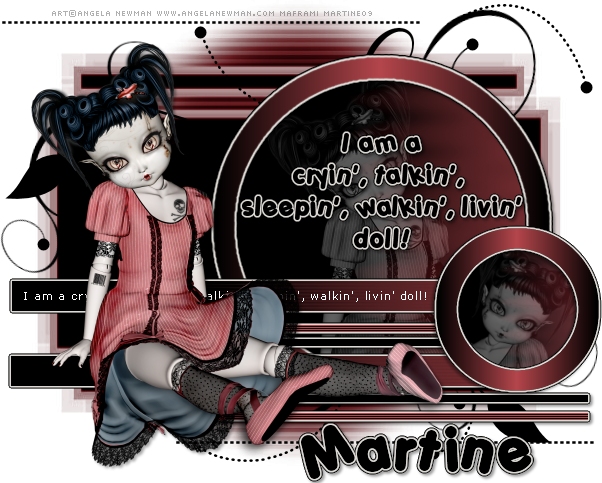
Martine |

My Template:
Mask: Mask WSL Mask145 by Chelle at Weescotslass Creations.
Doodle Art 5 by Melissa of Scrappy Expressions
Plugins: Alien Skin Eye Candy 4000 available at Alien Skin - Visman Toolbox : Motion Trail which is free.
Fonts: Porky's and Verdana for the text; Pixelette for the credits.
You can download my E-Book which will let you work without being connected.
STEP 1 - Bakground and Masks
Open the template and duplicate. Close the original. Delete the Credits layer. Activate the white background. Keep this background white for the Results page.
Choose a colour from your tube to use throughout the tut. I used this shade of red: #B4464C.
Masks : New layer and feel with the colour of your tube. Mine is #B4464C. Then click on the WSL 145 mask and resize. Image > Canvas size > Enter 600x472 and make sure it is vertically centered.
Click on the template and apply the WSL Mask145. Masks > New > From image - OK. Then Masks > Delete. In PSP 8 and above, it's under Layers > New Mask Layer > From Image. OK then Delete.
Add a new layer and fill with black. Re-apply the same mask.
On your Layer Palette, set the properties to Luminance.
STEP 2 - Doodle
Copy paste the Doodle as a new layer.
STEP 3 - Circle
Background : Click on the Circle layer. Selections > Select All > Selections > Float > Selections > Defloat. Fill with black.
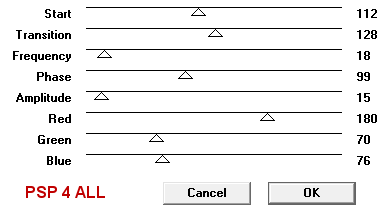
Then apply Vm Toolbox - Effect Motion Trail: for the Red, Green and Blue colours, I used my tube colour: #B4464C.
|
|
Border: Activate the Circle Border layer.
Selections > Select All > Selections
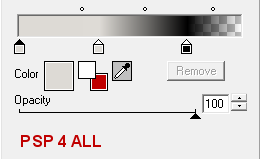
> Float > Selections > Defloat. Fill with a gradient made
up of the colour of your tube and black.
Set the angle at 270 and Repeats at 1.
Fill the border.
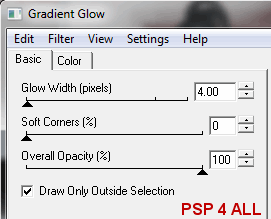
Then apply Eye Candy 4000 - Gradient Glow Effect.
Effects
> Plugins > Eye
Candy 4000 > Gradient Glow.
The lighter colour is the colour of the skin
of my doll. It's #DDDAD5.
|
|
|
Add the same drop shadow to the border.
Tube in Circle: Paste the tube as a new layer. Then activate the
Circle Border Layer. Selections > Modify
> Increase by 8 pixels. Click back on the tube layer. Selections >
Invert and hit the del key on your keyboard.
On the Layer Palette, choose
Luminance and set the opacity to 40% for this layer.
Text: For the text, use either mine or make your own. I used Porky's,
size 18 Bold, colour= #000000
Apply the same Eye Candy effect but set the Glow Width to 3.
Then apply this
drop shadow:
|
V = 2 |
O = 40 |
|
H = 2 |
F = 4 |
STEP 4 - Dotted Lines
I
left them black.
STEP 5 - Rectangles and Tube
Rectangle sm 1:
Selections > Select All > Selections
> Float > Selections > Defloat. Fill with black. Then
click on Effects > Texture > Blinds. The colour again was taken from my
tube:
|
|
Apply Eye Candy Gradient Glow with the Glow Width set to 2 and not 4 as
it was for the Circle Border.
Add the same drop shadow.
Rectangle sm 4: Repeat exactly what you did to Rectangle sm 1.
Rectangle sm 2 et rectangle sm3:
Selections >
Select All > Selections
> Float > Selections > Defloat. Fill with black and apply
Eye Candy Gradient Glow, size 2 for the Glow Width and same drop shadow.
Rectangle 1:
Selections >
Select All > Selections
> Float > Selections > Defloat. Fill with black and apply
Vm
Toolbox - Motion Trail Effect as you have before to the Circle Background in
Step 3.
Then apply the Eye Candy Gradient Glow, size 3 this time.
Same
drop shadow.
Rectangle
2: Repeat the steps used for Rectangle 1.
Text: mine or yours. I used Verdana with anti-alias
unchecked in size 8. We will come back to the text after having added the tube.
Tube: one tube, preferably in a sitting position. Add the same
drop shadow.
Now click back onto the text layer. I duplicated mine and
position so the end part of the text was showing on the right of my tube. I then
moved down to the original text and selected then deleted the text that could be
seen on the right of the tube.
STEP 6 - The Small Circle
Background: Click on Small circle. Selections > Select All > Selections > Float >
Selections > Defloat. Fill with black.
Then apply Vm
Toolbox - Motion Trail Effect: for the Red, blue and Green colours, I used the
colour picked from my tube: #B4464C.
Keep selected.
Click on your tube.
And crop the head part. I resized the head to 80%.
Paste the head as a new
layer on top of the selection then click on Selections > Invert and hit the
delete key on your keyboard.
While on the tube layer click on Layers >
Properties and choose Luminance for the Blend Mode and set the opacity to 40%.
Small Circle border: Activate this layer.
Selections > Select All > Selections > Float >
Selections > Defloat. Fill with a gradient made up of the
colour of your tube and black.
Set the angle at 270 and Repeats at 1.
Fill the border.
Then apply Eye Candy 4000 - Gradient Glow Effect.
Add
the same drop shadow.
STEP 7 - Name and Credits
Name:
Do not leave your tag empty.
Add your name with the Porky's font - #000000.
Then apply the Eye Candy Gradient Glow on your name with the Glow Width
set at 3.
Apply the same drop shadow.
Credits: for the tube with the Pixelette
font in size 6.
Merge visible and export through the JPEG optmiser. I always set the Better image quality
to the highest point.
Martine
10 September 2009
If you have any questions, don't hesitate to contact me ![]()
![]()