|
|
(Version française ICI) |
|
|
|
|
|
|
|

You can do pretty much what you like with your result: create signatures with name added, extras or stats, websets.
|
Martine |

Scrapkit: Simple Pleasures by Scrappin Mar at http://scrappingmar.blogspot.com/
Plugin: Alien Skin Xenofex2 that can be bought here: Xenofex2.
Fonts: Wendy Medium for your name; Pixelette for your credits.
You can download my E-Book which will let you work without being connected.
STEP 1
Background layer: Open an image 800x400 - Fill with white, the colour of our Results page.
STEP 2
Frame: New layer and with your Selection tool draw a rectangle 600x200. Use the coordinates at the bottom of the working area:
|
|
Fill the selection with white Then Selections > Modify > Contract by 12 pixels and hit Delete on your keyboard.
Click on this layer and duplicate. Move back onto the original layer.
Click on Colours or Adjust > Hue and Saturation > Hue/Saturation>Lightness and set all at -100. The frame is now black. Click on Effects or Adjust > Blur > Gaussian blur of 1.
Close the white background and merge visible the two rectangular layers and rename Frame.
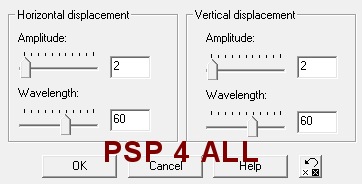
Wave Effect : Apply the Wave effect on the frame. Effects > Geometric Effects > Wave (PSP 7) with my settings or settings of your choice.
|
|
STEP 3
Sky and Grass: Click inside the frame with the magic Wand then Selections > Expand by 12 pixels. Add a layer for the sky. I used a gradient - blue in background and white as foreground colour. Then click on Gradient and fill the Sky layer. Keep selected. Add a layer and click on the Picture Tube tool and select the Grass 01/ Lawn and add grass at the bottom. See below:
|
|
STEP 4
Elements: Resize all elements, then click on Sharpen > Sharpen and apply a drop shadow:
|
H=2 |
O=40 |
|
V=2 |
B=2 |
Simple Pleasures_SMar_15.png - resized to 10% to be positioned on the right.
Simple Pleasures_SMar_7.png - resized to 8% to be positioned on the left of the tree.
Simple Pleasures_SMar_26.png - resized to 8% to be positioned on the left of the house.
Simple Pleasures_SMar_25.png - resized to 4%.
Simple Pleasures_SMar_32.png - resized to 5%.
Simple Pleasures_SMar_13.png - resized to 3%.
Simple Pleasures_SMar_12.png - resized to 2%.
Simple Pleasures_SMar_12.png - resized to 10%.
Simple Pleasures_SMar_20 & 21.png - resized to 3%.
Simple Pleasures_SMar_18.png - resized to 5%. Make 2 other copies and position them on the right of the tree, under the Tree layer.
Simple Pleasures_SMar_31.png - I removed the text - I selected around it and filled with the same colour as the cloud to hide the text. Then I resized it to 8%. Image > Mirror and position in between the house and the tree and under both layers.
STEP 5
Text/ Nom and Credits: Do not leave your tag blank.
Use the WordArt Simple Pleasures or as I did write your text using the font Wendy Medium or another of your choice - Size 60 - #FEB595 and #CAFDFE or colours to your liking, antialias checked.
Add a drop shadow.
|
H=1 |
O=40 |
|
V=1 |
B=1 |
New layer and add your credits with Pixelette, size 6 and no antialias.
STEP 6
Constellation Effect: Click on the Sky layer. Make 2 other copies. Close all the layers except the first Sky layer. Apply the Alien Skin Xenofex 2 Constellation :
|
|
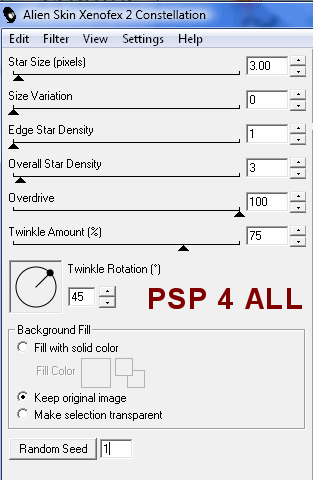
Close this first Sky layer and move onto the second Sky layer. Apply the Constallation filter again but click once on Random Seed.
Close this second Sky layer and move onto the third Sky layer. Apply the Constallation filter again but click once on Random Seed.
The three layers ready for AS: Open the background layer and make 2 new copies.
Close those three Background layers.
Close the three Sky layers.
Merge visible all the other layers and rename: Top. Make two other copies of this Top layer.
You should have 9 layers in all:
3 Background layers
3 Sky layers
3 Top layers.
Merge visible one layer from each group: 1 Background layer + 1 Sky layer + 1 Top layer. Keep the other layers closed when merging. Repeat until you have 3 merged layers.
Save these three layers.
STEP 7
Animation Shop: Open the three layers and save as a .gif.
Martine
14 June 2009
If you have any questions, don't hesitate to contact me