|
(Version française ICI) |
|
|
|
|
|
|
|
You can do pretty much what you like with your result: create signatures with name added, extras or stats, websets.
|
Martine |

Scrapkit: Loving Mom by Seachell's Scrapz at http://seachellscrapz.blogspot.com
Plugin: DSB Flux - Linear Transmission. Click HERE for a link to download.
Fonts: Monotype Corsiva for your name; Pixelette for your credits.
You can download my E-Book which will let you work without being connected.
STEP 1
Background: Open an image 650X650 - Fill with white, the colour of the background on the results' page.
STEP 2
First Elements: All the elements are resized and then added as a new layer. I then added this drop shadow:
|
H=-1 |
O=60 |
|
V=2 |
B=4 |
Circle Frame - Seachell_LM_Element31, resized to 55%
Heart Frame - Seachell_LM_Element4, resized to 60%
Ivy - Seachell_LM_Element16, resized to 55%. Move this layer under the circle layer and place on the left. Then Images > Mirror.
STEP 3
Tube in Heart: Click on the Heart layer. Then right click on this layer and duplicate. You are on the copy. Close all other layers.
Selections> Select All > Selections > Float > Selections > Defloat > Selections > Modify and contract by 6 pixels then click on the Delete key of your keyboard. la touche Effacer de votre clavier. You have removed the inside of the heart.
Click inside the heart and Selections > Modify > Expand by 4 pixels.
Add a layer and Copy paste your tube in this selection. Selections > Invert and click on Delete.
Open the original Heart Frame layer and merge visible these three layers.
STEP 4
Other Elements: - a little reminder: All the elements are resized and then added as a new layer. On each element, I then added this drop shadow:
|
H=-1 |
O=60 |
|
V=2 |
B=4 |
Bow on Heart - Seachell_LM_Element28, resized to 50%. On top of the heart, towards the bottom. Adjust with the deformation Tool so it fits properly. Trim any excess off with either the eraser or the lasso tool - point to point setting.
Pot with Flowers - Seachell_LM_Element3, resized to 30%
Nichoir - Seachell_LM_Element21, resized to 30%. On the right.
Flowers - Seachell_LM_Element9, Seachell_LM_Element10, Seachell_LM_Element11, resized to 20%. On the right, at the foot of the bird table.
Grass - Seachell_LM_Element15, resized to 10%. I made three copies. Placed them on the right at the foot of the bird table.
Dragonfly - Seachell_LM_Element17, resized to 10%. At the top.
Bear - Seachell_LM_Element1, resized to 55%.
Bird - Seachell_LM_Element8, redimensionné ŕ 28%. In front of the bear.
WordArt- Seachell_LM_Element5. At the top.
Flowers on the Circle frame - Seachell_LM_Element6, resized to 15%. I made three copies. I recolored one of them using #EBA862 with the Change to target tool or the tool you normally use to do this.
Other flowers- Seachell_LM_Element13, resized to 17%. On the right above the Circle layer.
Bow on the Heart frame - Seachell_LM_Element25, resized to ŕ 15%.
Clip on Heart frame - Seachell_LM_Element23, resized to2%. On the Heart layer. Image > Free Rotation > Right - 12. Use the Lasso tool - Point to Point - to remove the bit of the clip which should be behind the heart.
STEP 5
Plugin DSB Flux: Resize to 85% then close the white background and merge visible all the other layers.
Then click on the merged layer and duplicate.
Activate the original layer and Effects > Gaussian Blur of 12.
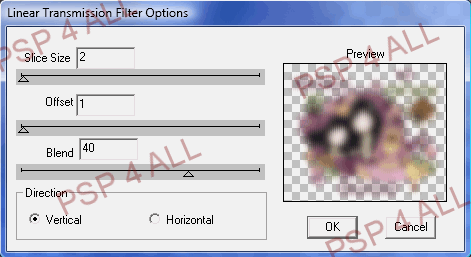
Then Effects > DSB Flux > Linear Transmission and use these settings:
|
|
Repeat but this time select Horizontal.
Open the white background and if necessary, lower the opacity of the layer with the Linear Transmission effect. Mine is at 70%.
STEP 6
Resize to 85% before adding
Text/ Name and Credits. Do not leave your tag blank.
Add your name with the Monotype Corsiva font or one of your choice - Size 62 - Foreground colour #000000 and background colour #B76C90 with antalias checked.
Apply the same drop shadow.
Add the necessary credits with the Pixelette font, size 6 with antialias unchecked.
Save and export using the JPEG optimiser with a white background for the group's results page.
Martine
6 May 2009
If you have any questions, don't hesitate to contact me

