You can do pretty much what you like with your result: create signatures with name added, extras or stats, websets. Give all the credits that are required and for the tut to: Martine (http://chezmartine.com) for PSP 4 ALL (http://psp4all.com).

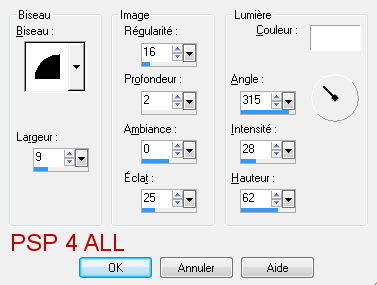
Scrapkit: Shades of Grey by Diane at Candy's Treats - Download here. Fonts: Brush Script Mt and Pixelette for the name/text and credits. Animation: Heart Bling 1 by Melissa at MelissaVgraphics - Download here. You can download my E-Book which will let you work without being connected. STEP 1: Elements Open a new transparent image 650x560 in PSP. Fill with #000000. CandysTreats-SOG-frame9 - as a new layer. CandysTreats-SOG-Cluster2 The following elements are placed below the frame9 layer. Click on the black background. Selections > Select All. Add a layer. CandysTreats-SOG-ele2 - Edit > Copy. Back to your work and Edit > Paste Into selection. CandysTreats-SOG-cloud - Add at the bottom, and to the right. CandysTreats-SOG-Leaves1 - 50%. On the left. Duplicate > Mirror and place towards the top, on the right. CandysTreats-SOG-Leaves3 - 30%. Top, right. CandysTreats-SOG-Leaves2 - 50%. On the right. CandysTreats-SOG-Leaves4 - 75%. Bottom. CandysTreats-SOG-ele16 - 75%. Top, right. The following elements are placed above the frame9 layer. CandysTreats-SOG-bow3 - 35%. Top, right. CandysTreats-SOG-ele19. Top, left. CandysTreats-SOG-ele8. Bottom, left. CandysTreats-SOG-ele19. Top, left. CandysTreats-SOG-ele10. Bottom, left. CandysTreats-SOG-ribbon7. Bottom, left. STEP 2: Tube Activate the Cluster2 layer. With your Magic Wand, click inside the frame. Select > Modify > Expand by 8 pixels. And add the image which comes with your tube if there is one. Select > Invert > Delete. If needed, greyscale your tube. I had to greyscale mine. If your tube comes without the image, then you must first fill with a paper of your choice and then the tube. STEP 3: Text and Credits Text: of your choice or mine. I used Brush Script MT in grey and then apply an Inner Bevel.
|


