|
|
(Version franÁaise ICI) |
|
|
|
|
|
|
|
You can do pretty much what you like with your result: create signatures with name added, extras or stats, websets.
|
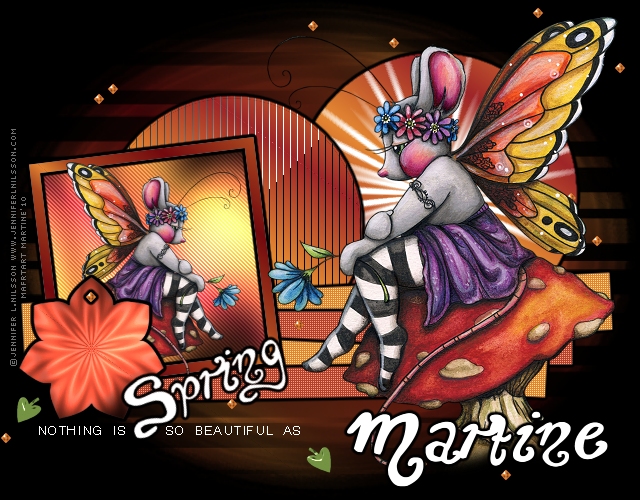
Martine |

Template: by Daira of Loving Miranda Creationz : Spring Tag Templates II - Template So beautiful
Mask: one of Cat - nį298Insatiable Dreams here http://insatiabledreams.net/Cat_s_Masks_too.html
Plugins: Eye Candy 3 - Eye Candy 4000; penta.com - Color Dot & jeans; Tramages - Tow The Line & Pool Shadow & Starmaker; Filters Unlimited - Patterns Generator
Fonts:
You can download my E-Book which will let you work without being connected.
STEP 1
Template: Open then Window > Duplicate and close the original template. Save and delete the credit layer at the top. Then I changed the canvas size to 645x500.
Background: Click on the first layer at the bottom and fill with black. That's the colour I would like for the Results page of the group
Choose two colours from your tube, one darker than the other. I used the same colours throughout the tut. And I made a gradient with those two colours.
Maskue : Add a layer and fill with your gradient. Set the Angle at 40 and Repeats at 3.
Apply Cat's mask 298. Masks >New > From Image - OK. Then Masks > Delete. In PSP 8 and more recent versions of PSP, go to Layers > New Mask Layer > From Image. OK. Click on Masks > Delete
Right Circle: Activate and Selections > Select All > Selections > Float > Selections > Defloat then add a layer and fill this layer with the gradient above.
Keep selected and apply Tramages > Starmaker :
|
|
Then Eye Candy > Gradient Glow - Click on Color > Fat and change the white for black:
|
|
 |
Select None. Close or delete the original layer underneath.
Left Circle: A
Keep selected and apply Tramages >
|
|
Puis Eye Candy > Gradient Glow as before.
S
Stripe 1 & Stripe 3: Each in turn -
Puis Eye Candy > Gradient Glow
S
Stripe 2 & Stripe 4:
Each in turn -
Square Frame:
Activate and Selections > Select All > Selections > Float > Selections > Defloat then add a layer and fill this layer with the gradient above.
Keep selected and apply Eye Candy > Gradient Glow as before.
Select None. Close or delete the original layer underneath.
Square: Activate and Selections > Select All > Selections > Float > Selections > Defloat then add a layer and fill this layer with the gradient above.
Keep selected and apply Penta.com:
|
|
Then Tramages > Pool Shadow:
|
|
Select None. Close or delete the original layer underneath. And move your new layer under Square Frame.
Flower: Activate and Selections > Select All > Selections > Float > Selections > Defloat then add a layer and fill this layer with one of the colours.
Keep selected and apply Pattern Generator > Magic Flower:
|
|
Then Tramages > Pool Shadow as above
and finally Eye Candy > Gradient Glow as before.
Select None. Close or delete the original layer underneath.
Leaves : Activate and Selections > Select All > Selections > Float > Selections > Defloat then add a layer and fill this layer with green.
Keep selected and apply Eye Candy 3 > Glass.
|
|
Select None. Close or delete the original layer underneath.
Spring: Activate and Selections > Select All > Selections > Float > Selections > Defloat. Apply Eye Candy > Gradient Glow.
Select None. Glitter: Activate and Selections > Select All > Selections > Float > Selections > Defloat then add a layer and fill this layer with the gradient above.
Kep selected and apply Eye Candy 3 > Glass as on the leaves above.
Select None. Close or delete the original layer underneath.
Select the glitter on the flower with the Selection tool then click in the selection with the magic wand and apply Eye Candy > Gradient Glow. Dťsťlectionner tout.
Tube on the right: Place right at the top above all the layers.
Tube on the left: Resize and add as a layer above the Square Frame layer and under the Flower layer.
STEP 5: Credits & Name
Credits: Choose a small font like Pixelette in size 6.
Name : Unchanged thoughts or a font of your choice. Size 62 with antialias checked and colour #FFFFFF - First letter of your name in size 90.
Then apply the same Eye Candy > Gradient Glow.
Save one last time with all the layers opened. Then merge visible all the layers except the black background and copy paste as a new image - that gets rid of the excess of canvas around your result.
Add a black background for the Results page and then click on File > Export > JPEG Optimizer. Click on the Wizard and choose Better image quality.
Martine
11 March 2010
If you have any questions, don't hesitate to contact me