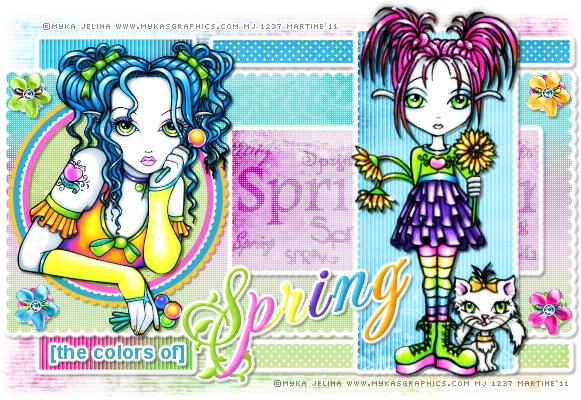
You can do pretty much what you like with your result: create signatures with name added, extras or stats, websets.
 One or two tubes of your choice, free or not, but in
either case, credit must be given on the tag. I used a tube ©Myka Jelina -
www.mykasgraphics.com.
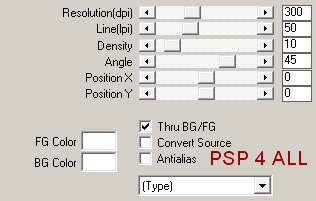
Fonts: Arial, Fleur de Leah and Pixelette for the credits.You can download my E-Book which will let you work without being connected. STEP 1 Open template 28 of Scraps of Enchantment - Duplicate and close the original. Delete the crédit layer. Resize all the layers to 85%. Increase the space around your template. Image > Canvas Size and enter 620x400 with 10 at the Top and 19 at the Bottom - 18 on the left and 19 on the right. STEP 2 Background: Fill with #FFFFFF. STEP 3 LrgGreyRectangle: Selections > Select All > Selections > Float > Selections > Defloat. Add paper 7 as a new layer. Selections > Invert. Then apply the Blinds Effects > Texture Effects > Blinds.
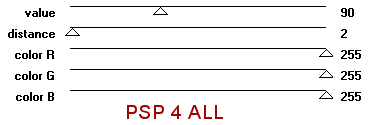
Then apply Eye Candy 4000 > Gradient Glow
And a Drop Shadow.
Delete the original layer. STEP 4 Black ScallopRectangle: Selections > Select
All > Selections > Float > Selections > Defloat. Add a new layer and
fill with DBV Rainbow Fling Paper (15) at 50%.
Selections > Select None. Then same Drop Shadow as before. Delete the original layer. STEP 5 ThinRectangle1: Selections > Selectr All > Selections > Float > Selections > Defloat. Add a new layer and fill with DBV Rainbow Fling Paper (9). Apply Mura's Meister > Tone.
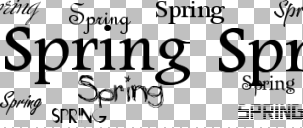
Then apply the same Gradient Glow used in STEP 3. Selections > Select None. And apply the same Drop Shadow. Delete the original layer. STEP 6 ThinRectangle2: Repeat STEP 5 but use DBV Rainbow Fling Paper (15). Same effets, same Drop Shadow. Delete the original layerl. STEP 7 SmallWhiteScallop: Selections > Select All > Selections > Float > Selections > Defloat. Add a new layer and fill with DBV Rainbow Fling Paper (14) at 55%. Open a new transparent image 304x 127 and fill with the text of your choice or with the same word Spring. I wrote it several times, using different fonts and sizes.
Merge visible all the layers. And copy paste as a new layer above the layer SmallWhiteScallop. Duplicate this Text layer. On the duplicated Text layer, apply a Gaussian Blur of 3 and set the Blend Mode to Screen. And set the Blend Mode on the original text layer to Luminance . Activate the paper layer and apply Penta.com > Color Dot.
Then apply the same Gradient Glow as before. And to finish, the same Drop Shadow. Delete the original layer . STEP 8 GreyScallop: Selections > Select All > Selections > Float > Selections > Defloat. Add a new layer and fill with DBV Rainbow Fling Paper (11) at 50%. Then apply the Blinds effect. Effetcs > Texture Effects > Blinds. As in STEP 3. Then the same Gradient Glow. Selections > Select None. Apply the same Drop Shadow as before. Delete the original layer. STEP 9 Circle Scallop: Copy paste as a new layer DBV Rainbow Fling Frame (9) at 41%. Same Drop Shadow as before. Delete the original layer. Click inside with the Magic Wand then Selections > Increase by 3 pixels and Selections > Invert > Delete. Apply Penta.com > Color Dot. Selections > Select None. Move this paper layer under the frame. Activate the frame layer and apply the same Drop Shadow. STEP 10 Tubes: One on the right, above the Grey Scallop of STEP 8. Duplicate this tube and apply a Gaussian Blur of 3 to the copy. Set the Blend Mode of this layer to Overlay. Apply a Drop Shadow on the tube layer underneath
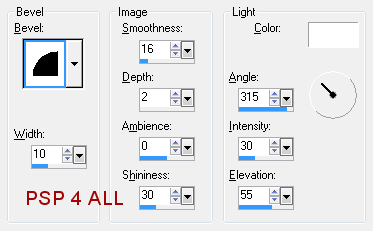
One tube on the left above the Circle Scallop of STEP 9. Duplicate it and apply a Gaussian Blur of 3 on the copy. Set the Blend Mode of this layer to Overlay. Apply the same Drop Shadow on the tube underneath as before. STEP 11 Text: mine or one of your choice - [The Colors Of] with the font Arial, in size 14, Bold, Vector, colour #30ADD6 and crénage (l'espace entre les lettres) ŕ 25; Spring with the font Fleur de Leah in size 72, Bold, colour #000000 and Kerning at 25. Turn the text slightly to the left so it's angled then Convert to Raster Layer. Color each letter one at a time using the Color Replacer. Apply an Inner Bevel
Apply a Drop Shadow on the whole text
STEP 12 Elements: A flower in each corner - DBV Rainbow Fling Element (23); (24); (54) et (55) ŕ 15%. Apply the same Drop Shadow. STEP 13: Credits Choose a small font like Pixelette, anti-alias off. STEP 14: Save Save as a jpg, optimized or as a png, optimized, on a white background. Martine 13 March 2011 If you have any questions, don't hesitate to contact me |
||||||||||||||||||||||||||||
| a |