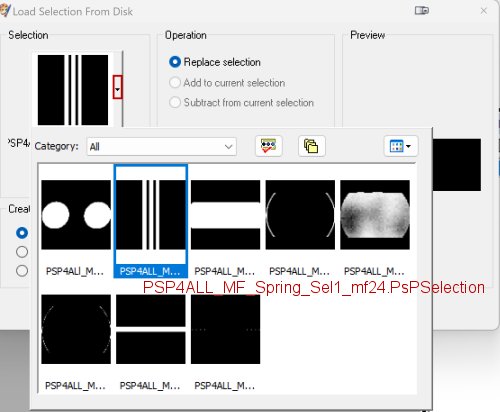
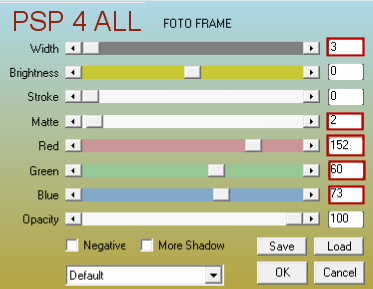
Scrapkit: miggs_syho021_february by miggins. Her blog is here. Download the kit here. Masks: one by Nikita - 1250181869_nikita_masques to download here and one by Lithium Flower - ForumSetMask2_DottyEdges_LF to download here (2nd from the top) and a third one - one by Fania FL-Fmask010 in the zipped folder. Supplies: Selections, the mask and the 2 texts in the zip here. Plugin: Xero > Fritillary. AAA Frames > Foto Frame. Font: Pixelette for the credits. ****************************** Colours: #983C49 and #F9E1E5. STEP 1 - Background 1. Open an image 600x250 and fill with white. 2. Selections > Select All and paste miggs_syho021_february (3) into the selection. 3. Selections > Select None. 4. Add a layer. Click on Selections > Load/ Save selection/ Load Selection From Disk. Choose PSP4ALL_MF_Spring_Sel1_mf24.PsPSelection.
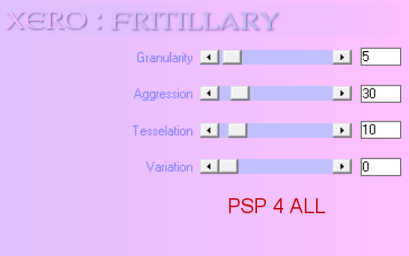
Fill with #983C49. 6. Selections > Select None. 7. Duplicate. Image > Mirror. 8. Add a layer. Click on Selections > Load/ Save selection/ Load Selection From Disk. Choose PSP4ALL_MF_Spring_Sel2_mf24.PsPSelection. 9. Fill with #983C49. 10. Add a layer and fill with #F9E1E5. 11. Open Nikita's 1250181869_nikita_masques. 12. Layers > New Mask layer > From an image and select 1250181869_nikita_masques. 13. OK. Layers > Merge group. 14. Selections > Select None. 15. Add a layer. Click on Selections > Load/ Save selection/ Load Selection From Disk. Choose PSP4ALL_MF_Spring_Sel3_mf24.PsPSelection. 16. Fill with #983C49. 17. Selections > Select None. 18. Renamer Border. 19.Add a layer. Click on Selections > Load/ Save selection/ Load Selection From Disk. Choose PSP4ALL_MF_Spring_Sel4_mf24.PsPSelection. 20. Fill with #983C49. 21. Rename Cercle. 22. Add another layer and fill with #F9E1E5. 23. Open masque FL-Fmask010. 24. Layers > New Mask layer > From an image and select FL-Fmask010. 25. OK. Layers > Merge group. 26. Layers > Arrange > Move Down. 27. Apply Xero > Fritillary
28. Adjust > Sharpness > Sharpness More. 29. Rename Circle. 30. Selections > Select None. 31. Back onto the Border layer. (Top of the pile). 32. Add a layer. Click on Selections > Load/ Save selection/ Load Selection From Disk. Choose PSP4ALL_MF_Spring_Sel5_mf24.PsPSelection. 33. Fill with #983C49. 34. Selections > Select None. 35. Open mask ForumSetMask2_DottyEdges_LF. 36. Click on Selections > Load/ Save selection/ Load Selection From Disk. Choose PSP4ALL_MF_Spring_Sel2_mf24.PsPSelection. 37. Add a layer and fill with #983C49. 38. Calques > Nouveau calque de masque > A partir d'une image et choisir le masque ForumSetMask2_DottyEdges_LF. 39. OK. Layers > Merge group. 40. Selections > Select None. 41. Add a layer. Click on Selections > Load/ Save selection/ Load Selection From Disk. Choose PSP4ALL_MF_Spring_Sel6_mf24.PsPSelection. 42. Fill with #983C49. 43. Selections > Select None. 44. Add text 1 Spring is here (in the supplies folder) : PSP4ALL_MF_Spring_Texts_mf24. 45. Add a layer. Click on Selections > Load/ Save selection/ Load Selection From Disk. Choose PSP4ALL_MF_Spring_Sel7_mf24.PsPSelection. 46. Fill with #F9E1E5. 47. Duplicate. 48. Image > Flip > Flip vertical. 49. Add the text: texte 2 Spring is here ( in the Supplies folder) : PSP4ALL_MF_Spring_Texts_mf24. See my tag above for positioning. 50. Recolour with #983C49. STEP2 - Tube and elements 51. In the Layers palette, click on Circle (28). 52. Selections > Float > Defloat. 53. Back to the top of the pile 54. Add the tube. 55. Selections > Invert > Delete to get rid of the excess. 56. Selections > Select None. 57. In the Layers palette, click on Border (18). 58. Layers > Arrange > Bring to Top. 59. miggs_syho021_februaryE (4) - 15%. Middle. 60. Duplicate > Mirror. 61. miggs_syho021_februaryE (7). 15%. Left, on the edge and in the middle. 62. Duplicate > Mirror. 63. miggs_syho021_februaryE (6). 15%. Left, in the corner at the bottom. 64. Delete the leaves which are just outlines. 65. Duplicate > Mirror. STEP 3 - Bordure and Credits 66. Edit> Copy Special > Copy Merged.
69. Crédits - avec une police comme Pixelette ou toute autre petite police. Martine 16 April 2024 If you have any questions, don't hesitate to contact me |