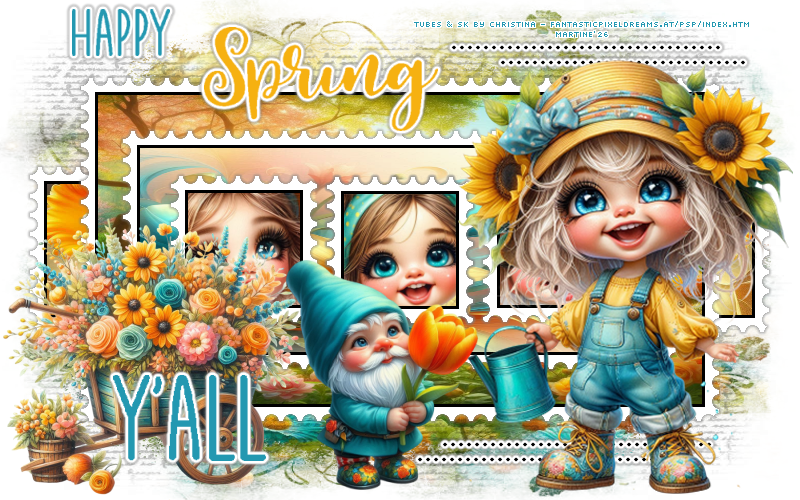
Scrapkit: Cheerful Spring by Christina - Fantastic Pixel Dreams PSP Design. Download the kit here. Script: Postage Stamp.PspScript on the Humbug Graphics Galore blog. It was free but the link is now dead. It is in the supplies zip. Masks: 2 masks by MizTeeque - available to download on her blog here Mizteeque's Digital Designs = Miz_Mask_292 & Miz_Mask_054. Supplies: Script and WA in this zip.
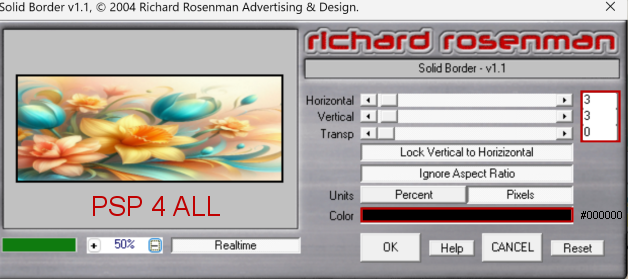
Plugins: Eye Candy 4000 > Gradient Glow. Richard Rosenman > Solid Border Fonts: Pixelette for the credits. STEP 1 - Template and background 1. Open the template. Shift+D to duplicate. 2. Delete the Credits layer at the top. 3. Activate Bkg. Add a layer. 4. Fill with paper bg_cheerfulspring (6) resized 50%. 5. Open mask Miz_Mask_292. 6. Layers > New Mask layer > From an image and select Miz_Mask_292. 7. Check Source Luminance and do not check Invert mask data. 8. Click on OK. 9. Layers > Merge Group. 10. Add a layer and fill with black. 11. Apply Mask_Miz_054. 12. Check Source Luminance and do not check Invert mask data.. STEP 2 - SCRIPT 13. Raster 1 - Click on it. Edit > Paste as new image. We will apply the script to this new image of Raster 1. 14. Fill with paper bg_cheerfulspring (6) resized 50%. 15. Apply Richard Rosenman > Solid Border
16. Unzip the Supplies zip. Take a copy of HGG_Postage Stamp.PspScript. 17. Now find where the folder MY PSP Files is for your version of PSP. It is generally under Local Disk (C:) > Users > YourName > My Documents > My PSP Files. Inside there will be lots of PSP sub-folders. 18. Put the script HGG_Postage Stamp.PspScript in the Scripts-Restricted folder. 19. In Paint Shop Pro, if you don't see the Script window in the Tools bar, you will have to make it show. 20. Click on View > Customize > Toolbars > Script > Close. 21. The Script window is now visible.
22. Click on the little arrow "Select Script" next to the menu. I have marked it in red. 23. A window will open. At the top, under Categories, select Restricted-Scripts. You will see all the Restricted-Scripts that are installed. Select HGG_Postage Stamp.PspScript.
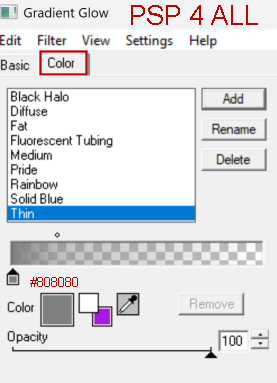
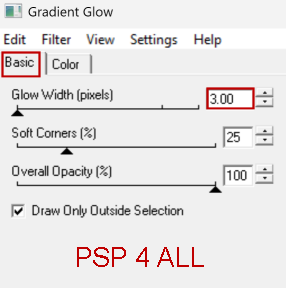
24. Then click on the arrow Run Selected Script (2). 25. Script will start to run - you can change the size of the border and the colour. A new window will open after each OK. 26. First is Size -> 14. OK. 27. Colour : #FFFFFF -> OK. 28. HGG_Postage Stamp.PspScript has 29. Apply Eye Candy 4000 > Gradient Glow. Thin, Colour #808080, Glow Width = 3
30. Copy this image on Raster 1 of the template then delete the original Raster 1 template layer. 31. Repeat for the following layers. The> method remains the same: the template layer as a new image, add paper, add border, apply script, and Gradient Glow. Place the finished image on the template. Delete the template original layer. 32. Raster 2 - New image. Fill with paper bg_cheerfulspring (4) resized 50%. 33. Raster 3 - New image. Fill with paper. bg_cheerfulspring (15) resized 50%. 34. Frame 1 - New image. No paper. Instead add a close-up of your tube. I used a different tube. Then border, script and Gradient Glow. Place finished image on template.Delete the template original layer. 35. Frame 2 - New image. No paper.Instead add a close-up of your tube. I used a different tube. Then border, script and Gradient Glow. Place finished image on template.Delete the template original layer. 36. Frame 2 - New image. No paper. Instead add a close-up of your tube. I used a different tube. Then border, script and Gradient Glow. Place finished image on template. Delete the template original layer. 37. Dots Top and Dots Bottom - Black and apply Gradient Glow but select Fat, White, et Glow width = 3. STEP 3 - Elements and Tube 38. natur_cheerfulspring (29) -30%. On the left. 39. props_cheerfulspring (73) - 25%. In the middle. 40. Tube on the right. STEP 4 - WA and Credits 41. WA -In the supplies. I used #2398B1 to colour HAPPY & Y'ALL. And #F6B111 to colour Spring. 42. Then apply Gradient Glow = Fat, Blanc, and Glow width = 3. 43. Credits - with a small police like Pixelette or any other small. 44. Save. Martine 15 April 2026 If you have any questions, don't hesitate to contact me |