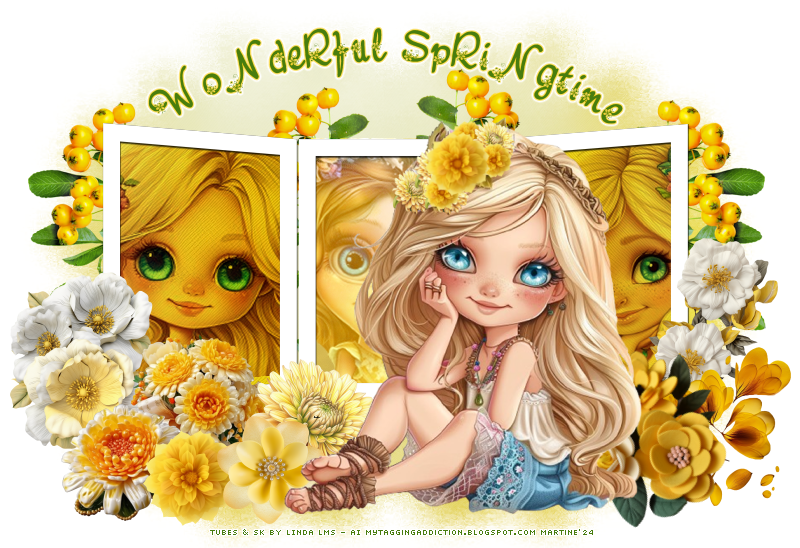
 Scrapkit: The Color Yellow by Linda LMS - mytagging addiction.blogspot.com. Download the kit here. Script : HGG_triple-frame1.PspScript on the Humbug Graphics Galore blog. It was free but the link is now dead. It is in the supplies zip. Masque : Mask7Random-vi by Rosey available here: Escape From Reality. Dowload it here. It is the 3rd one down. Supplies: Script and mask here. Plugins: Eye Candy 4000 > Gradient Glow. Fonts: Nebulo for the WA and Pixelette for the credits. *** Depending on the colors & tube you are going to use, feel free to change the mode and opacity of the layers. *** STEP 1 - Frame 1. Unzip the Supplies zip. 2. Now find where the folder MY PSP Files is for your version of PSP. It is generally under Local Disk (C:) > Users > YourName > My Documents > My PSP Files. Inside there will be lots of PSP sub-folders. 3. Put the script HGG_tripleframe1.PspScript in the Scripts-Restricted folder. 4. Open Paint Shop Pro. If you don't see the Script window in the Tools bar, you will have to make it show. 5. Click on View > Customize > Toolbars > Script > Close. 6. The Script window is now visible.
7. Click on the little arrow "Select Script" next to the menu. I have marked it in red. 8. A window will open. At the top, under Categories, select Restricted-Scripts. You will see all the Restricted-Scripts that are installed. Select HGG_tripleframe1.PspScript.
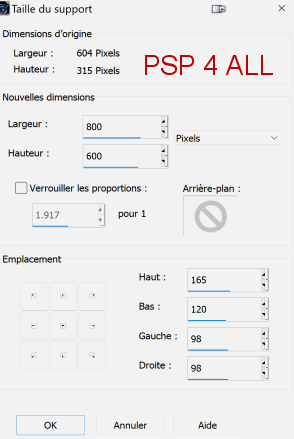
9. Check that the option "Toggle Execution Mode" (1) is pressed in. 10. Then click on the arrow Run Selected Script (2). 11. Script will start to run - you can change the colour and the shadow. A new window will open after each OK. 12. Size first -> OK. 13. Colour: #FFFFFF -> OK. 14. Drop Shadow: Changed nothing. 15. Frame is done. 16. Now resize at 17%. STEP 2 - Mask, elements and tubes 18. Layers > Merge Down (Frame and Drop Shadow layers). 19. Image > Canvas Size.
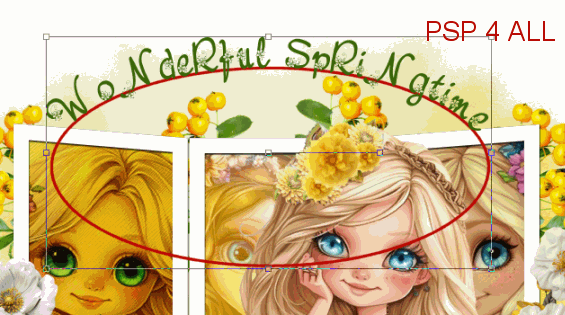
20. Add a layer under the frame and fill with white. 21. Add a layer. 22. Select All and paste paper-1 into the selection. 23. Selections > Select None. *** Le masque. *** 24.Open Mask7Random-vi by Rosey. 25. Layers > New mask layer > From an image and select Mask7Random-vi. 26. Click on OK. 27. Move a little bit downwards. *** Elements and Tubes ** 28. ele-6 - Resize 40%. 29. Rotate right 90°. 30. Position on the left. 31. Duplicate 3 times to have 4 copies in all. 32. One copy towards the top in between the left frame and the middle frame. 33. Image > Mirror on the other 2 copies. 34. Place these 2 copies on the right. See my tag. 35. Left frame - Click inside with the magic wand. 36. Selections > Modify > Expand 8 pixels. 37. Add paper-1 as a new layer. 38. Selections > Invert. 39. Delete. 40. Add one of the tubes. 41. Blend Mode of this layer on Multiply. 42. Delete. 43. Selections > Select None. 44. Repeat these steps for the frame on the right. 45. And repeat for the frame in the middle but change but use paper-12. 46. I set this layer on Overlay but choose what suits best. *** On the left. *** 47. ele-9 - 15%. 48. ele-19 - 15%. 49. ele-20 - 13%. 50. ele-16 - 15%. 51. ele-7 - 10%. 52. ele-14 - 13%. *** On the right. *** 53. ele-10 - 15%. 54. ele-24 - 20%. 55. ele-12 - 25%. Rotate left 30°. 56. Add the tube. STEP 2 - WA and Credits 57. WA - Create a vector circle with the Preset Shape Tool. Choose the Ellipse. 58. Font Nebulo, green, vector & anti-alias. 59. Move your cursor close to the edge of the circle, you will see the traditional cursor will change shape - tilting to the left and with a curve underneath and will be either a T or an A (older versions). 60. Text box opens in older versions and in newer, just write your text. 61. My text is Wonderful Springtime
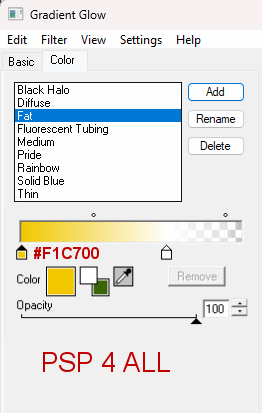
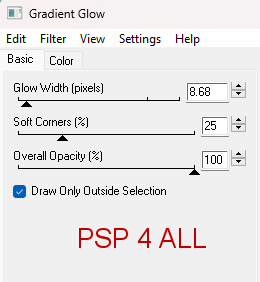
62. In the Layers palette, open the vector layer. 63. In the Layers palette 64. In the Layers palette, convert the vector layer to raster. 65. Apply Eye Candy 4000 > Gradient Glow.
66. Credits - with a small font like Pixelette or any other small font. 67. Save.
|
