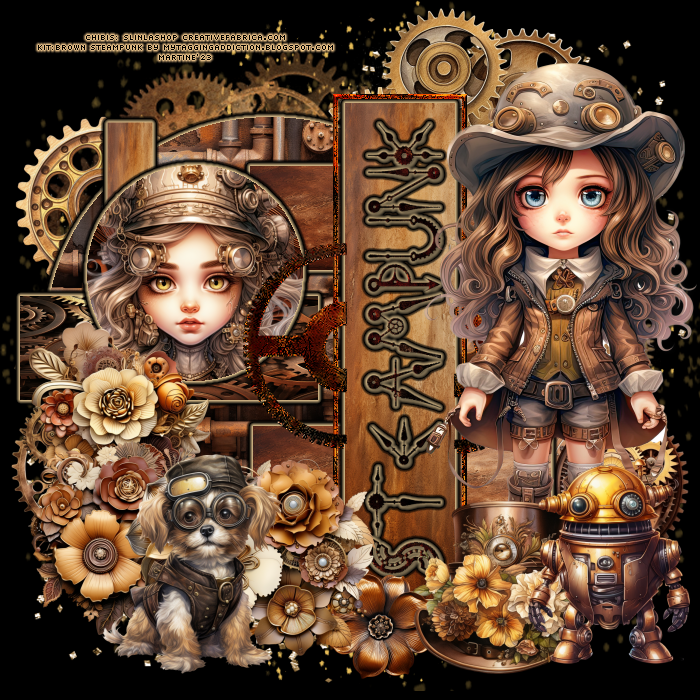
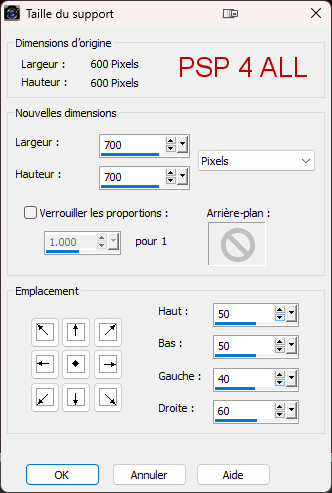
Scrapkit: Brown-Steampunk_MTA by Linda at My Tagging Addiction. Download here. Mask: by Mizteeque - Miz_Mask_198. Download here. Template: Steampunk Template 1 by Trese. Download here. Plugin: Eye Candy 4000 > Gradient Glow. Fonts: Pixelette for the credits. ****************************** Reminder: *** Method to color a layer or add a paper - To fill a layer with colour, Selections > Select All. Selections > Float > Selections > Defloat. Or click with the magic wand. Add a layer > Fill with the new colour or paper, texture. Apply plugin if needed. Selections > Select None. Delete the original layer. *** Depending on the colors & tube you are going to use, feel free to change the mode and opacity of the layers. STEP 1 - Mask, Wheels and Template 1. Open the template. Shift+D to duplicate. 2. Delete Raster 1(Crédits). 3. Image > Canvas Size. I have increased the space on the right for my tube.
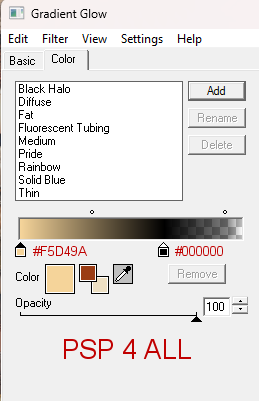
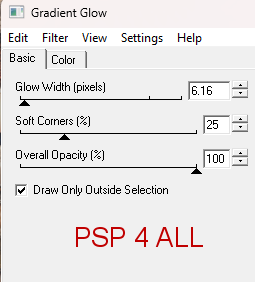
4. white background - Fill with black. 5. Add a layer and paste element_75 Into Selection. 6. Add a layer and paste element_78 Into Selection. 7. Duplicate > Renverser verticalement. 8. Add a layer and paste element_80 Into Selection. 9. Dupliquer > Mirror horizontal > Flip Vertical. 10. Add a layer and paste paper_7 Into Selection. 11. Open mask Miz_Mask_198. 12. Layers > New Mask layer > From an image and select Miz_Mask_198. 13. Click on OK. 14. Layers > Merge Group. 15. Image > Resize 120% with Resize all layers unchecked. 16. element_43 - 30%. Top, left. 17. element_45 - 30%. Right at the top, a bit on the right. 18. element_44 - 30%. Right. 19. element_46 - 30%. Left. 20. large Circle - Fill with paper_6. 21. Apply Eye Candy 4000 > Gradient Glow
22. Delete left Rect. BG. 23. Left Rectangle - Fill with paper_4. 24. Apply Eye Candy 4000 > Gradient Glow. 25. Delete right bottom Rect BG. 26. Right Bottom Rectangle - Fill with paper_2. 27. Apply Eye Candy 4000 > Gradient Glow. 28. Delete right top Rect BG. 29. Right Top Rectangle - Fill with paper_2. 30. Apply Eye Candy 4000 > Gradient Glow. 31. Delete long rectangle BG. 32. Long Rectangle Left - Fill with paper_7. 33. Apply Eye Candy 4000 > Gradient Glow. 34. Delete Circle BG. 35. Small Circle -Fill with paper_8. 36. Apply Eye Candy 4000 > Gradient Glow. 37. Add a close up of your tube. 38. Right Long Rectangle - Fill with paper_7. 39. Appy Eye Candy 4000 > Gradient Glow. 40. Word ARt - Apply Eye Candy 4000 > Gradient Glow. 41. Large Rect Frame - Don't change. STEP 2 - Tube and other elements at the bottom 42 - Add the tube on the right. 43 - element_1 - 30%. Bottom left. 44 - element_10 - 25%. Bottom and Middle. 45 - element_3 - 30%. Bottom left. 46 - element_13 - 30%. Bottom left. 47 - element_2 - 25%. En bas. 48 - element_59 - 27%. Bottom right. 49 - element_58 - 30%. Bottom right 50 - element_69 - 27%. Bottom right.
51. with a small font like Pixelette or any other small font. 52. Save. Martine 1 November 2023 If you have any questions, don't hesitate to contact me |