|
 |
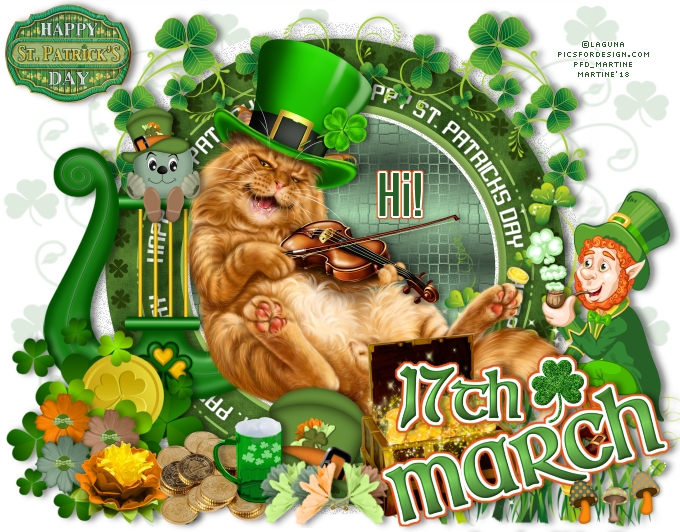
~*~ Patty's Clover ~*~
(Version française
ICI) |
|
|
 |
|
You can do pretty much what you like with your result: create signatures with
name added, extras or stats, websets. Give all the credits that are required and
for the tut to:
Martine (link to
http://chezmartine.com) for PSP 4 ALL (link to
http://psp4all.com).
This pointing hand is here to help you.
You can drag and drop it and use it as a marker to help with following the
tutorial.
Martine
 |

Tubes of your choice, free or not, but credit for them
must be added to your tag. I used a tube ©Laguna -
PicsForDesign.com, bought there.
Don't forget your license! It must be legible on your tag.
Scrapkit:
BBD Patty's Clover by Babs C at
Bitzy Beez Designs, free kit to download
here.
Template: Tag Template58_Rose by Rose at
Tag Templates And More. Download here:
Templates 51-60, link in the menu on the right.
Mask: CheriMask13 at
Graphic Groupies. Download
here. Right click and save.
Wordard: FTU St. Patrick's Day Word Art at
Escape From Reality. Download
here. Select the first one.
Polices: steelfish rg.ttf for the text and Pixelette for the credits.
STEP
1: Drop Shadow, Template, Masque and Word Art
Drop Shadow: I used this one in black
|
V = 0 |
O = 50 |
|
H = 5 |
B = 1O |
Open the template. Window > Duplicate. Close the original.
Close
these layers: 11, 13, 12 and 14.
Activate Raster 1. Add a layer and fill with #025E02.
Open the mask.
Apply CheriMask13. Layers > New Mask Layer > From
Image. OK. Layers > Merge > Merge Group
Raster 2 - Leave as it is.
Raster 4 - Selections > Select All. Selections > Floating.
Add a layer and fill with Paper 11 at 50%.
Selections > Select None. Close Raster 4.
Raster 5 - Close it.
Raster 6 - Text. I left it white.
Raster 3 - Leave as it is.
Raster 7 - Leave as it is.
Raster 8 - Leave as it is.
Raster 10 - Selections > Select All. Selections > Floating.
Add a layer and fill with Paper 7 at 50%.
Selections > Select None. Close Raster 10.
Raster 9 - Leave as it is.
STEP2: Elements and Tube
BBD_PC_CLOVERSCATTER_01 - 40%. Top left. Duplicate and Image >
Mirror > Horizontal Mirror. Copy on the right.
BBD_PC_CLOVERPATCH_01- 70%. Image > Mirror > Horizontal Mirror.
Bottom, right.
BBD_PC_Leprechaun_01 - 30%. Image > Mirror > Horizontal Mirror. Bottom,
right.
BBD_PC_HARP_01 - 50%. Left.
BBD_PC_CLOVERMAN_01 - 15%. Left, on the harp.
Add the tube, in the middle.
BBD_PC_HAT_02 - 25%. Bottom, in the middle.
BBD_PC_TREASURECHEST_01 - 30%.Bottom, on the right of the hat.
BBD_PC_CLOVERNCOIN_01 - 55%. Bottom, left.
BBD_PC_FLOWER_03 - 12%. Bottom, left.
BBD_PC_FLOWER_02 - 12%. Bottom, left.
BBD_PC_FLOWER_04 - 12%. Bottom, left.
BBD_PC_FLOWER_01 - 20%. Bottom, left.
BBD_PC_COINS_01 - 20%. Bottom, left.
BBD_PC_BEER_03 - 15%. Image > Mirror > Mirror horizontal. Bottom
left.
BBD_PC_CORSAGE_03 - 10%. Rotate left 30°. In the middle.
BBD_PC_CORSAGE_02 - 10%. Rotate left 30°. In the middle.
BBD_PC_CORSAGE_01 - 10%. Middle. Image > Mirror > Horizontal
Mirror.
Rotate right 30°. In the middle.
BBD_PC_SIGN_01 - 17%. Top right.
Word Art : 17th March - 45%. Selections > Select All. Selections >
Floating. Selections > Modify. Increase by 3 pixels. Add a layer. Fill with
white. Move this layer under. Then Selections > Modify by 2 pixels,
add a layer and fill with #DF5319. Selections > Select None.
Add these 3 mushrooms, at the bottom, on the right: BBD_PC_MUSHROOM_01
and
BBD_PC_MUSHROOM_01 - 7% and BBD_PC_MUSHROOM_06 - 5%.
STEP 3: Text and Credits
Text: Hi or text of your choice.
Use the steelfish rg.ttf font in green #276027. Add a layer, increase by 2
pixels and fill with white, then add anther layer, increase by one pixel and
fill with orange #DF5319.
Credits: use a font like Pixelette or
any font you choose..
Martine
6 March
2018
If you have any questions, don't hesitate to contact me
|
|