You can do pretty much what you like with your result: create signatures with name added, extras or stats, websets. Give all the credits that are required and for the tut to: Martine (link to http://chezmartine.com) for PSP 4 ALL (link to http://psp4all.com).
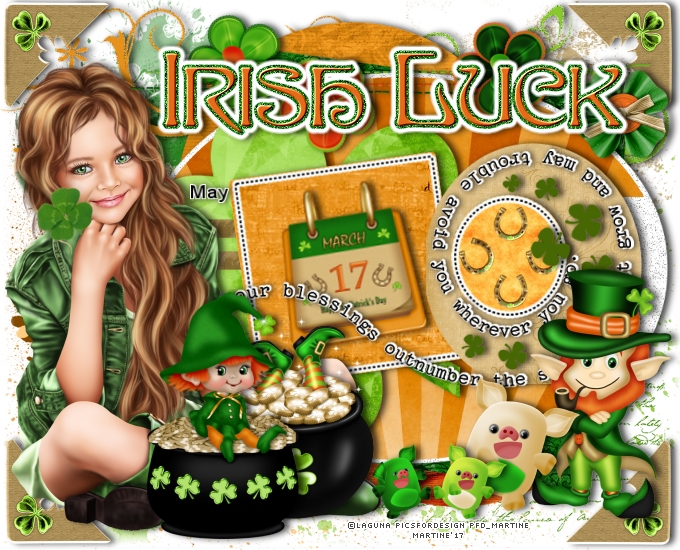
 Scrapkit: St. Patrick's Day", free kit by Lorenzen availabe on her blog Lorenzen Design PsP & Scrap. Download here. Template: Template154_St.Pattys Day Blessing by Dee of Dees'Sign Depot. Download here. Plugins: Eye Candy 4000 - Gradient Glow. Fonts: Pixelette for the credits. You can download my E-Book which will let you work without being connected. STEP 1: Template and Elements under the layers of the template Drop shadow: I used this one when necessary
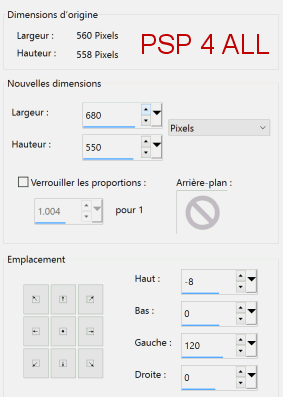
Open the template. Windows >Duplicate and close the original. Rezize 80%. The template is now 560x558. Click on Image > Canvas Size to increase the space on the left and remove a few pixels at the top.
Delete the layers at the top of the templae: font info, info, wordart black
and wordart
white bg.
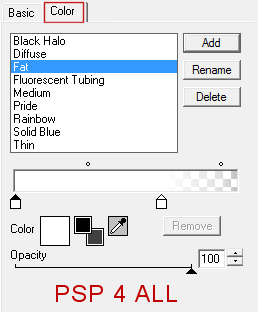
brown oval - LD_Paper 16 at 30%. yellow oval - LD_Paper5 at 30%. dotted oval - Don't change the colour but apply Eye Candy > Gradient Glow, settings as before. small clovers - Only add a drop shadow. STEP 2: Elements above the template and tube. LD_Calendar - rotate 8° left and place on yellow square (SD_paper18). LD_Doodle 3 et LD_Doodle 1 at 65%. Place them towards the bottom of all the layers on the template, right above LD_Splat 3, on the left and on the right - see my tag. LD_FlowerString - 65% then rotate 90°. Place at the top, in the middle. LD_ButtonFlower - 20%. Top, right LD_Leprechaun - 50%. On the right. LD_LuckPig - 30%. Bottom. LD_LuckPig2 - 30%. Bottom. Add the tube on the left. LD_PotOfGoldWithLegs - 35%. On the left, in front of the tube. LD_ElfPotOfGold - 55%. On the left also. LD_WA 1 - Top, and in the middle. Apply Eye Candy > Gradient Glow, same settings as before and a similar drop shadow as before but change the horizontal from 5 to 2. Same drop shadow with 2 for the horizontal for the wordart black of the template. STEP 3: Credits Credits: with a pixel font like Pixelette or any other pixel font. Save your work. Martine 2 March 2017 If you have any questions, don't hesitate to contact me |