You can do pretty much what you like with your result: create signatures with name added, extras or stats, websets.
 Tube of your choice, free or not, but in either case, credit must be given on
the tag. I used a tube ©Gorjuss -
www.gorjussart.com..
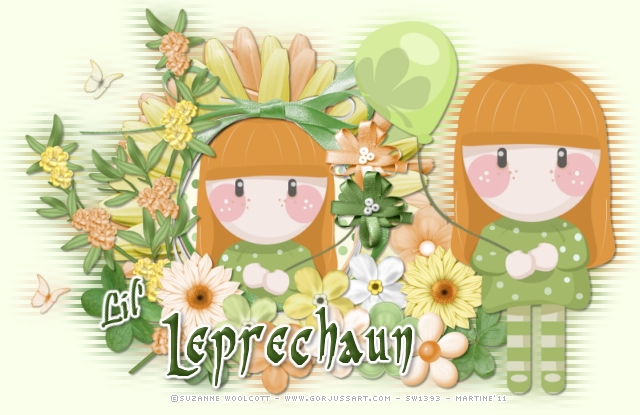
Fonts: Pristina, Pr Celtic Narrow et Pixelette pour les crédits.You can download my E-Book which will let you work without being connected. STEP 1 Open a new transparent image 800x500. Add a layer and fill with #FAFFEB, colour I use for the results page. STEP 2: Elements and tube ssam_POG_FlowerFrame: Add this flower frame as a new layer. Duplicate this layer. Colorize in orange #DE9743 or one of your tube colours. Adjust > Hue and Saturation > Colorize Hue: 22 and Saturation: 179. Move this new layer under the other one and apply a free rotation - Image > Free rotation to the right of 10°. Activate the top frame layer and click inside with the magic wand. Selections > Modify > Increase by 10 pixels. Copy paste Paper 8. Selections > Invert > Delete. Move this paper layer under the two frames. Resize the top part of your tube and add as a new layer. Hit Delete to get rid of the parts outside the frame. Selections > Select None. Activate the top frame layer. ssam_POG_Ribbon3 : Image > Mirror and paste as a new layer. ssam_POG_Flowers1: Position on the left. I colorized some of the flowers. Click on Zoom In More and using the lasso tool - Point to Point, go right around the flower, left clicking every so often and right clicking at the end. Use the same Hue and Saturation as before. ssam_POG_luckyclover3 and ssam_POG_luckyclover8: resized to 45%. Position at the bottom on the right and left of the frames and ribbon. Flowers: As many as you like. Resize them to 45%. And colorize some of them, same Hue and Saturation as before. ssam_POG_RibbonBow1 and ssam_POG_RibbonBow2: resized to 45% and placed on the right. I colorized Ribbon2 in orange, same Hue and Saturation as before. ssam_POG_Butterfly1: resize to 30% and placed on the left. Duplicate. Colorize this layer in orange and move slightly below. Add your tube. I selected and deleted the bit of ssam_POG_Ribbon3 that you could see behind the head. STEP 3: Resize all layers to 80% STEP 4: Effet Transmission Close the background layer and merge visible all the other layers. Increase your canvas size - Image > Canvs size, to 640x415. Image > Duplicate this layer. Activate the bottom layer and apply a Gaussian Blur. Adjust > Blur > Gaussian Blur of 10. Then apply VM Extravaganza > Transmission.
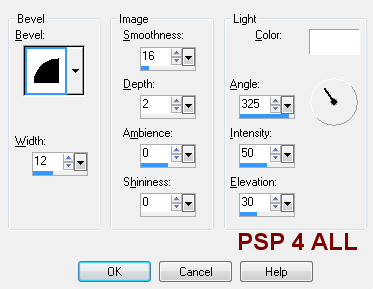
Activate the top layer. STEP 5 - Text Lil' Leprechaun or to your choice. Lil': Font Pristina, size 32. Bold. In green #365417. Apply an Inner Bevel
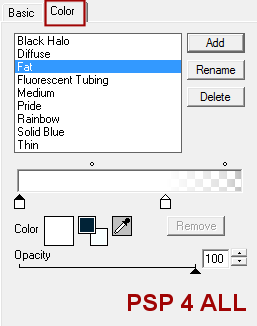
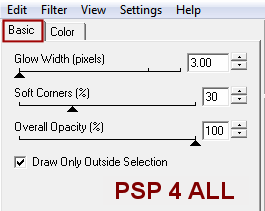
and a Gradient Glow. Effects > Eye Candy 4000 > Gradient Glow
Image > Free rotation left 8°. Leprechaun: Font Pr Celtic Narrow in size 54. Bold. In green #365417. Apply the same Inner Bevel. Then drop shadow on both words.
STEP 6: Credits Choose a small font, like Pixelette, in size 6, antialias off. STEP 7: Save Save as an optimized jpg or png for better colours. Martine 10 February 2011 If you have any questions, don't hesitate to contact me |