|
|
(Version française ICI) |
|
|
|
|
|
|
|
You can do pretty much what you like with your result: create signatures with name added, extras or stats, websets.
|
Martine |

Template is by Sunf of Urban Fairy Tales. but we will draw it so we can have the different elements on different layers.
Scrapkit: BD-Irish Charm by Bluey of Blue Dream Designs at http://www.bluedreamdesigns.co.uk/
Mask: one of Weescotlass: Mask 84
Fonts: Cygnet Round for the text; Pixelette for your credits and PC Shamrock Dark for the name or a font of your choice.
You can download my E-Book which will let you work without being connected.
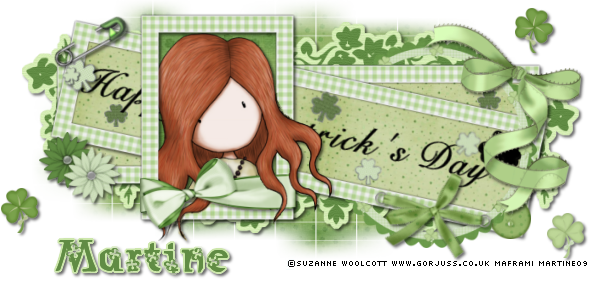
STEP 1
Rectangle: Open an image 700X350 - Fill with white. And that's the colour on the Results page.
New layer and Selection Tool > Rectangle and draw a rectangle 565x140. Use the coordinates at the bottom of the working area:
|
|
Fill with your fill tool filled with BD-Irish Charm-Paper 8 - scale set at 50. Then Selections > Modify > Contract by about 20 pixels and click on Delete.
Click on this layer and duplicate. Move back onto the original layer.
Click on Colours or Adjust > Hue and Saturation > Hue/Saturation>Lightness and set all at -100. The frame is now black. Click on Effects ou Adjust > Blur > Gaussian blur of 1.
Close the white background and merge visible the two rectangular layers and rename Rectangle.
STEP 2
. Rectangle 1: Click inside the rectangle with the magic wand and Selections > Modify > Expand by 6 pixels and new layer > fill the selection with one of the papers. I used BD-Irish Charm-Paper 7, keep the scale at 50.
Move this layer under the Rectangle.
Merge visible the two layers and rename Rectangle 1.
Add a drop shadow:
V & H = 2;
O = 60; B = 4
STEP 3
Rectangle 2: Duplicate the Rectangle layer. Then Image > Free Rotate > select Right and enter 12. Rename Rectangle 2.
Add the same drop shadow.
STEP 4
Vertical Frame with Tube: New layer and with your selection tool draw a rectangle 180x241. Use the coordiantes at the bottom of the working area:
|
|
Fill with the Fill tool filled with BD-Irish Charm-Paper 8 - scale at 50. Then Selections > Modify > Contract by about 20 pixels and click on Delete.
Click on this layer and duplicate; then move back onto the original layer.
Click on Colours or Adjust > Hue and Saturation > Hue/Saturation>Lightness and set all at -100. The frame is now black. Click on Effects ou Adjust > Blur > Gaussian blur of 1.
Close all layers and merge visible these two new frames and rename Vertical Frame.
Click inside the vertical frame with your magic wand and Selections > Modify > Expand by 6 pixels and new layer > fill the selection with one of the papers. I used BD-Irish Charm-Paper1.
Keep the selection and add your tube. Then click on Selections > Invert > Delete.
Close all layers except the Vertical Frame and the
two new layers: paper and tube.
Merge visible and rename Vertical Frame with Tube.
Add the same drop shadow.
STEP 5
Happy St Patrick's Day Text:
Activate the Rectangle 2 layer then click on the
Text tool. I used the Cygnet round font- vectorial; bold; #000000. Then Image >
Free Rotate > select Right and enter 12. Adjust if necessay and then convert
into a Raster layer.
STEP 6
Mask and Tagback 2: Activate the white background at the bottom and add a
layer. Fill with BD-Irish Charm-Paper 1 and apply the WSL 84 mask. Masks > New >
From image - OK. Then Masks > Delete. In PSP 8 and above, it's under Layers > New
Mask Layer > From Image. OK then Delete.
BD-Irish
Charm-TagBack2 and paste as a new layer - then duplicate this layer and
Image > Flip. Use the mover tool to position these two layers so they show on
all sides of under Rectangle 1.
Ad the same drop shadow.
STEP 7
Elements: BD-Irish
Charm-Frame 4 -
resized to 40%. Place it on Rectangle 2
and with the lasso tool remove a bit on the left to give the impression that
it's going under Rectangle 1, to give the impression that it's going around the
2 rectangles.
BD-Irish
Charm-LargeBow 3 -
resized to 50%- and place on the
right.
BD-Irish
Charm-Safety Pin 1 -
resized to 55%.
Then Image > Free Rotate > choose Left and enter 30 and position on the
left on Rectangle 2.
BD-Irish
Charm-flowers 1 & 5 - resized to 20%.
BD-Irish
Charm-Shamrocks 1 & 2 - resized to 15%
BD-Irish
Charm-Button 8 -
resized to 20%
BD-Irish
Charm-RibbonBow 3 - resized to 30%
Add
the same drop shadow to all your elements.
STEP 8
Resize to 85% before adding
Text/ Name and Credits. Do not leave your
tag blank.
Add your name with the PC Shamrock Dark font or one of your choice - colour #5F8A42
with antialias checked.
Then Selections
> Modify > Expand by 2 pixels and fill with #D8F0B6. Move this frame under
your name and apply a drop shadow.
Add the necessary credits with the Pixelette font, size 6 with antialias
unchecked.
Save and export using the JPEG optimiser with a white background
for the group's results page.
Martine
3 March 2009
If you have any questions, don't hesitate to contact me