You can do pretty much what you like with your result: create signatures with name added, extras or stats, websets.
 One tube of your choice, free or not, but in either case, credit must
be given on the tag. I used a tube ©Lia -
www.linmida.com.
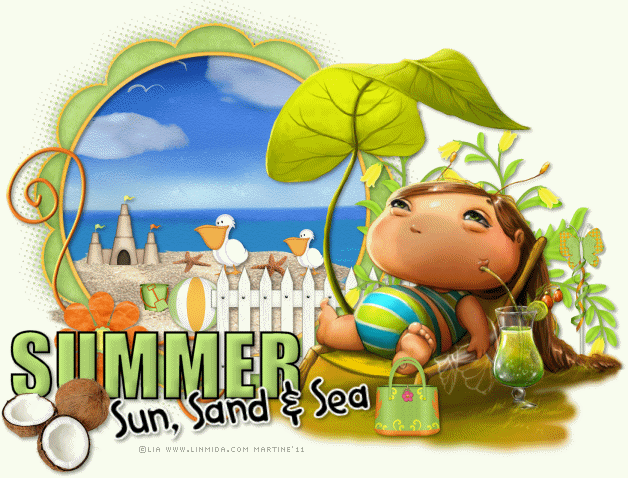
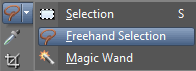
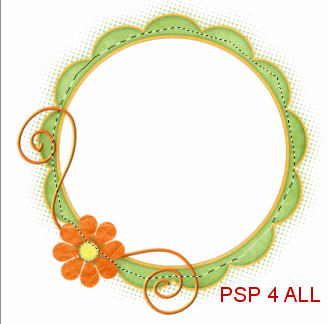
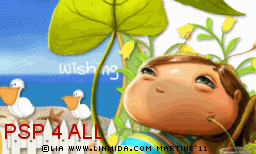
Fonts: Pixelette for the credits; Impact, Veggie et Handwriting.You can download my E-Book which will let you work without being connected. STEP 1 Open a new transparent image 650x500. Add a layer and fill with white. STEP 2: Elements and tube Add the frame element 28, resized to 75%. Place towards the left. Use the Freehand Selection tool, Point to point, and click on the frame border to draw a circular selection. Start at the top with a left click on your mouse, and move along, clicking regularly on the left of your mouse while following the circle of the frame until you have gone right round. Then right click to close the circle. Your circular selection must be a bit bigger than the inside of the frame.
Add paper 16, resized to 50% and then click on Selections > Invert > Delete. Keep selected. Add the sand element - element 7 at 80% . Delete. Selections > Select None. Apply a drop shadow on the frame:
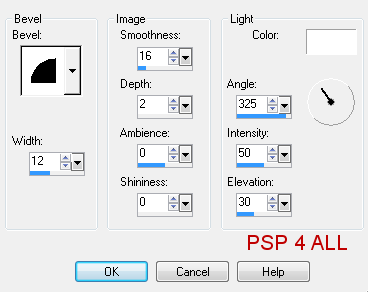
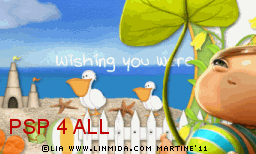
Use this same drop shadow on all the elements. Elements to add within the frame: Add the castle - Castle 23 at 20%. Ball - element 19 at 20%. Bucket and spade - element 46 at 10%. Starfish - element 45 at 30%. Mine are on 2 layers so I could place them where I wanted. Pelican - element 42. One at 20% and the other at 15%. Elements outside the frame: Fence - element 49 at 70%, on the right. Element 47. One at 50% and the other at 55%, below the fence layer. Element 54, butterfly, at 30% on the right. Add your tube on the right. Bag - element 31, at 25%. Coconut - element 11 at 40% on the left. Do not forget to add a drop shadow on your elements and tube. STEP 3: Text Summer: in capital letters, with Impact or a font of your choice, in size 62. Black for the foreground and Stroke colour and green #AFD36F taken from the frame for the background and fill. Apply a 3D Effects > Inner Bevel
And the same drop shadow. Sun, Sand & Sea: the font is Veggie in size 40 and in black; create as vector. Apply Eye Candy 4000 > Gradient Glow :
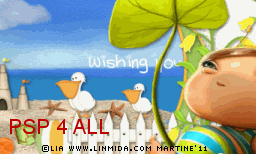
Rotate slightly to the left as in my tag above. Layers > Convert to raster layer. Add the same drop shadow. STEP 4: Credits Credits: Choose a small pixel font like Pixelette in size 6, anti-alias off. STEP 5: Text for the animation I chose Wishing you were here - with the Handwriting font, in size 16. Add as a new layer above paper16, which is the background inside the frame and beloww all the elements in the frame. Duplicate this layer so you have 7 in all. Close the 6 copies and keep the original, the first one open. Click on View > Grid and move the text along towards the right so only Wishing is inside the frame. Use the grid to keep the text on the same straight line. Delete the other words.
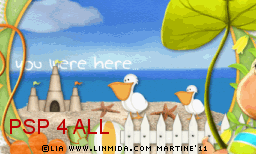
Name this layer Text1. Close it and open the second layer with the text in full. This time move the text so you only have the first 2 words showing inside the frame: Wishing you, on the right. Delete the other words.
Name this layer Text2. Close it and open the third layer with the text in full. This time you only keep Wishing you were, still on the right and delete the rest.
Name this layer Text3. Close it and open the fourth layer with the text in full. This time keep the whole text Wishing you were here... And place in the middle.
Name this layer Text4. Close it and opent the fifth layer with all the words. This time you keep you were here..., move it to the left and delete the word Wishing.
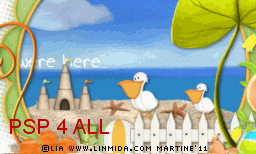
Name this layer Text5. Close it and opent the sixth layer with the text in full. This time only keep were here, move the two words towards the left and delete the rest Wishing you.
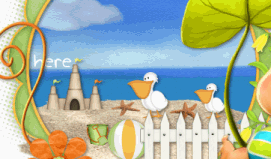
Name this layer Text6. Close it and open the seventh layer with the text in full. This time only keep here..., move it to the left and delete the rest Wishing you were.
Name this layer Text7. Close it. STEP 6: Animation FeClose all layers above the 7 layers of the text animation. Close the white background at the bottom. Merge visible all the other layers. Name this merged layer Ani1. Close this layer. Open all the layers above the seven layers of the text animation. Merge visible and name Ani2. STEP 7: Animation in Animation Shop Still in PSP, make sure that all layers axcept these 2 layers Ani1 and Ani2 are closed. Merge visible these two open layers: Ani1 and Ani2. Copy paste in Animation Shop. Back in PSP. Clck on Undo. Open Text1. There are now 3 layers which are open: Ani1 and Texte1 and Ani2. Merge visible these three open layers and copy paste in Animation Shop. There are now 2 frames in your new animation in AS. Back in PSP. Clck on Undo. Close Text1 and open Text2. Merge visible the three open layers: Ani1 and Texte2 and Ani2 . Copy paste in Animation Shop after the active frame. There are now 3 frames in your animation. Back in PSP. And repeat the same steps for each layer of the text animation. There should be 8 frames in your animation in AS. Edit > Select All. Right click on the first frame > Frame Properties and enter 55 for the speed. Click again on the first frame, the frame without the text Wishing you were here... and enter 250. Click on View and check the animation and see if the overall speed suits you. If it does not, change it. Click on Animation > Animation Properties > Canvas color - choose opaque and white. The background stays white when you do it this way. File > Save As. Martine 14 June 2011 If you have any questions, don't hesitate to contact me |