|
|
(Version française ICI) |
|
|
|
|
|
|
|
You can do pretty much what you like with your result: create signatures with name added, extras or stats, websets.
|
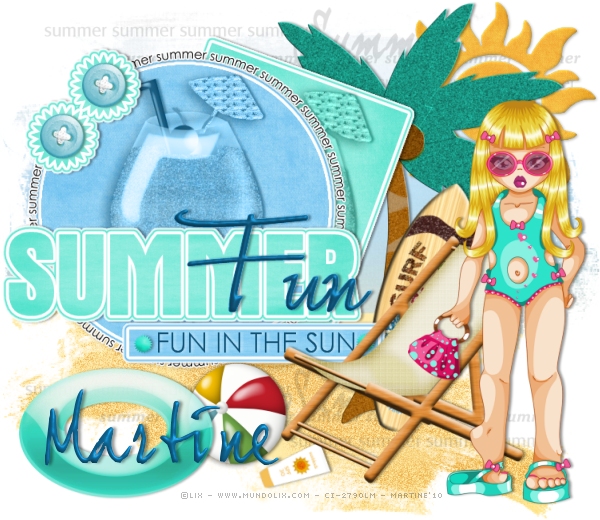
Martine |

Template: Template CM Challenge 03 by Daira at Loving Miranda Creationz.
Scrapkit: Summer Vacations at Jaelop Designs.
Mask: 544InsatiableDreams at Insatiable Dreams.
Plugins: Eye Candy 4000 - Gradient Glow
Fonts: JoeHand2 for the name and Pixelette for the credits.
You can download my E-Book which will let you work without being connected.
STEP 1
Open the template and duplicate. Close the original. Delete the Watermark layer. The template is 566x403. Click on Image > Canvas size and increase. New Dimensions are 750x650 with these numbers under Image Placement:
|
|

STEP 2: Mask
Masque : Add a layer and fill with JD paper 16. Apply the 544Insatiable Dreams mask. Masks > New > From image - OK. Then Masks > Delete. In PSP 8 and above, it's under Layers > New Mask Layer > From Image. OK then Delete.
With the lasso tool Freehand Selection, select the area at the bottom of the mask layer, where the colour is sort of beige and change the colour to yellow to mzke it more a sandy colour: Adjust > Hue and Saturation > Colorize
Hue: 33 and Saturation: 253
Let's make the sand grains. Selections > Select All > Selections > Float > Selections > Defloat. Pick up the Airbrush tool and set the colour to E69728.
|
|
Then spray where the colour is yellow to create the grains.
ETAPE 3: Soleil - Sun
Move to position above the mask layer, top right. Selections > Select All > Selections > Float > Selections > Defloat and add a layer. Fill with JD paper 5. Apply an Inner Bevel
|
|

STEP 4: Rectangle
Selections > Select All > Selections > Float > Selections > Defloat and add a layer. Fill with JD paper 8 - I colorized it to match one' of the colours of my tube (Hue=121; Saturation=201). Select None and close the original layer.
Apply an Eye Candy 4000 Gradient Glow:
|
|
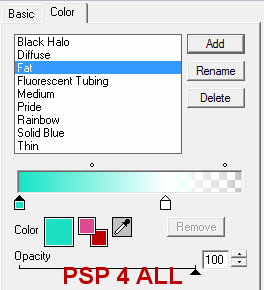
Repeat this gradient Glow but change the first colour - I matched the colour to the paper I used:
|
|
STEP 5: Circle
Selections > Select All > Selections > Float > Selections > Defloat and add a layer. Fill with JD paper 8.
Select None and close the original layer.
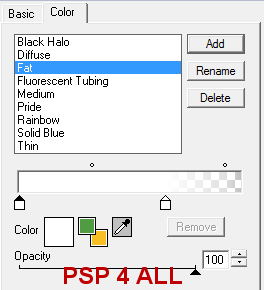
Apply the same gradient first Gradient Glow: click on Fat (white) and apply. Then re-apply a second time, but change the first colour to match your paper. I used blue #2DA2E5.
STEP 6: Shapes
Repeat what you did in Step 3 for the rectangle. Do not forget to apply the 2 Gradient Glow.
Add one of the button element - JD element 32, resized to 20%, on each of the "shape".
STEP 7: Wordart Summer Fun
Summer: Selections > Select All > Selections > Float > Selections > Defloat and add a layer. Fill with JD paper 8 and colorized green as in Step 3 or in the colour you are using.
Select None and close the original layer.
Apply the same gradient first Gradient Glow: click on Fat (white) and apply. Then re-aply a second time, exactly as you did in Step 3.
Fun: Selections > Select All > Selections > Float > Selections > Defloat and add a layer. Fill with blue #0C4D72 and apply an Inner Bevel.
|
|

Select None and close the original layerl.
STEP 8: Smaller Rectangle and Wordart Fun In The Sun
Smaller Rectangle: Repeat Step 4, use the same paper and apply the same 2 Gradient Glow.
Text - Fun In The Sun: Selections > Select All > Selections > Float > Selections > Defloat and add a layer. Fill with blue #0C4D72.
Small Shapes: Selections > Select All > Selections > Float > Selections > Defloat and add a layer. Fill with JD paper 8 colorized green (Hue=121; Saturation=201) as in Step 3 or in the colour you are using and apply the same Inner Bevel.
STEP 9: Other embellishments
Coconut Tree - JD element 15 - 35% - Select the top part, the fronds and colorize in the same colour used for the rectangle. I used green: Hue=121; Saturation=201).
Swimming Ring - JD element 53 - 20%.
Lounger - JD element 14 - 30%.
Surf Board - JD element 50 - 28% then click on Image > free rotation on the right 15°.
Sun cream - JD element 6 - 10% - Image > free rotation on the right 70°.
Balloon - JD element 11 - 18%.
Glass - JD element 4 - 40% - Add on top of the Circle layer and change the Blend mode to Luminance.
Duplicate this layer and add above the rectangle layer. Then click on Image > free rotation on the right 10°.
Wordart Summer - JD element 79 - 30% - place above the mask layer, towards the top. Lower the opacity to 12. Duplicate and position this new layer towards the bottom. See my tag.
Text Summer in a circle - JD element 80 - 21% - Add on top of the Circle layer.
STEP 10: Main Tube
Add on the right.
STEP 11: Drop Shadow
Colour=#000000 on all the layers and embellishments, except for the Fun In The Sun text, use #FFFFFF.
|
V = 0 |
O = 40 |
|
H = 3 |
B = 4 |
STEP 12: Enregistrement
Save one last time with all layers open. Then merge visible except the background layer and copy paste as a new image. It will get rid of the excess empty space around your tag.
Resize if wished. My result is 80% of the original.
STEP 13: Credits and Name
Choose a small font like Pixelette in size 6 for the copyright, anti-alias off.
For the name, I used JoeHand2, and then applied the same inner bevel and the same drop shadow.
STEP 14: Saving
Export using the JPG optimizer - use the wizard and choose better image quality - on a white background for my page for the group results.
Martine
7 July 2010
If you have any questions, don't hesitate to contact me