You can do pretty much what you like with your result: create signatures with name added, extras or stats, websets.
 Tube of your choice, free or not, but in either case, credit must be given on
the tag. I used a tube ©Barachan -
www.barachan.com.
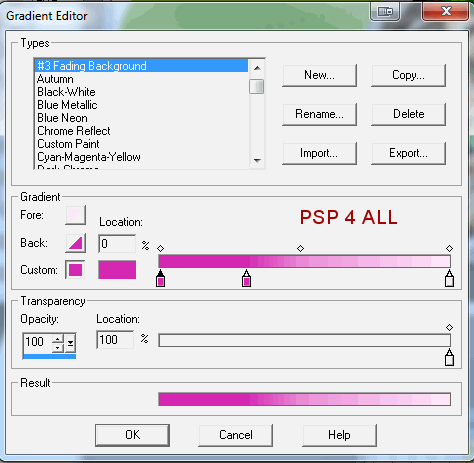
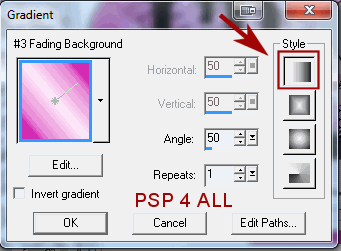
Fonts: Visitor TT2 BRK and Pixelette for the credits.You can download my E-Book which will let you work without being connected. STEP 1 Open the template Today N Everyday (Valentine's Day Set III) - Duplicate and close the original. Delete the credit layer. Resize all layers to 90%. STEP 2 Le fond : Remplir avec #FFEBFB. Poem: I used the poem in the template A Kiss For A Rose - you can use your own. Resize to 77%. Adjust > Sharpen > Sharpen. Position above the background layer, on the right. Lower the opacity to around 40. I moved about the first few lines by selecting them and then pasting them where I wanted. Ellipse: Selections > Select All > Selections > Float > Selections > Defloat. Add a layer and fill with a gradient #D428B2 and #FFEBFB.
Duplicate this layer. On the first layer, apply Tramages > Tow The Line
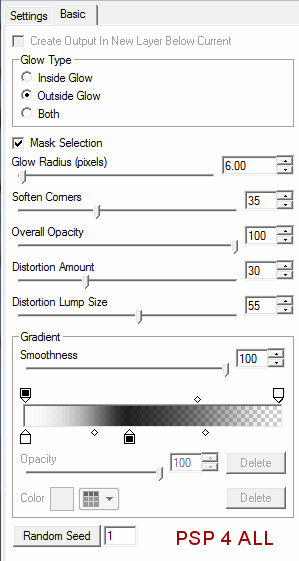
And on the second layer Filters Unlimited - Video > Interlace. Check Odd Scanlines and Include Alpha Channel. Select None. Delete the original laye. Close all layers except those two new ones and merge them visible. Apply Eye Candy 5 - Impact > Gradient Glow
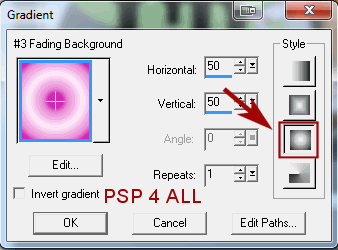
Open all the layers. Black Circle: Selections > Select All > Selections > Float > Selections > Defloat. Add a layer and fill with the same gradient. Apply Mura's Meister > Tone. Click on Reset. And the same Gradient Glow. Select None. Delete the original layer. Strip: Selections > Select All > Selections > Float > Selections > Defloat. Add a layer and fill with #000000. Apply the same Gradient Glow. Select None. Delete the original layer. V-Day: I added a new layer and type the text again so it was clearer. Remember we resized earlier. I used Visitor TT2 BRK, colour #D428B2 in size 12, antialias off. Delete the original text. Heart: Selections > Select All > Selections > Float > Selections > Defloat. Add a layer and fill with this new gradient. Same colours but click on a different style
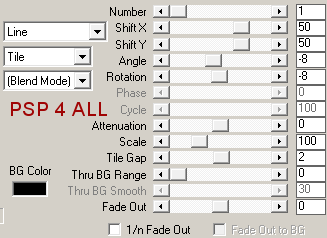
Text: Click on the text tool, colour black, Vector, size 10 and font Visitor TT2 BRK. Then click on Objects and choose Align > Center in canvas. Then click on Layer > Convert to raster Layer. Apply Mura Meister > Copies. Preset Menu bottom left - choose Tiling. Use the default settings except for Shift X et Shift Y, enter 50 and for Tile Gap, replace 0 by 2.
Paste as a new layer. Selections > Invert and Delete. Select None. Delete the original layer. Apply the same Gradient Glow. Circle: Selections > Select All > Selections > Float > Selections > Defloat. Add a layer and fill with the gradient used for filling the heart. Apply Xero > Fritillary.
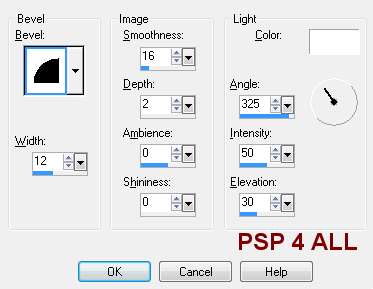
Select None. Apply the same Gradient Glow. Delete the original layer. Grey Circle Inner Frame: Selections > Select All > Selections > Float > Selections > Defloat. Add a layer and fill with the gradient used for filling the heart. Apply an inner bevel
Select None Apply the same Gradient Glow. Delete the original layer. Tube : Resize if needed and copy paste as a new layer. Add a drop shadow.
Text 'I Love you today': Selections > Select All > Selections > Float > Selections > Defloat. Add a layer and fill with the gradient used for filling the heart. Apply Eye Candy 5 - Impact > Extrude. Click on Factory Default then choose Centered, Small Taper and OK. Select None. Delete the original layer. Text 'And everyday...' : Apply Eye Candy 5 - Impact > Extrude. Click on Factory Default then choose Centered, Small Taper. Click on Basic > Selectionner Solid colour and enter #D428B2. Word Art - U R Mine: Use the lasso tool to select the word Mine. Copy paste as a new layer, exactly above then delete the original Mine. U R : Appliquer Eye Candy 5 - Impact > Extrude. Same settings used for And everyday... Mine: Selections > Select All > Selections > Float > Selections > Defloat. Fill with the gradient used for filling the heart. Apply Eye Candy 5 - Impact > Extrude. Click on Factory Default then choose Centered, Small Taper and OK. Select None. STEP 3: Credits Choose a small font, like Pixelette, in size 6, antialias off. STEP 4: Save Save as an optimized jpg or png for better colours, with this background #FFEBFB. Martine 10 February 2011 If you have any questions, don't hesitate to contact me |