You can do pretty much what you like with your result: create signatures with name added, extras or stats, websets. Give all the credits that are required and for the tut to: Martine (link to http://chezmartine.com) for PSP 4 ALL (link to http://psp4all.com).
 Scrapkit: LOVE, kit by Becky available on her blog Simple Expressions. Download here. Template: SE_Template22, on Becky's blog Simple Expressions. Download here. Mask: Mask36, mask by Moonbeams and Spiderwebs. Download here. Plugins: Eye Candy 4000 - Gradient Glow. Fonts: Pixelette for the credits. You can download my E-Book which will let you work without being connected. STEP 1: Template, Mask and Tube Drop Shadow: I used this drop shadow when it was necssary
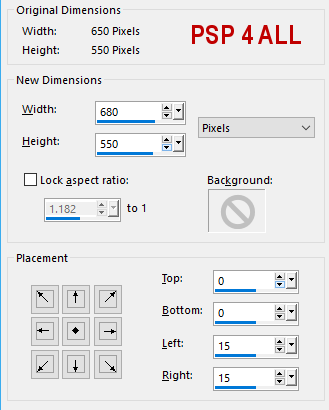
Open the template. Make a copy and close the original. Resize to have an image 680x550. Click on Image > Canvas Size
Delete the credit layer right at the top.
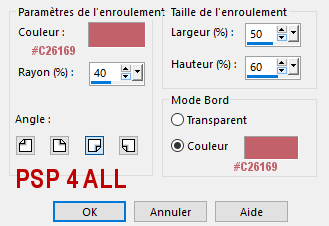
Image Effects > Page Curl
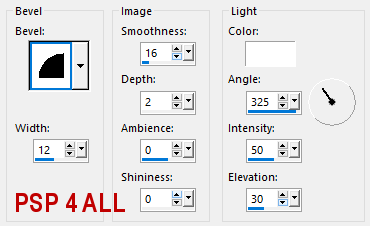
lace trim. Add a Drop Shadow. Delete the following layers: shadow, circle2; shadow, circle1. Click on the flower shape layer. Selections > Select All. Selections > Float. Selections > Defloat. Add a layer and fill with #c26169. Then apply an Inner Bevel. Effects > 3D Effects > Inner Bevel
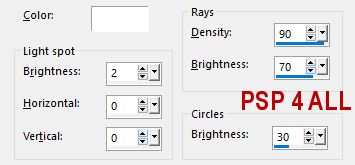
Selections > Select None. Delete the original layer. Add a Drop Shadow. Repeat for the heart shape layer. Move these 2 elements towards the left. Layer Love. Selections > Select All. Selections > Float. Selections > Defloat. Ajouter un calque. Add a layer and fill with #c26169. Then apply an Inner Bevel. Effects > 3D Effects > Inner Bevel as before. Delete the original layer. ETAPE 2: Elements 7flower - Image > Mirror > Mirror Horizont. Place on the left. Duplicate, this copy at 75%. Apply Eye Candy 4000 > Gradient Glow on both flowers.
Then apply a Drop Shadow. 8flower swag - bottom. Drop Shadow. 5clock - 50%. Bottom left. Same Drop Shadow. bow1 - Drop Shadow. Bottom and in the middle of the element 8flower swag. 9butterfly - 50%. Then rotate left 45°. Place on the right. 4heart shape - 50%. Adjust > Huen and Saturation. Colorize. Hue: 252 and Saturation: 255. Duplicate the layer and Image > Mirror > Mirror Horizontal. Image > Free Rotate > Right. 45°. Drop Shadow on both hearts. With the Magic Wand, select the inside of both hearts. Select > Modify > Expand 5 pixels. Select paper1 and resize it at 50%. Copy paste as a new layer. Selections > Invert. Click on the Delete key on your computer. Place this layer in between the 2 hearts layers. Layers > Merge > Merge Down . And again Layers > Merge > Merge Down. STEP 3: Credits Credits: with the Pixelette font or any other small pixel font. Save your work. Martine 7 February 2017 If you have any questions, don't hesitate to contact me |
