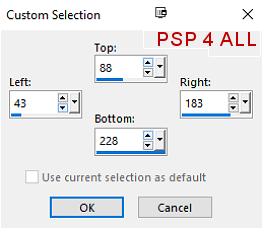
 An Autumn background of your choice. Masks: Narah's masks _1151-1175 - download here. Plugins: Mehdi Wavy Lab 1.1; Mura Meister : Copies; penta.com - color dot; Unplugged Tools - Interlace; Eye Candy 4000. Font: Candle Mustard for the text; Pixelette for the credits. I used this Drop Shadow H 2, V 2, O 45, F 5. STEP 1 Open an image 851x315. Selections > Select All. Activate your Autumn background. Edit > Copy then back to your work and Edit > Paste Into Selection. Selections > Select None. STEP 2 Add a layer and fill with #FDC87B. Layers > New Mask Layer > From Image and choose Narah_Mask_1159. Click on OK. Layers > Merge Group. Duplicate this layer. STEP 3 Add a layer. Click on the Selection Tool
Custom Selection window opens - add the following numbers
Fill with black. Then Selections > Contract by 5 and click on Delete - name this layer Black Frame.
Add a layer. Selections > Modify > Expand by 3 pixels. Apply Mehdi Wavy Lab 1.1 with these colours #FCC16C; #BD1B0E; #EABC1A et #BD1B0E.
Move this layer under the Black Frame. Add your tube. Selections > Invert. Click on Delete. Layers > Properties > Blend Mode on Luminance. Selections > Select None. Apply penta.com > color dot. Activate the Black Frame and click on Layers > Merge > Merge Down. Then repeat Layers > Merge > Merge Down. STEP 4 Apply Mura Meister > Copies.
STEP 5 Add a layer. Click on the Selection Tool . Then on Custom Selection.
Fill the selection with black. Selections > Select None. Name this layer Black Bar.
STEP 6 Add a layer. Click on the Selection Tool. Then on Custom Selection.
Click on your Background layer (your Autumn image) at the bottom of the pile. Promote Selection to Layer. Move this layer under the Black Bar from STEP 5. Apply Unplugged Tools > Interlace, default settings. Selections > Select None.
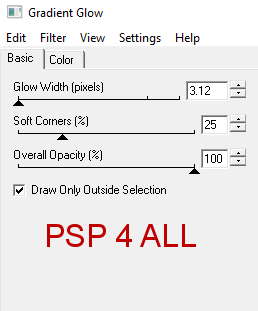
Activate the top layer (Black Bar) then Layers > Merge > Merge Down. Duplicate. Image > Mirror > Mirror Vertical. STEP 7 Add your tube on the right. Apply a Drop Shadow: 6, 6, 70, 8. STEP 8 Sélections > Sélectionner tout. Ajouter un calque et rempir avec #000000. Sélections > Modifier > Contracter de 6 pixels. Cliquer sur Suppr. Ajouter un calque et remplir avec #FCC373. Sélections > Modifier > Contracter de 5 pixels. Cliquer sur Suppr. Sélections > Ne rien sélectionner. STEP 9 Credits: with a pixel font like Pixelette. Colour: #FCDAA3. Apply Eye Candy > Gradient Glow
Text of your choice or your name with the font Candle Mustard. Colour: #FCDAA3. Apply Eye Candy > Gradient Glow, as before. Save your work. Martine 18 September 2019 If you have any questions, don't hesitate to contact me |


