Unzip the preset. To import it in Alien SKin Eye Candy 5: Double click on the preset and it will install itsef in Settings in Alien Skin Eye Candy 5. STEP 1 Colours:
Open the template. Duplicate. Close the original. On the copy, close the following layer: Credits. Merge visible all the layers with "line"in the name. There are 10. Renname this merged layer Lines. Move it under the Circle layer. Click on the Background layer. Apply Wavy Lab 1.1
Apply Mehdi > Sorting Tiles
Duplicate. Copy at 50% opacity. Image > Mirror > Mirror horizontal. Layers > Merge down. Effects > Edge Effects > Enhance. Apply Italian Editors > Fantasma
Then Filters Unlimited > FunHouse > Loom
Repeat Loom plugin. Apply L & K landksiteofwonders : Katarina
STEP 2 - Mask with #FFFFFF. Layers > New Mask Layer > From Image and choose Narah_Mask_1474. Click on OK. Layers > Merge Group. STEP - Lines and Circle Click on the Color Replacer Tool. #AE60AD is the foreground colour and #808080, the background colour. Change the colour of all the lines, those you have merged at the beginning. Then apply Eye Candy 5 > Impact > Glass. Click on Settings > Under User Settings, at the bottom, choose the preset PSP4ALL_MF_ITT_Glass_mf20. And then OK. Or enter these coordinates.
Selections > Select All. Selections > Float. Selections > Defloat. Add a layer and left click to fill with the foreground colour #AE60AD. Selections > Select None. Delete the black circle. Apply Carolaine & Sensibility : CS-LDots
Click on the Inner white border layer and then with your magic wand, click inside. Add your tube - the close-up. Click on sur Selections > Invert and then Delete. Selections > Select None. Opacity of the tube on 77 and Blend mode on Luminance. STEP 4 - Tube and Text Add your tube. Drop Shadow: -2 5 40 5. Text: add a layer. Click on the Selection Tool
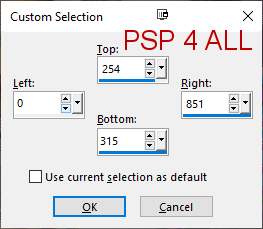
The Custom Selection window opens - add these settings
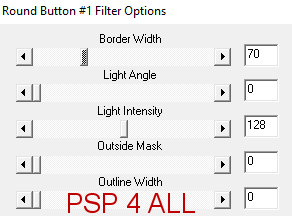
Fill with #FFFFFF. Set the opacity on 50. Add the text of your choice or mine, on a different layer. Font: Trébuchet MS, Color: #AE60AD. Apply Eye Candy > Gradient Glow - Thin in blanc. Add 2 buttons, one on the left and one on the right: Add a layer, then with your Selection tool, draw a square 15 x15. Fill with #AE60AD. Apply BorderMania > Round Button #1.
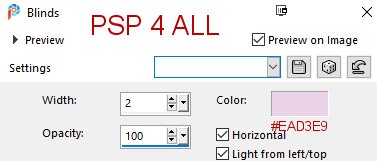
Apply the same Eye Candy 5 > Glass. Duplicate > Image > Mirror > Mirror horizontal. STEP 5 - Border and Credits Add a layer and fill with #AE60AD. Selections > Modify > Contract 10 pixels. Click on Delete. Selections > Select None. Apply Texture Effects > Blinds
Add a Drop Shadow: 1 1 100 5 and repeat -1 -1 100 5
- colour #AE60AD. |