STEP 1 Open an image 650x300. I used colours from my tube: #3E5D7F in Foreground and #BACADE in Background.
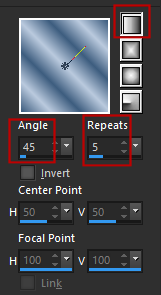
Fill with a gradient of your 2 colours - Angle at 45į and Repeat on 5.
Effects > Defined Filter > Mehdi > Sorting Tiles
Effects > Defined Filter > Filters Unlimited &<Bkg Designer sf10I > ALFs Border Mirror Bevel
Effects > Defined Filter > L en K landksiteofwonders > L en K's Raisa
STEP 2 Add a layer and fill with white. Layers > New Mask Layer > From Image and select Narah_Mask_0948. Click on OK. Layers > Merge > Merge group. Add a layer and fill with your foreground colour #3E5D7F. Layers > New Mask Layer > From Image and select Narah_Mask_1254. Click on OK. Layers > Merge > Merge group. Layers > Merge > Merge Visible. STEP 3 Effects > Defined Filter > L en K landksiteofwonders > L en K's Zitah twice.
Duplicate this layer. Effects > Defined Filter > Mura's Meister > Perspective Tiling
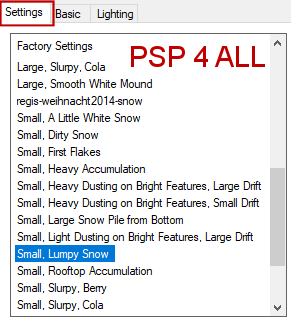
Effects > Defined Filter > Eye Candy 5 > Nature > Snow Drift
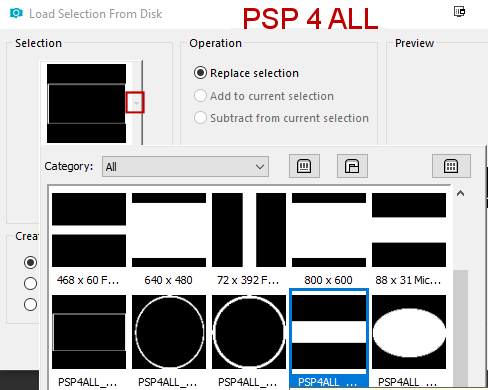
Add the tube on the right. Add a Drop Shadow - 4, 4, 70, 7. STEP 4 Edit > Copy Special > Copy Merged. Click on Selections > Load/ Save Selection > Load Selection from Disk. Select PSP4ALL_MF_Winter_mf20.
Layers > Convert to Raster Layer. Fill with the Foreground colour #3E5D7F. Selections > Select All. Selections > Modify > Contract by 2 pixels. Click on Delete. Fill with white and Selections > Modify > Contract by 4 pixels. Click on Delete. Fill with the Foreground colour #3E5D7F. Selections > Modify > Contract by 2 pixels. Click on Delete. Keep selected. Add a layer. Edit > Paste Into Selection. Selections > Select None. Put your Foreground color #3E5D7F as Background and white as your Foreground colour. Choose Impact as your font and write WINTER or your own text - Anti alias on Sharp and Create as Vector. Convert to Raster Layer. Layers > Merger > Merge Down. And you should see something like this
STEP 5 - Snow Sťlections > Sťlectionner > Sťlections > Flottante > Sťlections > Statique. Add a layer and rename S1. Effects > Defined Filter > VDL Adrenaline >
Snowflakes.
Add a layer and rename S2. Apply VDL Adrenaline > Snowflakes. Change Random Seed to 2000. Add a layer and rename S1. Apply VDL Adrenaline > Snowflakes. Change Random Seed to 5000. Add a layer and rename S1. Apply VDL Adrenaline > Snowflakes. Change Random Seed to 8000. Selections > Select None. Close S1, S2, S3, S4. STEP 6 - Credits with a small pixel font like Pixelette or any other small font. STEP 7 - Bordure Add a layer and fill with #3E5D7F. Selections > Modify > Contract by 2 pixels. Click on Delete. Fill with white and Selections > Modify > Contract by 5 pixels. Click on Delete. Remplir avec #3E5D7F and Sťlections > Modify > Contract by 2 pixels. Click on Delete. Selections > Select None. STEP 8 - Animation Open S1. Edit > Copy Special. Copy Merged. Open Animation Shop and Edit > Paste As New Animation. Back to PSP - Close S1. Open S2. Edit > Copy Special. Copy Merged. In Animation Shop, click on Edit > Paste After Current Frame. Back to PSP - Close S2. Open S3 - Edit > Copy Special. Copy Merged. In Animation Shop, click on Edit > Paste After Current Frame. Back to PSP - Close S3. Open S4 - Edit > Copy Special. Copy Merged. In Animation Shop, click on Edit > Paste After Current Frame. View your animation and adjust the speed if necessary. Save as a gif! Martine 20 January 2020 If you have any questions, don't hesitate to contact me |