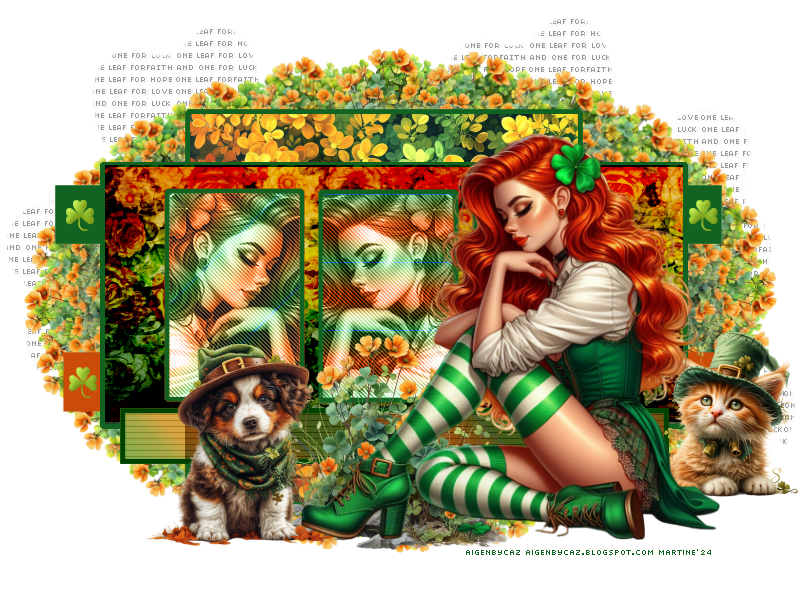
 Scrapkit: Good Luck by Adrienne - Adrienne's Designs. Download here, the top one. Template: St Patrick's by Mythical Designs - Creative Misfits Exclusive. Download here (3rd one down). WA: UFCloverwordart3. Download here. Filtres : Eye Candy 4000 > Gradient Glow. MuRa's Meister > Copies. penta.com > Jeans Carolaine & Sensibility > CS_Halloween2 Fonts: Pixelette for the credits. ****************************** Reminder: *** Method to color a layer or add a paper - To fill a layer with colour, Selections > Select All. Selections > Float > Selections > Defloat. Or click with the magic wand. Add a layer > Fill with the new colour or paper, texture. Apply plugin if needed. Selections > Select None. Delete the original layer. *** Depending on the colors & tube you are going to use, feel free to change the mode and opacity of the layers. Main colour: #2c3646. Note: I have colored or papered all the layers of the template although some of the layers will be hidden by my tube. However not all of you will use the same tube or put it where mine is so these layers may be visible. (38 ŕ 42). STEP 1 - Template 1. Open the template. Shift+D pour dupliquer. 2. Delete Raster 2(Crédits). 3. Image > Resize 90%. 4. Image > Canvas Size: Width = 800 and Height = 600
5. Raster 1 - Fill with white. 6. TopYellowRectangle - New layer and fill with #126221. 7. BottomYellowRectangle - New layer and fill with #CB4B09. 8. LrgSquare - New layer and fill with Good Luck Paper (2)
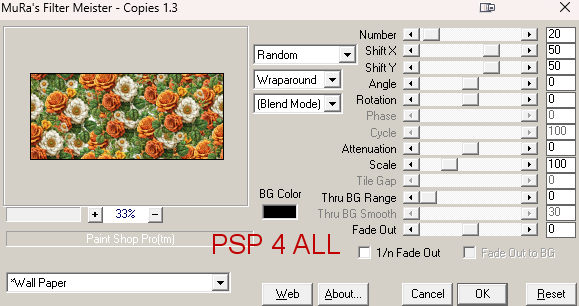
9. Keep selected. Selections > Modify > Expand 5 pixels. 10. Add a layer and fill with #126221. 11. Layers > Arrange > Move Down. 12. Select None. 13. ractangeNoiseBk (sic) - Delete. 14. Dot LineLeft and Dot LineRight - Delete. 15. Rectange (sic) > Calque and fill with Good Luck Paper (11). 16. Open a new image 578x257. 17. Add Good Luck Element (7), resize 25%. 18. Apply Mura's Meister > Copies > Wallpaper.
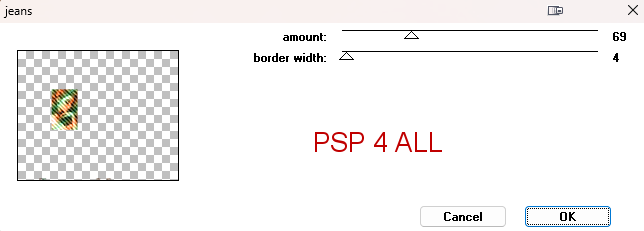
19. Copy this image as a new layer on your template above Rectange (the Good Luck Paper (11)). 20. Opacity on Burn. 21. Back on the original layer Rectange. Selections > Expand 5 pixels and fill with #126221. 22. Layers > Arrange > Move Down. 23. Make Linear Gradient 2 colours #126221 and #CB4B09. 24. Left Frame Gradient Bk - fill with this gradient with the angle on 135 and Scale on 5. 25. Select the original layer Left Frame Gradient Bk. Selections > Expand 5 pixels and fill with green #126221. 26. Back onto the Gradient layer. Select and add your tube. Image > Mirror. 27. Layers > Merge Down. 28. Apply penta.com > Jeans.
29. Middle Frame Gradient Bk - fill with this gradient with the angle on 0 and Scale on 5. 30. Select the original layer Middle Frame Gradient Bk. Selections > Expand 5 pixels and fill with green #126221. 31. Back onto the Gradient layer. Select and add your tube. 32. Layers > Merge Down. 33. Apply penta.com > Jeans. 34. Right Frame Gradient Bk - fill with this gradient with the angle on 45 and Scale on 5. 35. Select the original layer Right Frame Gradient Bk. Sélections > Selections > Expand 5 pixels and fill with green #126221. 36. Back onto the Gradient layer. Select and add your tube. 37. Layers > Merge Down. 38. Apply Penta.com/ Jeans. Default configuration. 39. Delete LeftFrame, MiddleFrame and RightFRame. 40. TopYellowRectangle - Fill with # 126221. 41. TopSmallClover - Remplir avec #8DB620. 42. Activate the Pick Tool (K) and modify both Position X: 16.00 and Position Y: 137
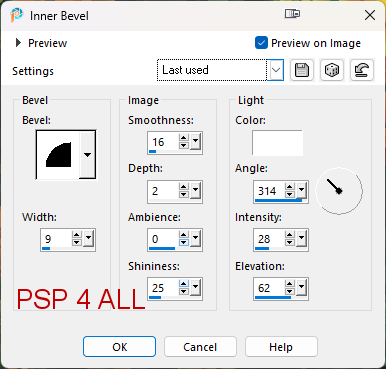
43. Click on M to disable the Pick Tool. 44. Apply 3D Effects > Inner Bevel.
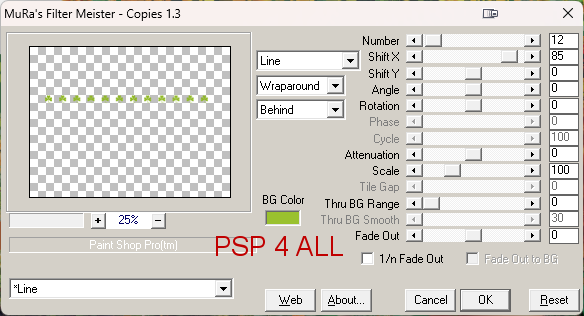
45. Apply Mura's Meister > Lines
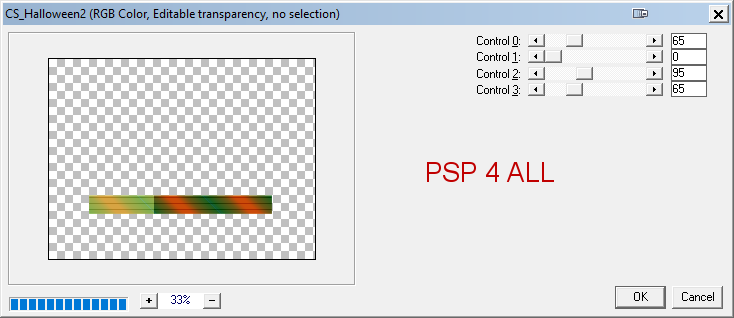
46. BottomYellowRectangle - Fill with #CB4B09. 47. Clover line - Duplicate and move the copy on top of BottomSmalllClover - Modify both Position X: 82 and Position Y : 382. 48. Supprimer BottomSmallClover. 49. FrontGradientRectangle - Fill with the 2 colours gradient Angle ŕ 45 and Scale on 5. 50. Apply Carolaine & Sensibility > CS_Halloween2
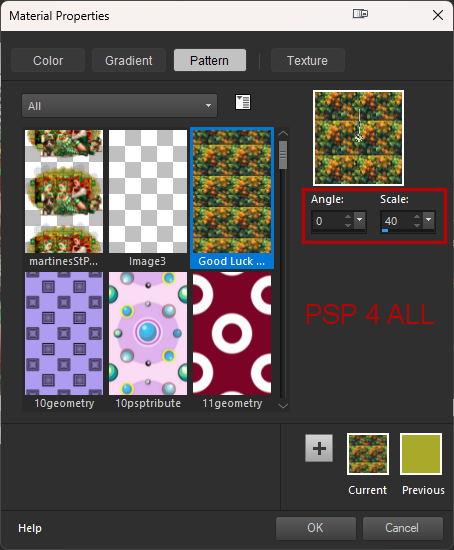
51. Delete Lips, KissMeImIrish-BG, KissMeImIrish and KissMeImIrishGradientNoise. STEP 2 - Tube and other elements 52. Good Luck Element (11) - 28%. Bottom, middle. 53. Good Luck Element (75) - 28%. Bottom, left. 54. Add lhe tube on the right. 55. Good Luck Element (72) - 28%. Right on tube. 56. Activate Raster 1 tout en bas. 57. Add UFCloverwordart3 on the left, opacity on 40%. 58. Add UFCloverwordart3 on the right, opacity on 40%. 59. Good Luck Element (18) - 25%. 60. Apply Mura's Meister Copies > Encircle
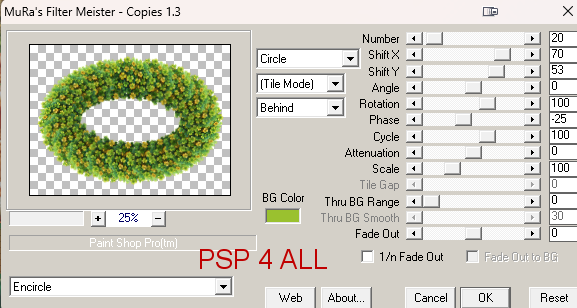
61. Good Luck Element (11) - 25%. 62. Apply Mura's Meister Copies > Encircle
STEP 3 - Credits 63. with a font like Pixelette or any other small pixel font 64. Save. Martine 27 February 2024 If you have any questions, don't hesitate to contact me |