|
|
(Version française ICI) |
|
|
|
|
|
|
|
You can do pretty much what you like with your result: create signatures with name added, extras or stats, websets.
|
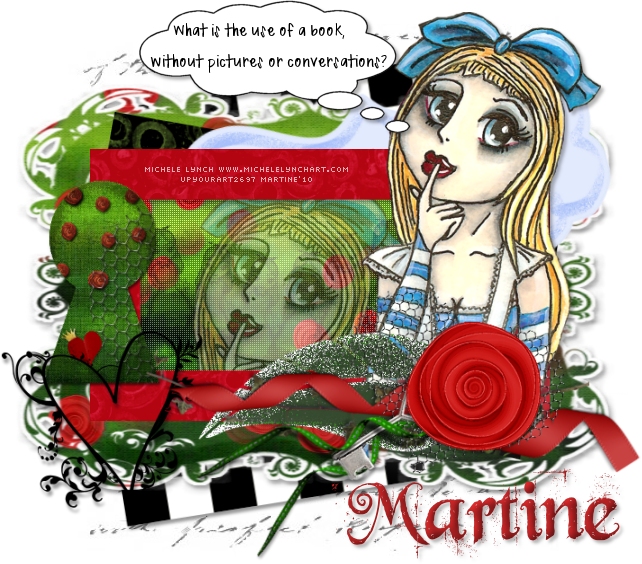
Martine |

Scrapkit: by SunF of Urban Fairy Tales at http://urbanfairytalesblog.blogspot.com/ : UFWonderland
Mask: Vix Mask 205 here http://www.freewebs.com/vixpsp/masks.htm
Filter: penta.com - Color Dot
Fonts : Beyond Wonderland for the name and Pixelette for the credits.
You can download my E-Book which will let you work without being connected.
STEP 1
Calque Fond : Open an image 650x600 - Fill with white.
STEP 2: Mask
Mask: Add a layer and fill with black #000000. Apply Vix's mask 205. Masks > New > From image - OK. Then Masks > Delete. In PSP 8 and above, it's under Layers > New Mask Layer > From Image. OK then Delete.
Lower this layer opacity and set it to 55%.
STEP 3: Elements
UFWonderlandcheckerboard: Add as a new layer then resize to 90%.
UFWonderlandstickerback: resized to 90% - you may have to adjust the width and height at the end, after adding all the other elements. Just use the deform tool.
UFWonderlandtextureframe: Add as a new layer, resize to 90%. Then Image > Rotate > Right 10.
UFWonderlandtag: resized to 90% - Then Image > Rotate > Left 15.
UFWonderlandframe1: Add as a new layer then resize to 90%.
Inside of
UFWonderlandframe1: Use the magic wand to click inside, then Selections >
Modify > Expand by
10 pixels. Add a new layer and fill with
UFWonderlandrosespaper at 50%. Then move this layer under
UFWonderlandframe1.
Add
UFWonderlandalicebrush as a new layer.
Filter - Color Dot:
Close all layers except
UFWonderlandframe1 and the
UFWonderlandalicebrush layers. Merge visible these two layers and
apply Color
Dot:
|
|
Re-open all the layers.
Tube: Use the magic wand to click inside UFWonderlandframe1, then Selections > Modify > Expand by 10 pixels and add the head part of your tube. Selections > Invert and hit the Delete key on your keyboardvier. Selections > Deselect All. Then move this tube layer under UFWonderlandframe1 and lower its opacity to 45.
UFWonderlandkeyhole: Add as a new layer on the left and then resize to 90%.
Your tube on the right.
UFWonderlandcluster: Add as a new layer and resize to 90%.
UFWonderlanddoodle: Add as a new layer on the left and resize to 90%.
Bubble: Click on the Preset Shape and choose the thought bubble.
Draw it from the right to the left so the bubbles are on the right.
Add
the text
UFWonderlandwordart4 or words of your choice.
STEP 4: Credits & Name
Credits:
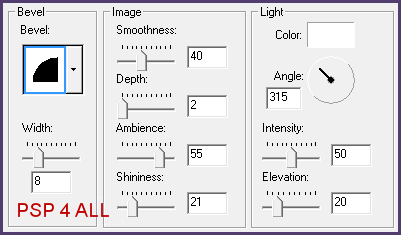
Name: I used Beyond Wonderland but feel free to use another one. Size 68 with antialias on and colour #9C1E1F.
Then add an Inner Bevel. Effects > Effets 3D >Inner Bevel:
|
|
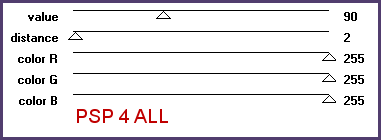
ETAPE 5: Drop shadow
Add this drop shadow to your tube, the thought bubble and your name:
|
V = 3 |
O = 30 |
|
H = 3 |
B = 5 |
STEP6: Saving
Save one last time with all the layers left open. Then close the background layer and merge visible all the other layers. Copy paste this as a new image: it will remove the excess space around your result neatly. Add a layer, fill with white for the Results page and send it to the bottom. Then file > Export > JPEG optimizer. Use the wizard and choose Better image Quality.
Martine
6 January 2010
If you have any questions, don't hesitate to contact me ![]()
![]()