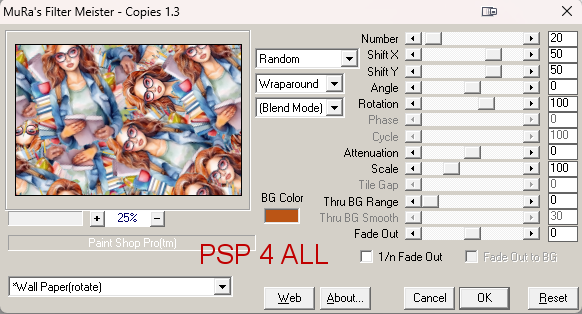
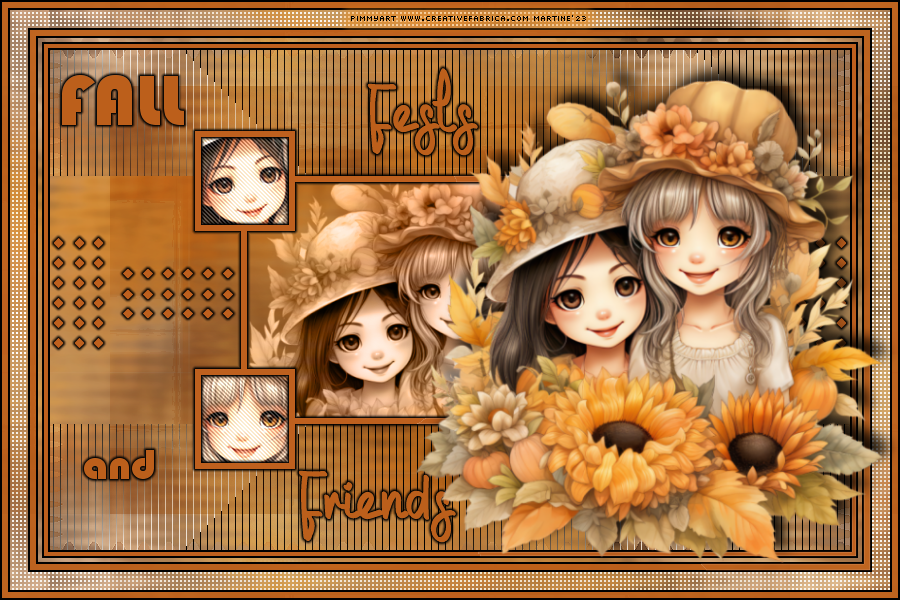
Matériel: My selections; My wordart & the Masque I used :Nikita's - 1250181664_nikita_masques on page18. Download here. Filtres: MuRa's Meiter > Copies FU2 > &<Bkg Designer sf10II> > Flutter AFS Import > sqborder2 It@lian Editor Effects > Effeto Fantasma Tramages > Tow The Line Eye Candy 6 > Text Selection > Gradient Glow penta.com > jeans Fonts: TheRain & Bauhos93 for the WA - Pixelette for the credits. Depending on the colors & tube you are going to use, feel free to change the mode and opacity of the layers. STEP 1 1. Open an image 900x600. Fill with white. 2. Add the tube. 3.Apply Mura's Meister > Copies > Wallpaper (Rotate).
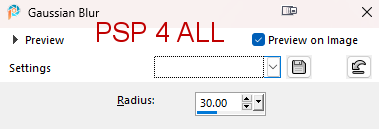
4. Adjust > Blur > Gaussian Blur
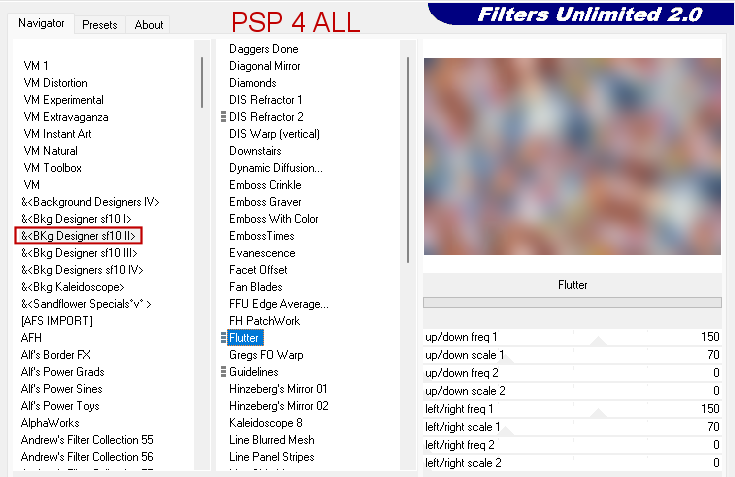
5. FU2 > &<Bkg Designer sf10II> > Flutter
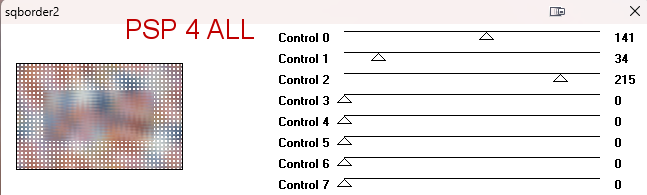
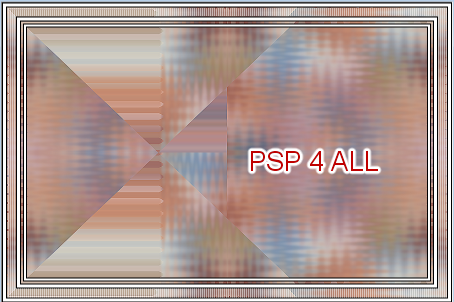
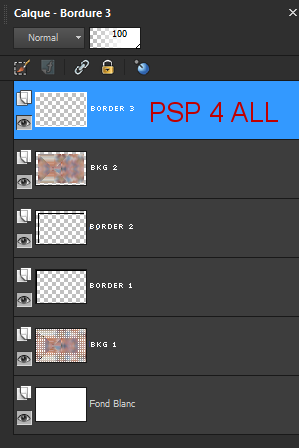
6. Effects > Edge Effects > Enhance. Rename Bkg 1. 7. Edit > Copy. The copy is saved in your clipboard for later. 8. Apply AFS Import > sqborder2
and in your Layers Palette this
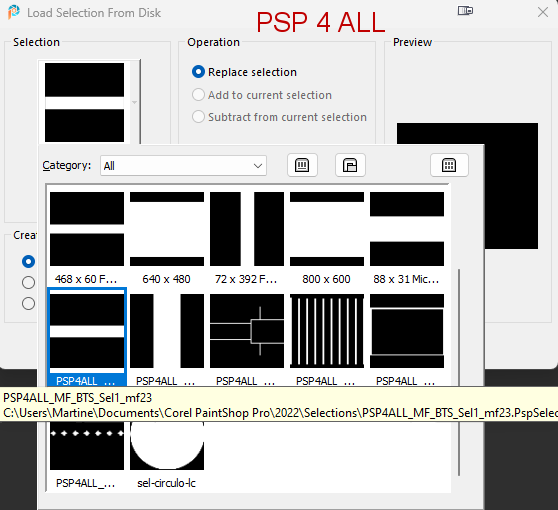
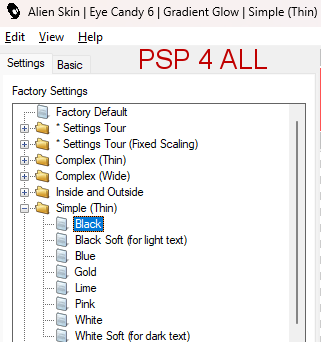
STEP - Bkg 2 20. Open the mask 1250181664_nikita_masques. 21. Click on Fond 2. Duplicate. 22. On the copy, apply mask 1250181664_nikita_masques. 23. Layers > New Mask layer> From an image. Select Nikita's mask. OK. 24. Layers > Merge Group. 25. Applyr It@lian Editor Effects > Effeto Fantasma - Default settings: 41 and 41. 26. Properties > Blend mode> Soft Light. 27. Duplicate. Properties of this layer > Blend mode > Burn. 28. Click on Bkg2. Click on Selections > Load/ Save selection/ Load Selection From Disk. Choose PSP4ALL_MF_BTS_Sel1_mf23.PsPSelection.
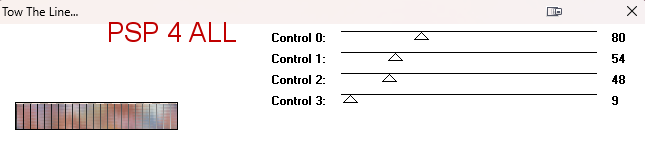
29. Selections > Promote Selection to Layer. 30. Apply Tramages > Tow The Line.
31. Selections. Select None. 32. Duplicate. Image > Mirror vertical. 33. Add a layer. Click on Selections > Load/Save selection > Load Selection From Disk. Choose PSP4ALL_MF_BTS_Sel2_mf23.PsPSelection. 34. Fill with white. Selections. Select None. 35. Add a layer. Click on Selections > Load/Save selection > Load Selection From Disk. Choose PSP4ALL_MF_BTS_Sel3_mf23.PsPSelection. 36. Fill with white. Selections. Select None. 37. Layers > Merge Down. 38. Apply Eye Candy 6 > Text Selection > Gradient Glow. Under Settings, choose Simple and Black. Under Basic, put the Glow Radius on 1.
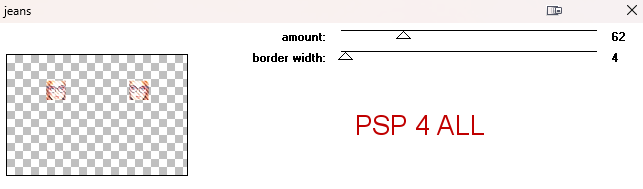
39. Duplicate. Image > Mirror horizontal. 40. Add a layer. Click on Selections > Load/Save selection ŕ partir du disque. Choisir la sélection PSP4ALL_MF_BTS_Sel3_mf23.PsPSelection. 41. Fill with white. Selections. Select None. 42. Apply the same Gradient Glow. 43. Click inside the big rectangle. Fill with a close up of your tube. 44. Properties > Blend mode > Luminance(Lagacy). 45. Click on the small rectangle on the left at the top and fill with a smaller version of your tube. 46. Duplicate. Image > Mirror. 47. Layers > Merge Down. 48. Apply penta.com > jeans
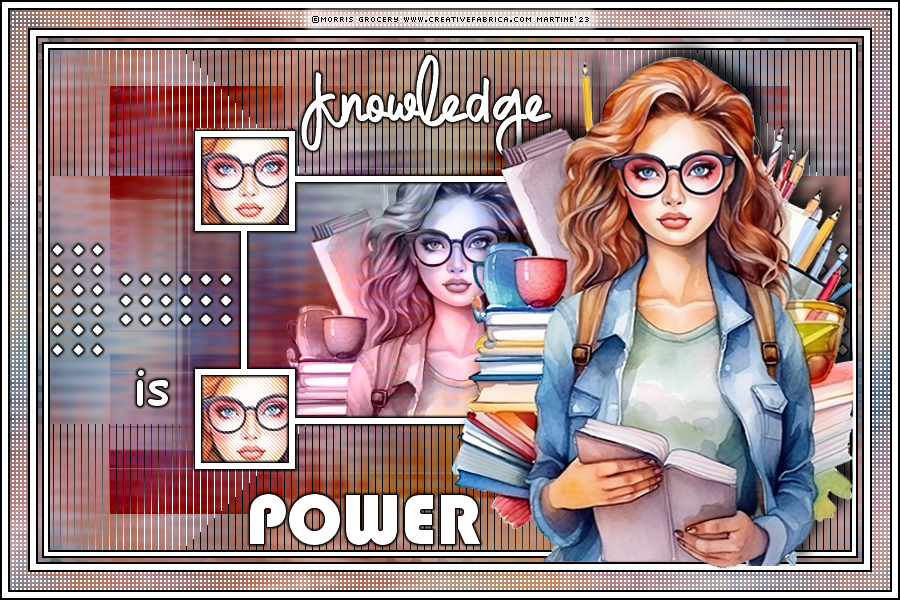
49. Duplicate and move this copy to fill the 2 little frames at the bottom. 50. Add the tube on the right. Drop Shadow: -10; 10; 85; 20. STEP 4 - Wordart and Credits 51. Wordart: Mine or one of your choice. Mine is with the rest of the supplies. I wrote Knowledge in white with the font TheRain and is Power in white too with the font bauhos 93. 52. I applied the same Gradient Glow. 53. Credits: with a font like Pixelette or any other small pixel font.
Etape 2 - 27. Different colours so for a more pleasant result I changed the Blend mode. Instead of Burn, I chose Multiply. Martine 20 septembre 2023 If you have any questions, don't hesitate to contact me
|