|
|
(Version française ICI) |
|
|
|
|
|
|
|
You can do pretty much what you like with your result: create signatures with name added, extras or stats, websets.
|
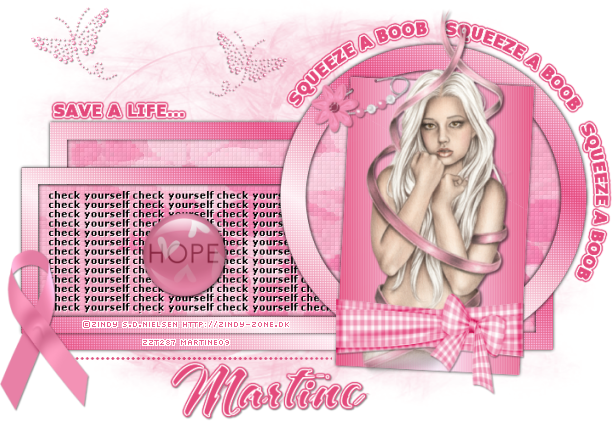
Martine |

Template: by Mirella at Scrapity Scrap and More - ssam_BCATemp4 in the BCA Tag Templates set.
Scrapkit: CS_BCA_freebie by Cinnamon Scraps at http://cinnamonscraps.blogspot.com
Mask: Gem's Mask 60. To be downloaded here: Gems Taggin Tuts. Click on Navigation > Dowloads > Gemsmasks2.
My text Check Yourself to download here.
Plugin: Xero Fritillary, Alien Skin Eye Candy 4000 here at Alien Skin and Penta.com Color Dot filter to download here.
Fonts: A&S Snapper for your name; Verdana for the text and Pixelette for your credits.
You can download my E-Book which will let you work without being connected.
STEP 1 - Mask
Open the template and duplicate. Close the original.
Image > Canvas size and increase the size. Make it 750X510. Add the 10 pixels at the bottom.
Delete the top layer Credits (Raster 9). And activate the white background: Raster 1. Keep this white background as the background for the Results page.
Mask: Add a layer and fill with a colour from your tube. I used #E44A7C.
Open gemsmask60. Masks > New > From image - OK. Then Masks > Delete. In PSP 8 and above, it's under Layers > New Mask Layer > From Image. OK then Delete
I set the opacity of this layer to 45%.
STEP 2 - Raster 2 and Raster 8 - Texts
Work with these layers in turn. Selections > Select All > Select > Float > Select > Defloat. add a layer and fill with a colour of your choice. I used #E44A7C.
Apply Eye Candy Gradient Glow - click on fat and set as below:
|
|
Repeat for the other text.
Then delete Raster 2 and Raster 8.
STEP 3 - Dotted Line
Activate Raster 3. Selections > Select All > Select > Float > Select > Defloat. Add a layer and fill with the same colour as before.
STEP 4 - Raster 4 - Big rectangle
Activate Raster 4. Selections > Select All > Select > Float > Select > Defloat. Add a layer and fill with a gradient with #E44A7C for the background and #FEECF2 for the foreground. Set the angle to 30 and Repeats to 1.
|
|
Click on Selections > Modify > Contract by 20 and hit the Delete key on your keyboard. Apply Penta.com - Color dot. Renoame Border Big Triangle.
|
|
Duplicate this layer and then Selections > Select All > Select > Float > Select > Defloat and fill with black.
Apply a Gaussian Blur of 2 and move this layer under the other one.
Delete the original Raster 4 layer.
Activate the Border Big Rectangle layer and with the Magic Wand click inside.
Selections > Modify > Increase by 4 and fill with CS_BCA_paper6.
Then apply Xero Fritillary :
|
|
STEP 5 - Raster 5
Activate this layer then Selections > Select All > Select > Float > Select > Defloat. Copy paste CS_BCA_Paper 6 and click on invert. Hit Delete on your keyboard.
Applyr Xero Fritillary as above.
Copy paste my text layer Check yourself or a text of your choice as a new layer.
Then Delete Raster 5.
STEP 6 - Copy of Vector 4.
Activate Copy of Vector 4. Selections > Select All > Select > Float > Select > Defloat. Aaa a layer and fill with the same gradient as before. Then apply Penta.com - color dot.
Activate Copy of Vector 4 and Selections > Select All > Select > Float > Select > Defloat. Fill with black.
Apply a Gaussian Blur of 2.00.
STEP 7 - Raster 6 - Inside of Circle
Repeat what you did in Step 5 - Raster 5.
STEP 8 - Copy of Vector 3 - Circle Border
Repeat what you did in Step 6 - Copy of Vector 4. Do not forget to apply a Gaussian Blur.
STEP 9 - Raster 7
Selections > Select All > Select > Float > Select > Defloat. Add a layer and fill with the same gradient but with different settings. Check Invert Gradient.
|
|
Apply the blinds Effect - Effects > Texture Effects > Blinds:
|
|
STEP 10 - Your tube
Apply
a drop shadow:
|
V = 2 |
O = 60 |
|
H = 2 |
B = 4 |
STEP 11 - Elements
CS_BCA_Ribbon Wrap resized to 50% then place on your tube using the deformation tool to make it fit. Colorize: Colours > Colorize or Adjust > Hue and Saturation > Colorize
Hue = 240 and Saturation = 189
CS_BSA_Safety Pin resized to 40%. Do not forget to remove a bit of the pin with your lasso tool and also add two black dots with your paint brush, size 4 for the holes:
|
|
CS_BCA_Butterfly 1 resized to 20%. Colorize - Hue at 240 and Saturation at 189. Add a drop shadow:
|
V = 1 |
O = 50 |
|
H = 1 |
B = 2 |
Duplicate and resize at 90%. Image > Mirror.
CS_BCA_Button2 resized to 40% and apply the same drop shadow.
CS_BCA_twistribbon resized to 60% and apply the same drop shadow.
STEP 18 - Resize all layers to 85%
Now click on Image and Resize and enter 85%. Check all layers. Save and add _85 to the name.
STEP 19 - Name and Credits
Nom : Don't leave your tag blank.
Add your name with A&S Snapper or a font of your choice - colour: #E44A7C.
Then apply the Gradient Glow of Step 2.
Credits: for your tube, with Pixelette in size 6.
STEP 20 - End of tut
Vérifier votre travail et repositionner les calques si nécessaire.
Fusionner visible et exporter en fichier JPG optimisé.
Martine
21 October 2009
If you have any questions, don't hesitate to contact me