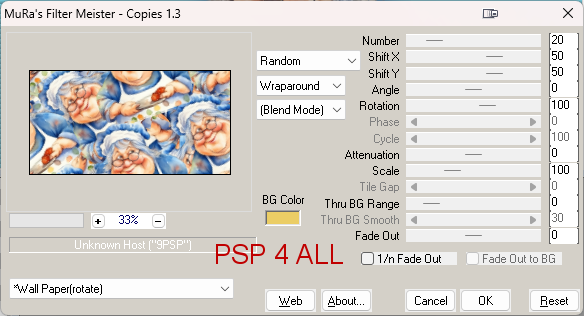
Template: Happy Being Me by Lithy at Lithium Flower Creations. Download here. 2nd from the top. Plugins: MuRa's Meister > Copies. Photo Effects > Scanlines Eye Candy 4000 > Gradient Glow. Eye Candy 5 Impact > Perspective Shadow. AAA Frames > Foto Frame Font: Pixelette for the credits. ****************************** Reminder: *** Method to color a layer or add a paper - To fill a layer with colour, Selections > Select All. Selections > Float > Selections > Defloat. Or click with the magic wand. Add a layer > Fill with the new colour or paper, texture. Apply plugin if needed. Selections > Select None. Delete the original layer. *** Depending on the colors & tube you are going to use, feel free to change the mode and opacity of the layers. Main colour: #0A3686. STEP 1 - Template 1. Open the template. Shift+D to duplicate. 2. Delete the copyright layer ©info. 3. Add the tube. 4. Apply Mura's Meister > Copies > Wallpaper(Rotate)
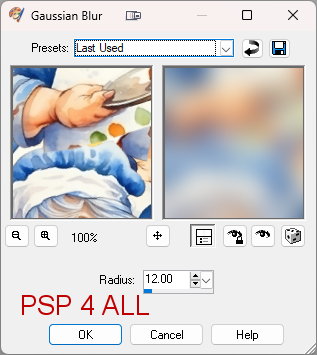
5. Blur > Gaussian Blur
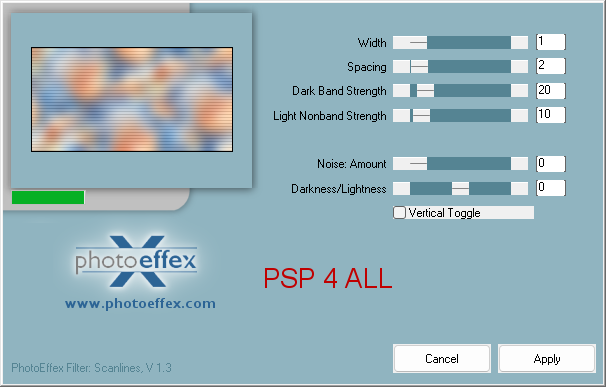
6. Edit > Copy. 7. Edit > Paste As New Layer. Rename Image1. 8. Back onto yoiur work Apply Photo Effects > Scanlines
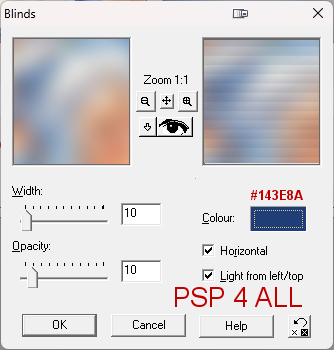
9. Adjust > Sharpness > Sharpen More. 10. Black rectangle - Edit > Paste As New Layer Image 1. 10. Ativate Black rectangle. Selections > Float > Defloat. 11.Back onto the copy above. Selections > Invert. Delete. 12. Selections > Select None. 13. Apply Texture Effects > Blinds.
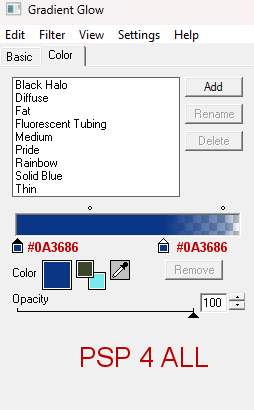
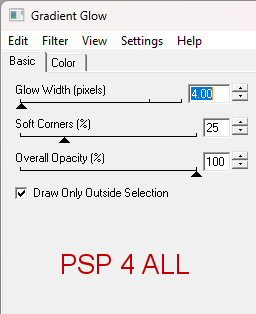
14. Repeat Texture Effects but do not check Horizontal. 15. Blue glitter stripe - Selections > Layer and fill with white. 16. Apply Eye Candy 4000 > Gradient Glow
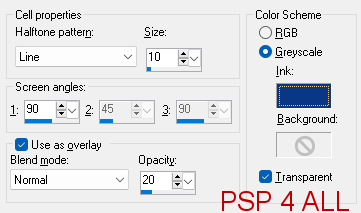
17. Blue circle - Edit > Paste As New Layer Image 1 18. Back to the original Blue Circle. Selections > Float > Defloat. 19. Back to the copy. Selections > Invert. Delete. 20. Selections > Select None. 21. Apply Artistic Effects > Half Tone.
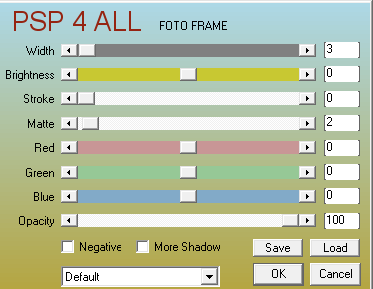
22. Select and add your tube. 23. Invert. Delete. 24. Blend Mode on Screen. 25. Selections > Select None. 26. White circle frame. Apply the same Gradient Glow. 27. Delete Wave 1, Wave 2 and Wave 3. 28. WA Happy - Apply the same Gradient Glow. 29. WA Me! - Apply the same Gradient Glow. 30 - WA Being - Selections > Layer and fill with #0A3686. Select None. 31. Apply the same Gradient Glow but change the colour and use White (Click on Fat) but keep the Glow Width on 4. 32. Small circles - Selections > Layer and fill with #0A3686. Select None. 33. Apply the same Gradient Glow, white (Fat). STEP 2 - Tube, Border and Credits 34. Add the tube on the right. 35. Apply Eye Candy 5 Impact > Perspective Shadow. Default Config > Blurry but Color Shadow to #0A3686. Or a drop shadow of your choice. 36. Edition > Copy Special > Copy Merged. 37. Edit > Paste As New Layer. 38. Apply AAA Frames > Foto Frame
Martine 6 March 2024 If you have any questions, don't hesitate to contact me |