You can do pretty much what you like with your result: create signatures with name added, extras or stats, websets. Give all the credits that are required and for the tut to: Martine (lien ŕ http://chezmartine.com) pour PSP 4 ALL (lien ŕ http://psp4all.com).

Template 439 by Millie at Millie's PSP Madness - Dowload here. Scrapkit: Christmas Tweets by Amy of Gimptastic Scraps - Download here. Plugins: penta.com. Unplugged Tools > Interlace. Eye Candy 4000 > Gradient Glow. Mehdi > Curves 2. Police: Pixelette for the credits. You can download my E-Book which will let you work without being connected. STEP 1: Template Open the template in PSP. I have added some height, at the bottom, went from 558 to 650. Layer 1: Selections > Select All > Selections > Float > Selections > Defloat. Add a layer and fill with #5ABFBA. Apply penta.com> jeans
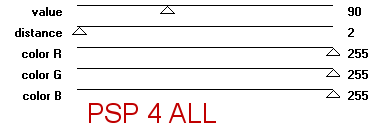
Add a Drop shadow
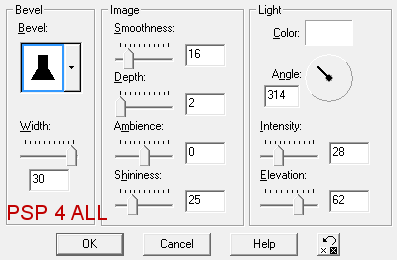
Selections > Select None. Layer 2: As for layer 1 but this time fill with #FECD59. And apply a 3D effect > Inner Bevel
Add a Drop shadow
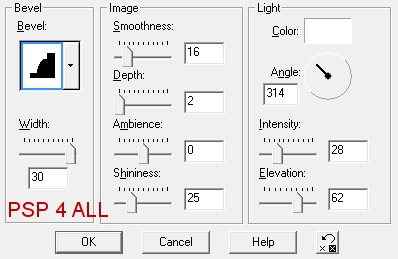
Selections > Select None. Layer 3: As in layer 1 and fill with #FECD59. And apply a 3 D effect > Inner bevel
Add a Drop shadow
Selections > Select None. Layer 4: Keep the same color and apply Unplugged Tools > Interlace
And the same drop shadow as in layer 3. Selections > Select None. Layer 5: Keep the same color and apply penta.com > Dot and Cross.
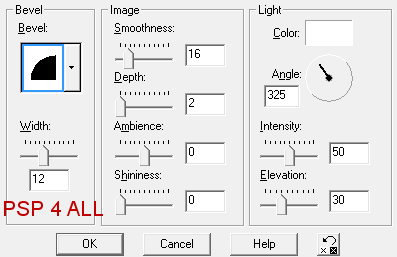
And the same drop shadow as in layer 3. Selections > Select None. Layer 6: Leave as it is. Layer 7: As in layer 1 but fill with #FECD59. Apply a 3D effect > Inner bevel
And the same drop shadow as in layer 3. Selections > Select None. Layer 8: Do not change the colour and apply penta.com > jeans as in layer 1. And the same drop shadow as in layer 3. Selections > Select None. Layer 9: As for layer 1 but fill with #014710. Apply penta.com > color dot
And the same drop shadow as in Layer 3. Selections > Select None. Layer 10: Leave white. Layer 11: Close the layer. Layer 12: Close the layer. ETAPE 2: Elements and Tube(s) Do not forget to apply a drop shadow. Scatter - 60%. Copy paste it on the left. Duplicate and place on the right. Transparency of both layers at 57%. Tree - 85% Add the tubes. Bird1 - 75%. On the right. Present - 75% . On the right. Snowflake - Place above Layer 4 . Duplicate > Mirror. Bird4 - 50%. On the left. Bauble1 - 35%. Hanging from layer 7 Bauble2 - 35%. A bit higher on layer 7. Button - 35%. Place on Bauble1 and Bauble2. Wordart. Bird2 - 45% ETAPE 3 : Credits Credits: with a small font like Pixelette or any other pixel font. ETAPE 4: Animation Make 3 copies of Christmas Tweets, the wordart. First layer - Do nothing. Second layer - Select the word Christmas with the lasso tool and apply Mehdi > Curves 2
Select > Select None. Third layer - Selectionner the word Tweets and apply Mehdi > Curves 2, as before. Select > Select None. Close the 3 layers. Make 3 copies of the layer Tree. First layer - Do nothing. Second layer. Select the star at the top of the tree and some of the balls. And apply Curves 2. Select > Select None. Third layer - Select the star at the top of the tree and the balls that were not selected before on Layer 2 and apply Curves 2. Select > Select None. Close the 3 layers. --------------- Open the first layer of the Wordart and the first layer Tree. Merge visible all the layers and copy paste in Animation Shop. Back in PSP. Open all the layers and close the second Wordart layer and the second Tree layer. Merge vivible. Copy paste in AS after current frame. Back in PSP. Open all the layers and close the third Wordart layer and the third Tree layer. Merge vivible. Copy paste in AS after current frame. You now have 63 images in AS. Clico on the first image. Edit > Copy and paste after the second image. Change the speed. I entered 18. Click on View Animation. If it is ok, then save as a gif. Martine 12 December 2013 If you have any questions, don't hesitate to contact me |
