You can do pretty much what you like with your result: create signatures with name added, extras or stats, websets. Give all the credits that are required.
 Scrapkit: Spring Cleaning by Lorie Stracher of LJS Designs. Download here. Template: Mine. Download here. Mask: RD_Masks756 by Rachel of Rachel Designs. Download here. Fonts: Stockport & Broken for the text; Pixelette for the crédits. I used this Drop Shadow H 2, V 3, O 55, F 5 et H 1, V 1, O 100, F 1. You can download my E-Book which will let you work without being connected. STEP 1 Open the template. Maj D Duplicate and work on the copy. Delete the Credits layer. STEP 2 Select ljs-sc-pp7 and resize to 20%. Copy paste as a new layer. Open mask RD_Masks756. I removed some of the white areas around the mask so it would fill my image better.
For this result:
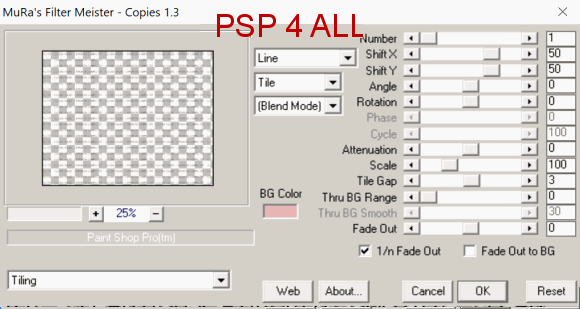
Layers > New Mask Layer > From Image and choose RD_Masks756. Click on OK. Layers > Merge Group. Set the opacity at 45. STEP 3 Click on the Vertical layer. Selections > Select All. Selections > Float. Selections > Defloat. Select paper ljs-sc-pp3, resize to 20% and copy paste as a new layer. Selections > Invert > Delete. Selections > Select None. Delete the original grey layer. STEP 4 Activate the Bottom Rectangle layer. Repeat what you have done in STEP 3 but use paper ljs-sc-pp6. Delete the original grey layer. STEP 5 Activate the Top Rectangle layer. Repeat what you have done in STEP 3 but use paper ljs-sc-pp4. Delete the original grey layer. STEP 6 Activate the Bottom Dashes layer Selections > Select All. Selections > Float. Selections > Defloat. Fill with #C00000. Selections > Invert > Delete. Selections > NSelect None. Delete the original grey layer. Apply this Drop Shadow: H 1, V 1, O 100, F 1. STEP 7 Activate the Top Dashes layer. Repeat what you have done in STEP 6, and use the same Drop Shadow. STEP 8 Text in the rectangle. Open a new image 680x550. Choose the Oh La La font, in black, floating. Type this text Clean House = Broken Computer. Selections > Promote Selection to Layer. Click on Objects > Align > Center in Canvas. Apply Mura Meister > Copies
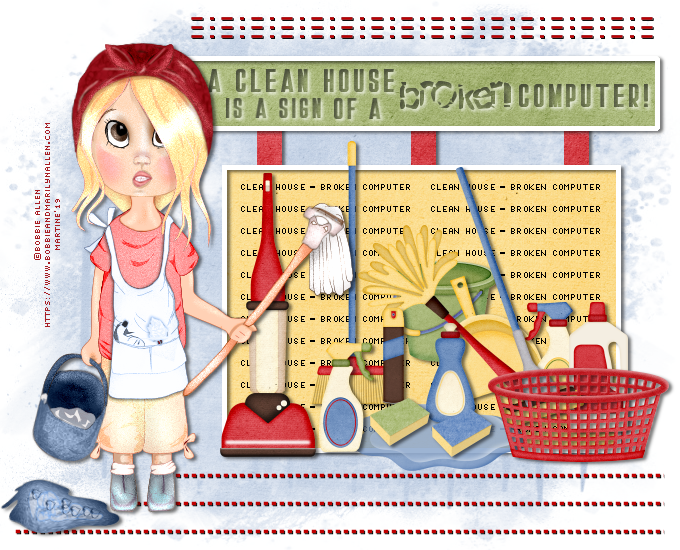
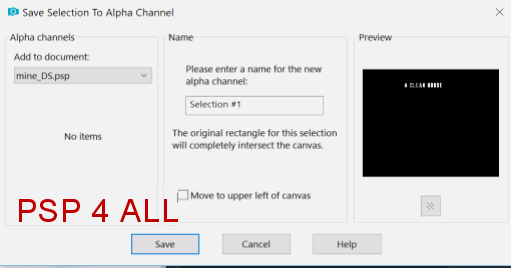
STEP 9 Add these elements at the bottom of the Bottom Rectangle. ljs-sc-Vacuum Red - 13%. ljs-sc-Bucket Green - 13%. ljs-sc-Broom - 12%. ljs-sc-Puddle - 16%. ljs-sc-Furniture Polish Brown - 8%. ljs-sc-Dust Pan - 13%. ljs-sc-Feather Duster - 15%. Image > Mirror > Mirror Horizontal. ljs-sc-Glass Cleaner1 - 10%. ljs-sc-Floor Cleaner Cream - 10%. ljs-sc-Mop Blue - 13%. ljs-sc-Glass Cleaner 2 - 10%. Image > Mirror > Mirror Horizontal. ljs-sc-Dish Soap Blue - 10%. ljs-sc-Sponge 1 - 10%. ljs-sc-Sponge 2 - 10%. ljs-sc-Feather Duster - 15%. Image > Mirror > Mirror Horizontal. ljs-sc-Laudry Basket - 12%. STEP 10 WORD ART - A Clean House Is A Sign Of A Broken Computer or the text of your choice using these 2 fonts: Stockport and Broken, in black. Place in the Top Rectangle. Click on the Text. Selections > Select All. Selections > Float. Selections > Defloat. Selections > Load/ Save Selection > Save Selection to Alpha Channel.
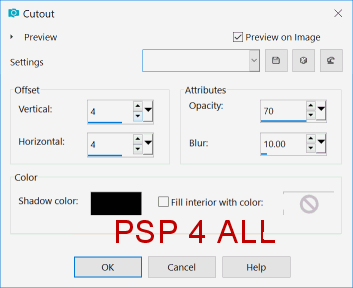
Selections > Select None. Click on Delete. Selections > Load/ Save Selection > Load Selection from Alpha Channel. Click on Load. Apply the Cutout Effect > Effets 3D > Cutout
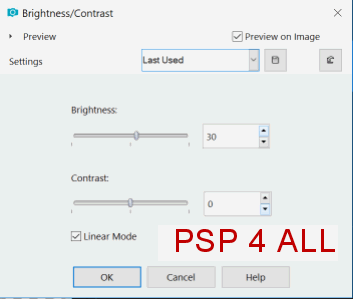
Adjust > Brightness and Contrast.
Apply a Drop Shadow
Selections > Select None. STEP 11 Credits: with a font like Pixelette or any other small pixel font. Save your work. Martine 20 May 2019 If you have any questions, don't hesitate to contact me |