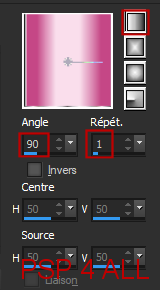
Plugins: VM Instant Art > Tripolis AFH > AFH Beveler Simple > Pizza Slice Mirror Toadies > Weaver Eye Candy 5 > Impact Eye Candy 4000 > Gradient Glow Mask: 1250181316_nikita_masques.jpg offered by Nikita on her site Ręveries. Included in the material. Camera Flash: animation by Simone at Scrappy bit of fun. Download here. Material: My selections and Nikita's mask. Download here. Font: Arial for the text & Pixelette for the credits. Depending on the colors & tube you are going to use, feel free to change the mode and opacity of the layers. STEP 1: Image without flash animation 1. Open an image 900x600. 2. Fill with blanc. Add a layer and fill with a linear gradient. Choose 2 colours from your tube #C54786 et #FADEEC.
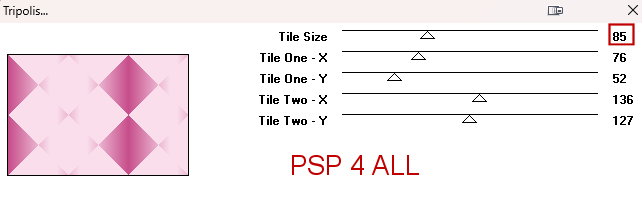
3. Apply VM Instant Art > Tripolis
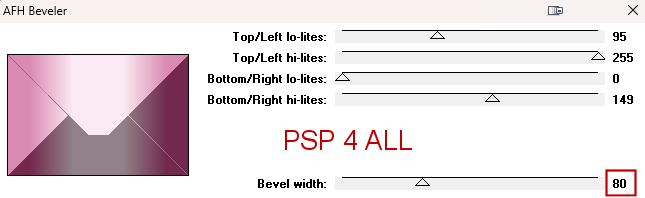
4. Repeat but leave Tile size on 128. 5. Apply AFH > AFH Beveler
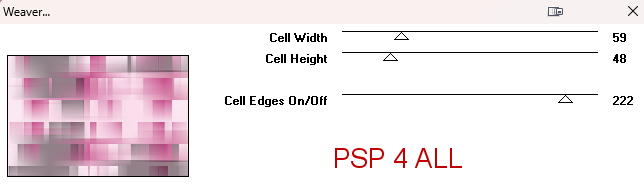
6. Then Simple > Pizza Slice Mirror. 7. Effects > Edge Effects > Enhance More. 8. Duplicate. 9. Apply Toadies > Weaver
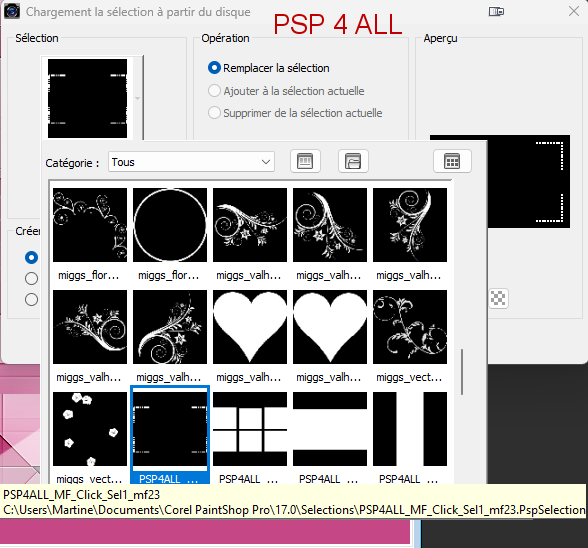
10. Blend mode on Multiply. 11. Open mask 1250181316_nikita_masques.jpg. 12. Add a layer and fill with white. 13. Layers > New mask layer > From an image and choose 1250181316_nikita_masques.jpg. 14. Click on OK. 15. Layers > Merge group. 16. Opacity of this layer on 45. 17. Borders - Add a layer and fill with white. 18. Selections > Modify > Contract 2 pixels. Delete. 19. Fill with the gradient darker color #C54786. 20. Selections > Modify > Contract 20 pixels. Delete. 21. Selections > Modify > Contract 2 pixels. Delete. 22. Fill with the gradient darker color #C54786. 23. Selections > Modify > Contract 5 pixels. Delete. 24. Selections > Select None. 25. Add a layer. Click on Selections > Load/ Save Selection/Load Selection From Disk. 26. Choose selection PSP4ALL_MF_Click_Sel1_mf22.PspSelection.
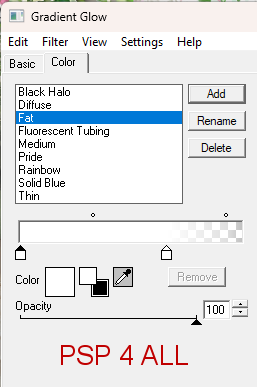
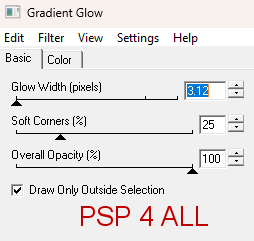
27. Fill with the gradient darker color #C54786 or colour of your choice. 28. Selections > Select None. 29. Add a layer. Click on Selections > Load/ Save Selection/Load Selection From Disk. 30. Choose selection PSP4ALL_MF_Click_Sel2_mf22.PspSelection. 31. Fill with the gradient darker color #C54786 or colour of your choice. 32. Selections > Select None. 33. Ajouter un calque. Cliquer sur Sélections > Charger/Enregistrer une sélection/Charger la sélection ŕ partir du disque. 34. Choisir la sélection PSP4ALL_MF_Click_Sel3_mf22.PspSelection. 35. Fill with white #FFFFFF or colour of your choice. 36. Selections > Select None. 37. Rename this layer Frames. 38. Add a layer. Click on Selections > Load/ Save Selection/Load Selection From Disk. 39. Choose selection PSP4ALL_MF_Click_Sel4_mf22.PspSelection. 40. Fill with white #FFFFFF or colour of your choice. 41. Selections > Select None. 42. Rename this layer Arrows. 43. Apply the same Drop Shadow on these 2 layers Frames and Arrows - 1, 1, 100, 1. Colour #000000. 44. With the magic wand, Click inside the top frame. 45. Selections > Modify > Expand 5 pixels. 46. Add a layer. 47. Fill with the gradient darker color #C54786 or colour of your choice. 48. Layers > Arrange > Move Down. 49. Resize the tube. 50. Select the head. 51. Add as new layer under the frame. 52. Selections > Invert > Delete. 53. Repeat for the other frame. 54. Layer colored with the gradient darker color #C54786 #C54786. 55. Tube but this time do Image > Mirror. 56. Add the tube on the left. 57. Drop Shadow Eye Candy 5 > Impact > Perspective Shadow. 58. Select the Blurry preset. 59. Add my text Click or one of your choice with the gradient darker color #C54786, police Arial. 60. Apply Eye Candy 4000 > Gradient Glow - Fat, Glow Width on 3.
61. Duplicate twice and arrange around your tube. 62. Credits: with a font like Pixelette or any other small font. 63. Save. 64. Open your merged image in Animation Shop. STEP 2: Animation in Animation Shop 1. Open the Camera Flash animation - Simone-Animations-MiscVol1-CameraFlash.mng. There are 6 images or frames in this animation. 2. Open your own image and duplicate to have 6 images in all. 3. Click on the first image to select it. 4. Edition > Select all. 5. Click on the first frame of Simone-Animations-MiscVol1-CameraFlash. Edit > Select All. Edit> Copy. 6. Back to your own image and Edit > Paste > Paste Into Selected Frame. 7. Put the flash exactly where you want it to be. 8. When you are happy with its position, click to apply with the left button of your mouse. 9. Check the result by clicking on Vew Animation 10. Change the Display Time. Animation > Animation Properties and set the time on 6. 11. Click on the last frame of this animation and change the Display Time to 60. 12. Check the result by clicking on Vew Animation. 13. Save As an optimized gif. Martine 17 May 2023 If you have any questions, don't hesitate to contact me |