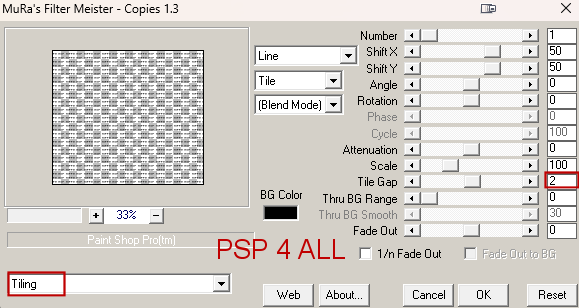
Plugins: Mura's Meister > Copies Font: Pixelette for credits. My colours: #5E238A and #FBBF4E. ****************************** Reminder: *** Method to color a layer or add a paper - To fill a layer with colour, Selections > Select All. Selections > Float > Selections > Defloat. Or click with the magic wand. Add a layer > Fill with the new colouror paper, texture. Apply plugin if needed. Selections > Select None. Delete the original layer. *** Depending on the colors & tube you are going to use, feel free to change the mode and opacity of the layers. STEP 1 - Layers under the eggs Open the template. Shift+D to duplicate. Delete the Credits layer. ***Activate rectangle background. Selections > Select All. Selections > Float > Sélections > Defloat. Fill with #5E238A. Selections > Select None. Duplicate twice to have 3 copies and rename rectangle background 1, rectangle background 2 andt rectangle background 3. Delete the original layer. Apply dsb flux > Bright Noise - Intensity = 75 on rectangle background 1. Then apply Bright Noise on rectangle background 2 and rectangle background 3 and click on Mix eact time. *** rectangle border - Fill with #FBBF4E. *** rectangle inside - Selections > Select All. Selections > Float > Sélections > Defloat. Add a layer and fill with #5E238A. Copy paste texture_stock_140 as a new layer. Invert. Delete. Blend Mode on Dissolve. Selections > Select None. Delete the original layer. *** Select strip 1 inside, strip 2 inside and strip 3 inside - Add a layer and fill with #FBBF4E. Copy paste Texture Pack #1 as a new layer - SeulgiGallery : 2.png. Invert. Delete. Blend Mode on Luminance. Sélections > Ne rien sélectionner. Delete layers strip 1 inside, strip 2 inside and strip 3 inside. STEP 2 - The Eggs J'ai fait la męme chose pour les 2 oeufs. Small egg on the left *** egg small border. Selections > Select All. Selections > Float > Sélections > Defloat. Fill with #5E238A. Selections > Select None. Delete the original layer. *** egg small - Selections > Select All. Selections > Float > Sélections > Defloat. Add a layer and fill a linear gradient made with the 2 colours #5E238A et #FBBF4E. Angle on 45° and Repetitions on 8. Keep selected. Copy paste miggs_tagtexturesset1 (5) in the selection. Selections > Select None. Blend mode on Luminance. Big egg on the right *** big egg border. Repeat what you have done for the small egg border. *** big egg - Repeat what you have done for the small egg but Mirror the texture before pasting into the egg. *** Le texte - Hippy Hop Open a new image 350 x 350. Write the text Hippy Hop or the text of your choice with Pixelette, colour #000000, vectorial with anticrénelage on Soft. Convert to raster layer. Click on Objets > Align > Center in Canvas. Apply Mura's Meister > Copies
Copy Paste this text as a new layer on your big egg. Sélections > Invert > Delete. Opacity on 80. Selections > Select None. STEP 3 - Décos, WA and Credits *** glass ball 1 & glass ball 2 - colorize with Hue on 194 and Saturation on 152. *** little circle bottom - With the magic wand, select one circle on 2. Add a layer and fill with #5E238A. Selections > Select None. Back on the original layer. Select the other circles and fill with #fbbf4e. *** circles vertical - Repeat using the same 2 colours #5E238A and #fbbf4e. *** circles 1 top & circles 2 top - one line filled with #5E238A and the other with #fbbf4e. *** bar under text - colour #5E238A. Drop Shadow: 1, 1, 100, 1. Duplicate twice to have 3 copies in all and rename bar under text 1, bar under text 2 and bar under text 3. Apply dsb flux > Bright Noise - Intensity = 75 on bar under text 1. Then apply Bright Noise on bar under text 2 and bar under text 3 and click on Mix each time. *** hopping by to say - Colour with #5E238A. *** Happy Easter with purple #5E238A and yellow #FBBF4E. Drop Shadow: 1, 1, 100, 1. *** Tube - in the middle. Drop Shadow: 3, 3, 75, 8. *** Credits: with a small font like Pixelette or any other small font.
Garder le calque rectangle background 1 ouvert et fermer les
cadres rectangle background
2 et rectangle background 3. Martine 5 April 2023 If you have any questions, don't hesitate to contact me |