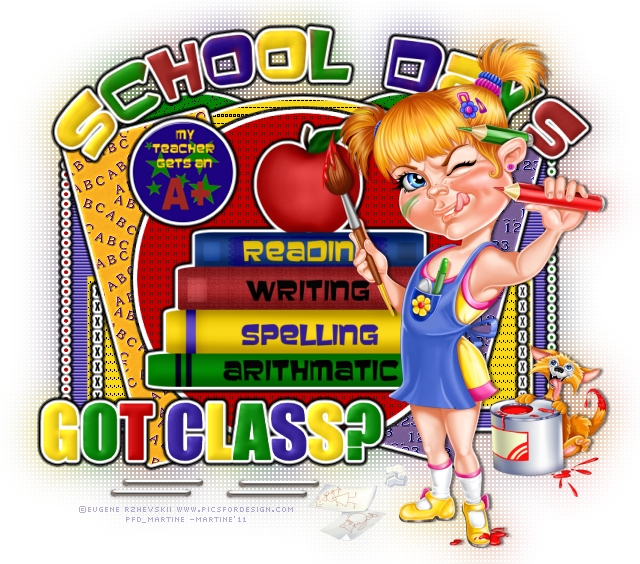
Template: Got Class by Cakes at Crazy Cakes Scraps. Scrapkit: WP_Back To Basics_Tagger by Wicked Princess at Wicked Princess Scraps Plugins:
You can download my E-Book which will let you work without being connected. STEP 1 Open the template. Duplicate. Close the original. Delete the copyright layer, the x layer and the xbackground layer, the background layer(under classwordart). Resize all layers to 75%. Click on Image > Resize > Enter 75% for the width and the height. Change the Canvas Size. Image > Canvas Size and enter 640 for the width and 564 for the height. Add a new layer. Layers > New Raster Layer. Then click again on Layers > Arrange > Send to Bottom. Name this layer "Background" and fill it with white. STEP 2 We will do the same for each layer of the template. Click to activate the layer > Selections > Select All > Selections > Float > Selections > Defloat then Layers > Add a Raster Layer. Fill this layer with colour or a paper from the scrapkit. Apply the effect with the plugin. Then apply Eye Candy Gradient Glow.
Selection > Select None. Delete the original layer. STEP 3: Layers - from bottom to top Circle: Follow the method outlined in Step 2. Fill with green #058105 or a colour of your choice. Apply Cybia > ScreenWorks > Lace Screen. Apply the Eye Candy Gradient Glow. Delete the original layer. The other Circle: Repeat what you did for the first circle. backoval: - Same steps outlines in 2. Fill with yellow F9D817 or a colour of your choice. Apply Cybia > ScreenWorks > Multi Line. Apply the Eye Candy Gradient Glow. Delete the original layer. big rectangle: colour #341E96 or one of your choice. Effects: Blinds. Effects > Texture Effects > Blinds
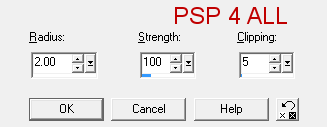
Apply Gradient Glow. Selections > Select none. Delete original layer. square: colour yellow #F9D817. Cybia Plugin > ScreeWorks > Bar Thread. Gradient Glow. dotline1: colour red #C00000. Apply the Gradient Glow effect only. dotline 2: colour green #058105. Apply Gradient Glow only. rect: fill with WP_BTB_PP1 at 15%. Then Adjust > Sharpness > Unsharp mask.
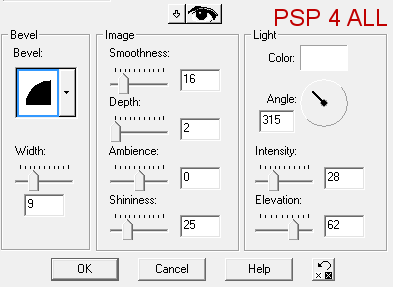
Apply Gradient Glow. rect2: Repeat what you did for the first rect. But change the paper. This time use WP_BTB_PP2. noisy circle: leave as it is. back circle: colour white #ffffff. No effects. circle: fill with red #C00000. Cybia > ScreenWorks > Point Array. classwordart: each letter to be coloured differently. Select each letter in turn, and then fill with your chosen colour on the added layer. When you have finished, all the coloured letters will be on the same layer. Delete the original layer. Apply an Inner Bevel. Effects > 3D Effects > Inner Bevel
Then the same Gradient Glow. xline et xline2: leave as they are and apply a Gradient Glow. Then move these 2 layers above dotline2. STEP 4: Elements and tube WP_BTB_STACKEDBOOKS: resize to 75%. Place above the circle layer. Apply a Gradient Glow. WP_BTB_STAPLE: at 75%. Duplicate and position below the classwordart. WP_BTB_WORDART: at 75%. Paste above rect2. Apply the same Inner bevel as before and then the Gradient Glow. WP_BTB_TEACHERBUTTON: at 30%. Sharpen with Unsharp Mask as before. Apply the Gradient Glow. Tube: Add a drop shadow.
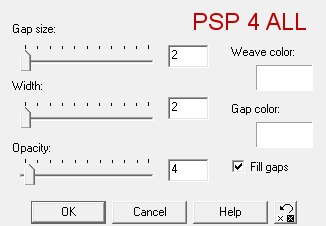
STEP 5: Mask We are not using one but doing something else instead. Close the white background layer at the bottom. Merge visible all the layers. Duplicate this merged layer and activate the bottom one, the original merged layer. Make sure you have enough space around. If not increase it. Image > Canvas Size. You can remove the excess later. Apply a Gaussian Blur. Adjust > Blur > Gaussian Blur of 18. Then apply the Weave effect. Effects > Texture Effects > Weave.
Merge visible the 2 layers. Copy paste as a new image to remove the excess space around your result. Add a white background layer. Merge visible. STEP 6: Credits With a small font like Pixelette, in size 6, anti-alias off. Save. Martine 8 September 2011 If you have any questions, don't hesitate to contact me |