You can do pretty much what you like with your result: create signatures with name added, extras or stats, websets. Give all the credits that are required.
 Tubes of your choice, free or not, but credit for them must be added to your
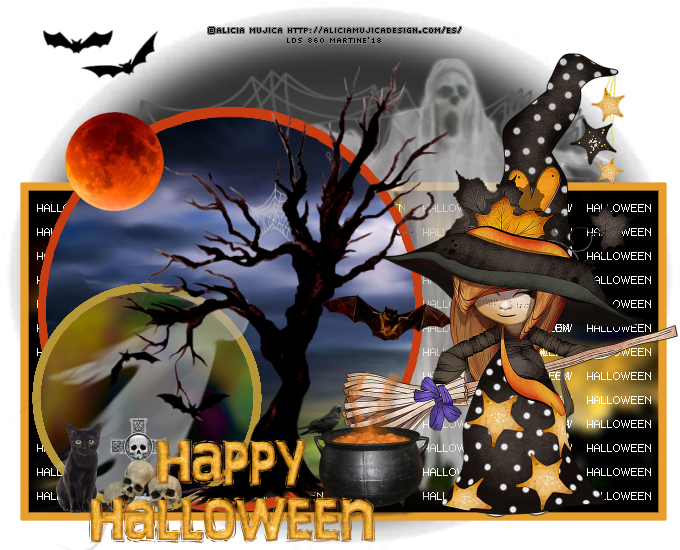
tag. I used a tube ©Alicia Mujica -
http://aliciamujicadesign.com/es. Don't forget your license! It must be legible on
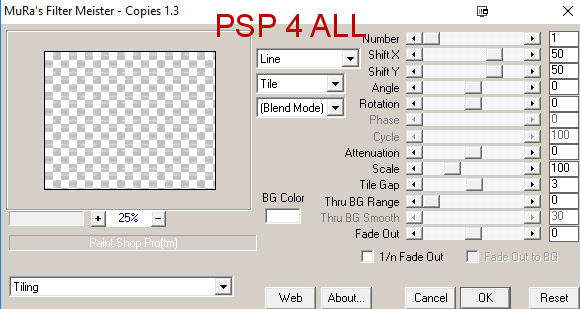
your tag. STEP 1 Open an image 680x550. Fill with #202020. Rename Background. Load the selections. • Selections > Load/ Save Selection > Load Selection from Disk. Select PSP4ALL_MF_Halloween18-1. Fill the selection with #E69F2F. Selections > Promote Selection to Layer. Selections > Select None. • Selections > Load > Save Selection > Load Selection from Disk. Select PSP4ALL_MF_Halloween18-2. Fill the selection with #C73D11. Selections > Promote Selection to Layer. Selections > Select None. • Selections > Load > Save Selection > Load Selection from Disk. Select PSP4ALL_MF_Halloween18-3. Fill the selection with #B59636. Selections > Promote Selection to Layer. Selections > Select None. STEP 2 • Click inside the rectangle with the Magic Wand. Selections > Modify > Expand by 5 pixels. Copy paste Miz_TasteOfHalloween_P12 as a new layer. You may have to stretch the paper a bit so you can fill the whole rectangle. Selections > Invert > Delete. Selections > Select None. • Click inside the big circle with the Magic Wand. Selections > Modify > Expand by 5 pixels. Resize Miz_TasteOfHalloween_P13 to 50% and then copy paste the paper as a new layer. Selections > Invert > Delete. Selections > Select None. • Click inside the small circle with the Magic Wand. Selections > Modify > Expand by 5 pixels. Resize Miz_TasteOfHalloween_P8 to 50% and then copy paste the paper as a new layer. Selections > Invert > Delete. Selections > Select None. STEP 3 Click on the Background layer. Add a layer and fill with #000000. Open Mask Ibm15. Layers > New Mask Layer > From Image and select Mask Ibm15. Layers > Merge Group. Add a new layer and fill with #626262. Open Mask SpiderWeave. Layers > New Mask Layer > From Image and select Mask SpiderWeave. Layers > Merge Group. Move this layer towards the bottom a bit and delete the excess showing below the rectangle at the bottom. STEP 4 CMiz_TasteOfHalloween_El 69 - 70%. On top of the Rectangle layer. Duplicate. CMiz_TasteOfHalloween_El 40 - 49%. On the left, on big circle. CMiz_TasteOfHalloween_El 15 - 15%. Bottom left. CMiz_TasteOfHalloween_El 65 - 18%. Bottom left. CMiz_TasteOfHalloween_El 60 - 12%. Bottom left. CMiz_TasteOfHalloween_El 54 - 65%. On big circle. Add the tube on the right. CMiz_TasteOfHalloween_El 48 - 20%. Colorize the green stuff. I chose orange. CMiz_TasteOfHalloween_El 25 - 8%. On cauldron. CMiz_TasteOfHalloween_El 25 - 23%. On big circle. CMiz_TasteOfHalloween_El 61 - Select some bats and paste them here and there. See my tag. CMiz_TasteOfHalloween_El 68 - Place under the big circle on the right. Duplicate STEP 5 Text in rectangle. Open a new image 680x550. Choose the font FFF Harmony in white, Floating. Type the text Halloween. Selections > Promote Selection to Layer. Click on Objects > Align > Center in Canvas. Apply Mura Meister > Copies.
Click in side the rectangle. Selections > Modify > Expand by 5 pixels. Copy Paste the Halloween text as a new layer. Selections > Invert > Delete. Selections > Select None. STEP 6 Happy Halloween WA - 11%. Bottom left. STEP 7 Credits: with a font like Pixelette or any other small pixel font. STEP 8 Save your work. Martine 1 November 2018 If you have any questions, don't hesitate to contact me |