|
|
(Version française ICI) |
|
|
|
. |
|
|
|
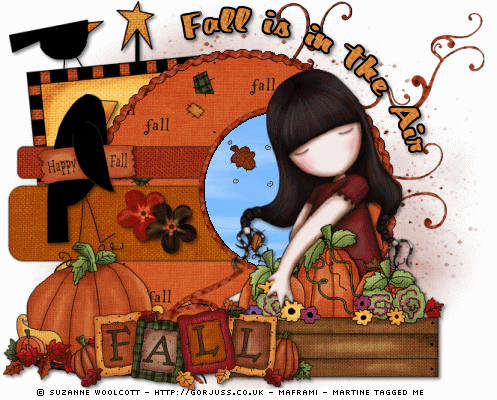
You can do pretty much what you like with your result: create signatures with name added, extras or stats, websets.
|
Martine |

Template : One of Rachel of Scraps of Enchantment - Template 21 to download on her blog.
Scrapkit: Happy Fall created by Laura of Cinnamon Dreamz. Link: Happy Fall
Mask: One of Becky's of Secrets of Imagination - Mask 009.
Animation Feuilles : MF_HF_Feuilles-Leaves_mf08
Fonts: Pixelette and Buddy or a font of your choice.
You can download my E-Book which will let you work without being connected.
Open Template 21 in PSP. We don't work on the original. So click on Shift and letter D on your keyboard to make a copy. Close the original.
Close the Info layer right at the top on the Layer Palette.
Activate the Background layer, copy paste one of the papers from the Happy Fall kit as a new layer and then apply the mask. I used CS_happyfall_paper1.
Masks >New > From Image - OK. Then Mask > Delete. In PSP 8 and more recent versions of PSP, go to Layers > New Mask Layer > From Image. OK. Then Delete.
Activate the CIRCLESCALLOP layer. Then Selections > Select All > Selections > Float > Selections > Defloat. Fill with black.
Selections > Modify > Contract by 1 pixel> Use the Flood Fill Tool to fill the selection with one of the papers. I used: CS_happyfall_paper 14. On the Styles Palette, click on Pattern, find your paper and then use these settings:
Angle= 27 and Scale= 50.
Select > Modify > Contract by 8 and fill with black. Select > Modify > Contract by 1 and fill with another paper of your choice or CS_happyfall_paper7. On the Styles Palette, click on Pattern, find your paper and then use these settings:
Angle= 0 and Scale= 50.
Deselect and add a Dropped Shadow: Effects > 3D Effects > Drop Shadow:
H= 3 and V= 3
O= 50 and B= 5
Activate the RECTANGLE 1 layer: then Selections > Select All > Select > Float > Selections > Defloat. Fill with black.
Selections > Modify > Contract by 1 pixel> Use the Flood Fill Tool to fill the selection with one of the papers. I used: Paper 2.
Deselect and add a Drop Shadow as above.
Activate the RECTANGLE 2 layer: then Selections > Select All > Select > Float > Selections > Defloat. Fill with black.
Selections > Modify > Contract by 1 pixel> Use the Flood Fill Tool to fill the selection with one of the papers. I used: Paper 4.
Add some elements: CS_happyfall_journaltag1 and position this layer just above the mask layer. See my own tag above.
I added a flower on RECTANGLE 1 and also CS_happyfall_wordart4 resized at 40% and placed it on RECTANGLE 2 .
Deselect and add a Drop Shadow as above to the elements.
Activate the CIRCLEBRUSH layer: then Selections > Select All > Select > Float > Selections > Defloat. Fill with black.
elections > Modify > Contract by 1 pixel> Use the Flood Fill Tool to fill the selection with one of the papers. I used: Paper 14. On the Styles Palette, click on Pattern, find your paper and then use these settings:
Angle= 27 and Scale= 50.
Select > Modify > Contract by 8 and fill with black. Select > Modify > Contract by 1.
Apply Alien Skin Xenofex 2.
Effects > Plugins > Xenofex 2 > Little Fluffy Clouds - Settings: Wispy Morning.
Then play with the Random Seed until you have the clouds that you like.
Deselect and add a Drop Shadow as above.
Let's add the other elements and the main tube.
Apply a Drop Shadow to
each.
CS_happyfall_pumpkins1 and CS_happyfall_pumpkins2. Look at my tag to see
where I have placed them. Add a Dropped Shadow to each.
I cut off the
hand and a bit of the arm to make a copy and position on top of the pumpkins
layer. I used the Freehand selection tool configured like this:
Selection type - Point to point
Feather - 0
Anti-alias - 1
When
using the Freehand tool, it is important to really zoom in and to go really
slowly, you click with the left button of your mouse as often as possible to
really follow the curves. Make sure you are on your Tube layer. Select around
the arm and the hand and when you are done, right-click and Edit > Copy > Edit >
Paste as New Layer and position this new layer above the pumpkins. If you are
not happy with the result, then you undo and start again.z.
And now add
the WordArt: CS_happyfall_wordart1. Add a Drop Shadow, same as before.
Time to resize your image. First save it full-size. Then resize. I resized all
layers at 75% of the original. Do resize before you add your text and credits!
Add your text.
For the credit, use Pixelette size 6 anti-alias off and
floating.
For the text Fall in the Air:
With the Preset Shapes, draw
an ellipse - vector checked - about 20 pixels away from the CIRCLESCALLOP. Click on the text
tool.
Click with your mouse on your curve and you will see this letter
A with a curve under:

Click there and the Text window will open.
Choose your font and size and
write your text with anti-alias and Floating selected. OK!
Now position your mouse in the center of the circle, on the little rectangle on
the right and when you see two little arrows going in opposite directions,
left-click and move the circle clockwise - this will also move your text to the
right.
On your Layer Palette, Click on the + sign and delete the ellipse
layer at the bottom, the click on the vector layer and convert to a raster
layer.
Selections >
Select All > Selections > Float > Selections > Deloat. Selections >
Modify > Expand by one pixel. Add a layer > Fill with black and move this
black layer under the text layer. Add A Drop Shadow.
Save!
Animation:
Your Layer Palette should look like this:
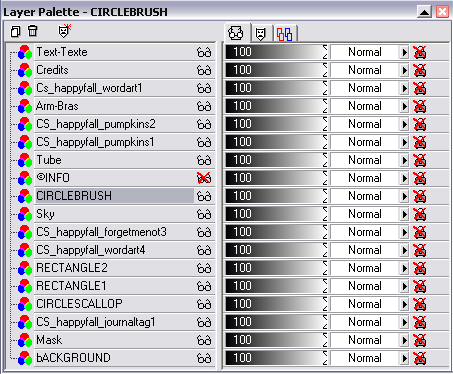 |
Activate the CIRCLEBRUSH layer and close all the layers above it.
Merge visible all the layers below it and copy paste this merged layer into Animation Shop.
Open the MF_HF_Feuilles-Leaves_mf08 animation that I give you. There are 7 images.
Click on your merged image with the mask, template and elements and then Duplicate
|
|
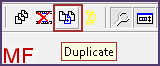
to make 7 copies in all. You need 7 images since my leaves animation has 7. If you click on Duplicate, you will end up with 9. You just delete 2.
Now click on the first image of the MF_HF_Feuilles-Leaves_mf08 animation: click on Edit > Select All. All the images are blue all around which means they are all selected. Then Edit > Copy. Now back onto your own animation with the mask, template and elements and click on the first image then Edit > Select All and Edit > Paste Into Selected and use your mouse to postion the leaves where they should be. Left-click when it looks good!
To see your result, click on View Animation
Go back to PSP. Merge visible all the layers above the CIRCLEBRUSH layer and copy paste into dans Animation Shop.
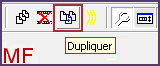
Click on Duplicate
|
|
to make your copies. You need 7 images in all since your first animation with the leaves has 7 images.
Now click on the first image of this new animation
with the tube and the text > Select All.
All the images are blue. Now click on Edit > Copy. Now click on the first image
of the animation you just created with the leaves, mask, template and elements
and Edit > Select All - Edit > Paste Into Selected and with your mouse,
position the Tube-Text animation with the pumpkins where it looks best. When you
are happy, left-click.
Click on Animation > Frame Properties and enter 40 for the Display time or what
suits you. The smaller the number, the faster the animation.
File >
Save As - Name your animation and then optimize.
Martine
22 Septembre 2008
If you have any questions, don't hesitate to contact me![]()
![]()