You can do pretty much what you like with your result: create signatures with name added, extras or stats, websets.

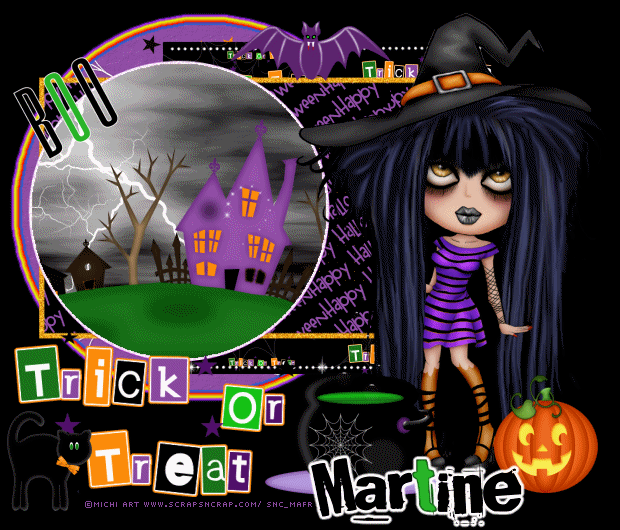
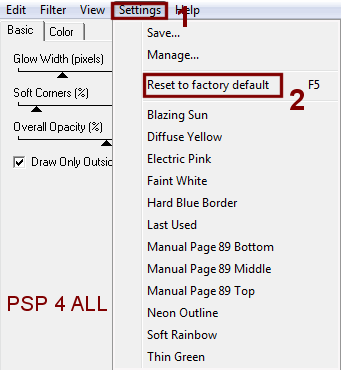
Scrapkit: Trick or Treat by Kittz of http://kittzkreationz.blogspot.com/ - Available for download on the Creative Misfits blog under Halloween Scrap Kits 2009 here. Template: by Deb available for download on the Creative Misfits blog under Halloween Templates 2010 here. Filters: Eye Candy 4000 (Gradient Glow) - Alien Skin Xenofex2. Font: Pixelette & Broken15 for name & your credits. You can download my E-Book which will let you work without being connected. STEP 1: Template Open in PSP, duplicate and close the original. Resize the template to 80%. Increase your work space. Click on Image > Canvas Size. STEP 2: Template layers Delete the following layers - the 4 top layers: Raster 8 with the credits, the 2 Merged at the top (I am the Treat) and Raster 7 with the text I am the Treat in small. Raster 1: Fill with black. Raster 6: Fill with Paper1, scale at 50%. Apply Eye Candy 4000 > Gradient Glow. Click on the tab marked Settings, then click on Reset to factory default or if you prefer hit F5 on your keyboard.
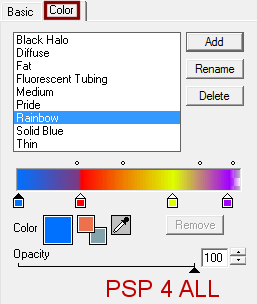
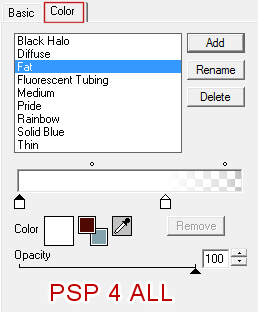
Click on the Color tab and select Rainbow
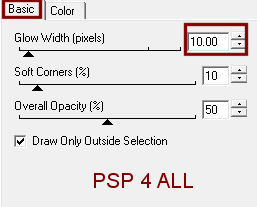
Click on the Basic tab and enter 10 in Glow Width (pixels)
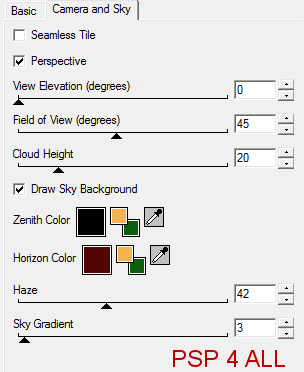
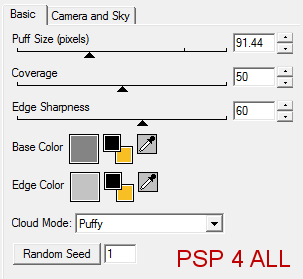
Raster 4: Selections > Select All > Selections > Float > Selections > Defloat. Resize Paper9 to 50%. Then copy paste as a new layer. Selections > Invert > Hit Delete on your keyboard. Selections > Select None. Raster 5 & Copy of Vector 1: The white dots - I left them white. Raster 2: Fill with Paper5 at 50%. Copy of Vector 1: Left as it is. Raster 3: Colorized with Hue at 210 and Saturation at 223. Just choose a colour to suit. Copy of Vector 1: Selections > Select All > Selections > Float > Selections > Defloat. Apply Xenofex2 > Little Fluffy Clouds. First Click on Settings > Reset to factory default and then again under Settings, choose Dark storm. Under Camera and Sky, you should have these settings
and under Basic
Keep Selected. STEP 3: Elements Haunted House - Resize 55%. Paste as new layer. Selections Invert > Hit Delete on your keyboard. Selections > Select None Add your tube. Scary Pumpkin at 45%. Witch Cauldron at 40%. Boo word art at 45% Batty Bat at 40% Witches Cat at 25% STEP 4: Text and Credits Trick Or Treat Word art at 70%. I separated the three words and put them on different layers to position them where I wanted. Your name with Broken 15 in black. Add a Gradient Glow.
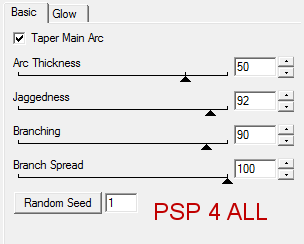
Add required credits with Pixelette in size 6. STEP 5: Animation 1. In PSP Click on Copy of Vector 1. Duplicate until you have 4 copies in all. Rename Lightning 1, Lightning 2, Lightning 3, lightning 4. Close all the Lightning layers except for the Lightning 1 layer. Click on Lightning 1. Selections > Select All > Selections > Float > Selections > Defloat Click on Alien Skin Xenofex2 > Select Lightning. Under Settings, reset to Factory default then still under Settings, choose Old Horror Movie. Click on Basic and enter 50 under Arc Thickness and 100 under Branch Spread.
Now look at the preview on the right, your will see two circles with a cross in the middle. Move each cross so it is exactly on the edge of your circle.
Click on OK. Do not deselect. Close Lightning 1 and move onto the Lightning 2 layer. Open this layer 2. Repeat the Lightning effect but change the Random Seed until you get an effect you like. Click on OK. Keep selected. Close Lightning 2 and move onto the Lightning 3 layer. Open this layer 3. Repeat the Lightning effect and again click on the Random Seed until you get a lightning effect you like. OK. Close Lightning 3 and activate and open the Lightning 4 layer. Repeat the Lightning effect with a different Random Seed. OK. Selections > Select None. 2. In Animation Shop Still in PSP, close all lightning layers except Lightning 1. Merge visible all layers. Edit > Copy Merged. In Animation Shop, Edit > Paste As New Animation. Back to PSP hit the Undo Arrow at the top and this time Close Lightning 1 and open Lightning 2. Merge visible. Edit > Copy Merged. Back in AS: Edit > Paste After Current Frame. Back to PSP hit the Undo Arrow at the top and this time Close Lightning 2 and open Lightning 3. Merge visible. Edit > Copy Merged. Back in AS: Edit > Paste After Current Frame. Back to PSP hit the Undo Arrow at the top and this time Close Lightning 3 and open Lightning 4. Merge visible. Edit > Copy Merged. Back in AS: Edit > Paste After Current Frame. You now have 4 frames in Animation Shop. Click on Animation > Frame Properties. Change the 10 to 35. Now visualize your animation, click on View Animation. You like what you see? Then save your work as a gif, using the optimizer. Martine 12 October 2011 If you have any questions, don't hesitate to contact me |