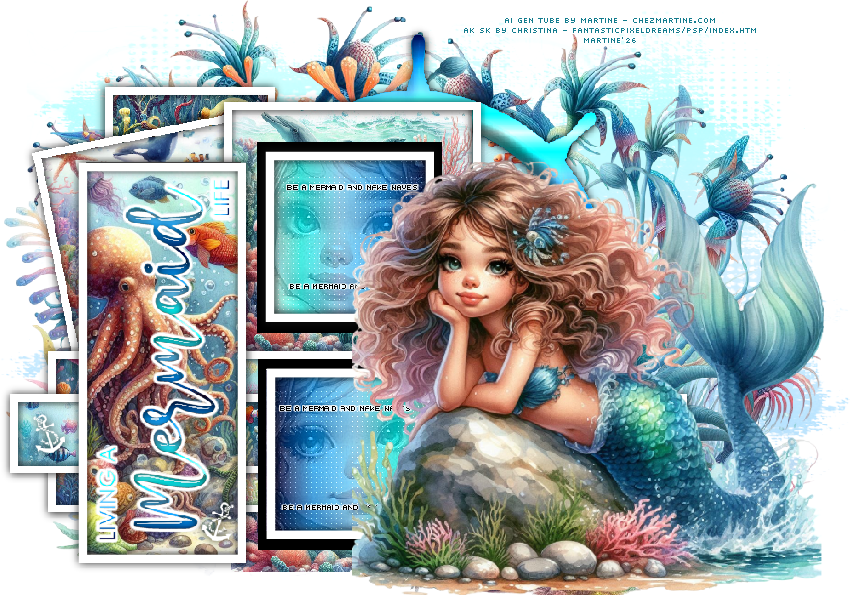
 Template: Salsa-Mermaid on Queen of Darkness's site. Download here. AI Scrapkit Under The Sea on Christina's site: PSP Design. Download here. Mask: Miz_Mask_125 by Mizteeques. Download here. Plugins Eye Candy 5 > Impact > Glass Eye Candy 4000 > Gradient Glow. Carolaine and Sensibility > CS-LDots Eye Candy 3.1 > Gradient Glow. Supplies: my selections, gradient, preset Eye Candy Glass in this zipped folder.
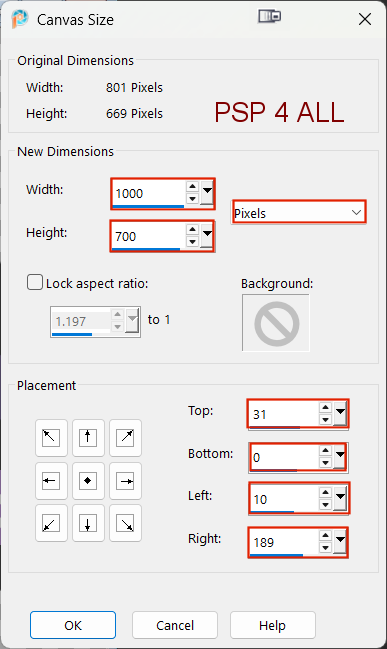
Put my selections in the Selections folder of your PSP. Import the gradient in your PSP Gradient folder. To import the preset in Alien SKin Eye Candy 5: Double click on the preset and it will install itsef in Settings in Alien Skin Eye Candy 5. Font: Pixelette for the credits. ****************************** Reminder: *** Method to color a layer or add a paper - To fill a layer with colour, Selections > Select All. Selections > Float > Selections > Defloat. Or click with the magic wand. Add a layer > Fill with the new colour or paper, texture. Apply plugin if needed. Selections > Select None. Or click on Selections and paste the paper or texture as a new layer. Selections > Invert. Delete. Select None. Delete the original layer. *** Depending on the colors & tube you are going to use, feel free to change the mode and opacity of the layers. *** Template: I work from the bottom to the top. STEP 1 - Background 1. Open the template. Shift+D to duplicate. 2. Delete Raster2 - credits & R Purple Rec. 3. Image > Canvas
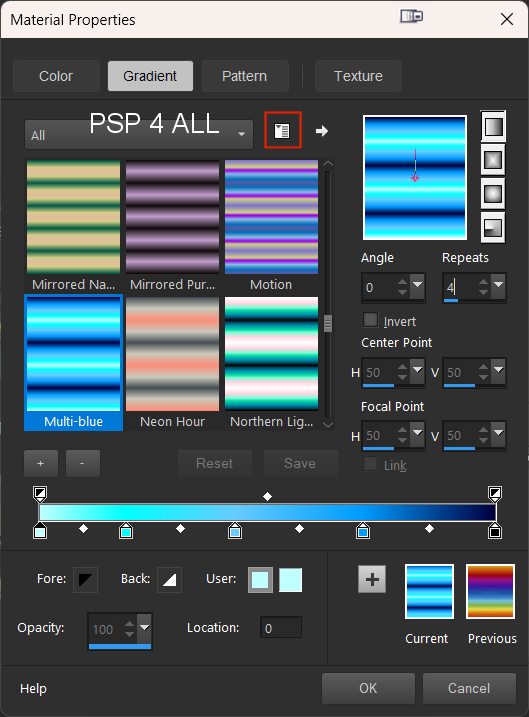
4. Add a layer and fill with white. 5. Ouvrir le masque Miz_Mask_125 de Mizteeques. 6. Layers > New mask layer > From an image and choose Miz_Mask_125. 7. Click on OK. 8. Layers > Merge group. 9. Image > Resize 120%. 10. Add these elements from right to left: natur_underthesea (34) - 65% natur_underthesea (30) - 65% Duplicate and move left, and a bit up too. natur_underthesea (31) - Image > Mirror - 65% STEP 2 - Template 11. Gradient Circle - Select. 12. Add a layer and copy paste paper cluster underthesea (5) resized to 40% into the selection. 13. Select None. 14. Ship Wheel Frame - Select. 15. Add a layer and fill with the gradient - Angle on 0 et Repeat on 4
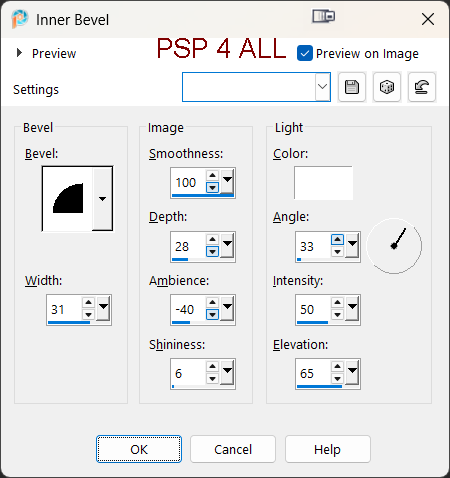
16. Apply Effects 3D > Inner Bevel
17. Select None. 18. Duplicate and colour the original in black. 19. On the original, click Adjust > Gaussian Blur - radius on 5. 20. Black rectangle - Select. 21. Copy paste paper bg_underthesea (9) at 40% as a new layer. 22. Invert > Delete. 23. Select None. 24. Selections > Loadr/ Save selection > Load selection from the disk. Choose PSP4ALL_MF_Mermaid_Sel1_mf26. 25. Click on Load. 26. Add a layer and fill with #FFFFFF (White). 27. Select None. 28. Duplicate and colour the original in black. 29. On the original, click Adjust > Gaussian Blur - radius on 5. 30. L Purple Rect. Repeat 14 to 23. Change the paper : bg_underthesea (5) still at 40% and rotate left 10%. choose PSP4ALL_MF_Mermaid_Sel2_mf26. 31. Blue Rectangle - Répéter 14 to 23 but use paper bg_underthesea (4), still at 40%. Choose PSP4ALL_MF_Mermaid_Sel3_mf26. 32. Black Rectangle - Répéter 14 to 23 but use paper bg_underthesea (2), still at 40%. Choose PSP4ALL_MF_Mermaid_Sel4_mf26. 33. Purple Rectangle - Répéter 14 to 23 but use paper bg_underthesea (2), still at 40%. Choose PSP4ALL_MF_Mermaid_Sel5_mf26. 34. Black Fill - Sect All. 35. Copy paste paper bg_underthesea (1) ŕ 50% as a new layer. 36. Invert > Delete. 37. Select None. 38. Text : Living a mermaid life - Click onLife. 39. Layers > Merge > Merge Down. 40. Layers > Merge > Merge Down. 41. Select All and add a layer. 42. Fill with the gradient - angle on 0 and Repeat on 4. 43. Appliquer Eye Candy 5 > Impact > Glass. 44. Select None. 45. Apply Eye Candy 4000 > Gradient Glow - Fat, white and Glow Width = 3.96. 46. Large Border - Duplicate and colour the original in black. 47. On the original , click Adjust > Gaussian Blur - radius on 5. 48. Bottom Gradient. Select All and add a lcayer. 49. Fill with the gradien - Angle on 90 and Repeat on 0 and check Invert. 50. Add a close-up of your tube. 51. Put this layer on Soft Light or the Blend Mode that suits. 52. Layers > Merge Down. 53. Apply Carolaine and Sensibility > CS-LDots twice.
54. Bottom Border - Duplicate and colour the original in black. 55. On the original , click Adjust > Gaussian Blur - radius on 5. 56. Duplicate the merged layer with the close-up of the tube wuth the CS-LDots effect. 57. Move it up and place it on top on Top Gradient. 58. Top Border - Duplicate and colour the original in black. 59. On the original , click Adjust > Gaussian Blur - radius on 5. 60. Be a mermaid - colour in black and apply Eye Candy 3.1 > Gradient Glow
61. Place on the top small frame towards the top. 62. Duplicate and place on the bottom small frame towards the bottom. 63. Add the tube on the left. 64. Resize to 850 px in width. STEP 3 - Credits 65. with Pixelette or any other small font. 66. Save. Martine 16 June 2026 If you have any questions, don't hesitate to contact me |